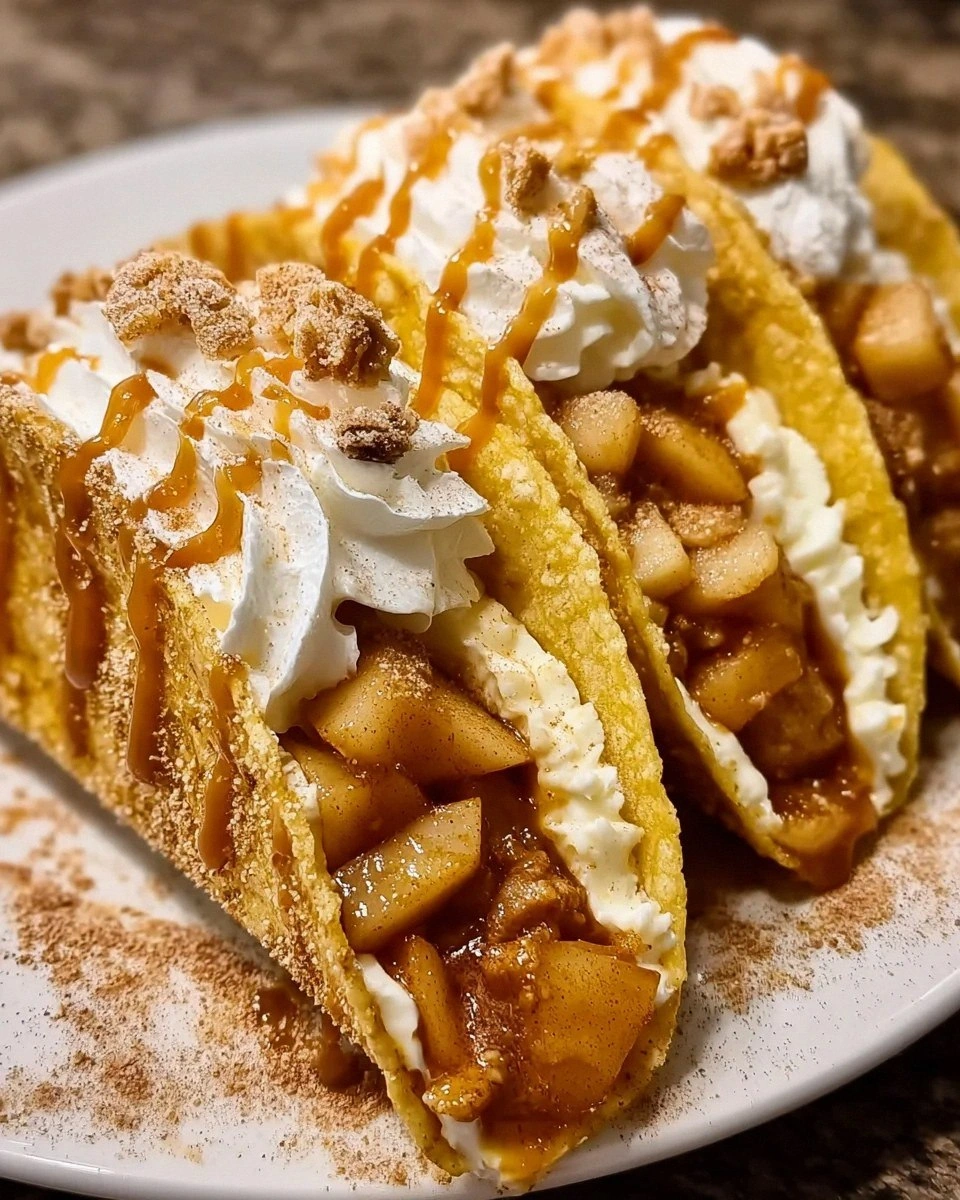
I was standing in my kitchen on a rainy Tuesday, staring at a half‑empty bag of flour tortillas and a lone block of cream cheese, when my roommate dared me to turn breakfast leftovers into a dessert that would make the whole apartment beg for seconds. I laughed, I scoffed, and then I did the impossible: I tossed those tortillas into the pan, swirled them in butter, and sandwiched them between a silky cheesecake filling and caramelized apples. The moment the first bite hit my tongue, I heard a tiny choir of angels singing “this is the best thing ever.” I dare you to taste this and not go back for seconds – it’s practically a culinary dare‑devil move.
Picture this: the kitchen fills with the sweet perfume of butter melting and cinnamon dancing in the air, the sizzle of tortillas hitting the hot skillet like a drumroll before the main act, and the glossy sheen of caramelized apples glistening like tiny jewels. The sound of the tortilla edges crisping is a crisp snap that reminds you of fireworks on the Fourth of July, while the creamy interior feels like a cloud of vanilla‑kissed cheesecake hugging your palate. Your fingertips feel the warm, buttery crust, and the contrast of the cool, tangy cream cheese against the warm, spiced apple filling creates a symphony of textures that’s both comforting and exhilarating.
What sets this version apart from every other “cheesecake taco” you’ve ever seen (or imagined) is a secret technique I stumbled upon while watching a late‑night cooking show: I brush the tortillas with melted butter and a whisper of cinnamon sugar before crisping them, which creates a caramelized edge that’s both crunchy and subtly sweet. Most recipes either skip the butter entirely or drown the tacos in a soggy mess – not this one. By adding a quick caramelization step, the tortillas become a golden, crackly vessel that never lets the luscious filling leak out, no matter how aggressively you bite.
And there’s a surprise ingredient that will make you gasp: a pinch of ground cinnamon folded directly into the cream cheese mixture. This tiny addition transforms the filling from “just good” to “mind‑blowing,” giving it a warm, autumnal depth that lingers long after the last bite. Okay, ready for the game‑changer? I’m about to walk you through every single step — by the end, you’ll wonder how you ever made it any other way.
What Makes This Version Stand Out
- Texture: The double‑crisped tortilla provides a buttery crunch that shatters like thin ice, while the interior stays creamy and smooth, creating a perfect contrast that most desserts lack.
- Flavor Layering: Each bite delivers caramelized apple, sweet cinnamon sugar, and a velvety cheesecake core, building complexity that feels like a dessert symphony.
- Simplicity: You only need a handful of pantry staples and a skillet – no oven, no fancy equipment, just pure, honest cooking.
- Visual Appeal: When you pull the tacos apart, the golden edges glisten against the ruby‑red apples, making them Instagram‑ready without any extra effort.
- Crowd Reaction: I’ve watched friends stare, then grin, then devour the whole batch in seconds; this is hands down the best version you’ll ever make at home.
- Ingredient Quality: Using fresh, crisp apples and full‑fat cream cheese ensures the flavor is rich, not watery, and the butter adds that luxurious mouthfeel.
- Make‑Ahead Potential: You can prep the filling and caramelized apples a day ahead, then crisp the tortillas right before serving for ultimate convenience.
- Versatility: Optional toppings let you customize each taco, turning a simple dessert into a personalized masterpiece.
Inside the Ingredient List
The Flavor Base
The star of our flavor orchestra is the cream cheese. It brings that unmistakable tang and luxurious body that turns a simple sweet into a decadent cheesecake experience. If you skimp on the cream cheese or use a low‑fat version, the filling will turn grainy and lose its signature silkiness. For the best result, choose a full‑fat block and let it soften at room temperature for at least 30 minutes before mixing. Swap suggestion: For a tangier twist, blend half cream cheese with mascarpone.
Powdered sugar is the quiet hero that sweetens the filling without adding any gritty texture. It dissolves instantly into the cream cheese, giving a smooth, melt‑in‑your‑mouth finish. If you prefer a less sweet profile, reduce the amount by a tablespoon and let the natural apple sweetness shine.
The Texture Crew
Flour tortillas serve as the vehicle for our sweet filling, providing a crispy contrast to the creamy interior. Their thin, flexible nature lets you fold them like a taco shell without breaking, while the butter‑brush step turns them into a golden, crunchy cradle. Choose small‑diameter (6‑inch) tortillas for bite‑size perfection; larger ones can become unwieldy.
Butter is melted to brush over tortillas, helping them get that golden crispiness we all love. It also adds a subtle richness that elevates the overall flavor. If you’re dairy‑free, coconut oil works as a solid alternative, though it will impart a faint coconut note.
Cinnamon sugar is a delightful sprinkle that gives each taco an aromatic sweetness. The sugar caramelizes during the crisping process, creating a thin, crackly glaze that adds both flavor and texture. For a deeper spice profile, add a pinch of nutmeg to the mix.
The Unexpected Star
Apples bring a fresh, crisp, and slightly tart contrast to the sweet filling. Their natural pectin helps thicken the caramel when cooked with brown sugar, preventing the apples from turning mushy. Choose a firm variety like Honeycrisp or Fuji for the best bite; Granny Smith adds extra tartness if you like a sharper edge.
Brown sugar is useful for caramelizing the apples, enhancing their natural sweetness while adding a subtle molasses depth. It also contributes to the glossy sheen that makes the apples look irresistible. If you’re watching sugar, swap half of the brown sugar with a natural sweetener like maple syrup.
Ground cinnamon adds a warm touch that elevates the apple flavor, making it reminiscent of fall. It also pairs beautifully with the vanilla in the cheesecake filling, creating a harmonious spice blend.
The Final Flourish
Vanilla extract brings warmth and a hint of nostalgia to our creamy mix. Just a few drops are enough to tie together the buttery crust, the tangy cheese, and the spiced apples. Use pure vanilla extract for the most authentic flavor; imitation can taste flat.
Optional toppings like caramel sauce, whipped cream, or chopped nuts can elevate the experience, adding layers of flavor and fun! Drizzle a thin ribbon of caramel for an extra glossy finish, or sprinkle toasted pecans for a crunchy surprise. These extras are completely customizable, letting you tailor each taco to your personal cravings.
Everything's prepped? Good. Let's get into the real action…
The Method — Step by Step
- Gather and prep your workspace. Lay out eight flour tortillas, a small bowl of melted butter, and a separate bowl of cinnamon sugar. Slice two medium apples into 1/4‑inch dice, and set them aside. This is the moment of truth: a tidy kitchen means a smoother flow, so I always line my counter with parchment paper to catch any stray butter drops. Kitchen Hack: Use a large zip‑top bag to shake the cinnamon sugar onto the tortillas – it distributes evenly and saves you from a messy spoon.
- Caramelize the apples. In a medium skillet over medium heat, melt 2 tablespoons of butter, then add the diced apples, 3 tablespoons of brown sugar, and 1 teaspoon of ground cinnamon. Stir constantly; you’ll hear a gentle sizzle as the sugar melts and coats the fruit. Cook for about 6‑8 minutes, or until the apples are tender and glossy, and the mixture looks like a thick, amber sauce. The scent at this point is pure autumn in a pan – if you can smell it, you’re on the right track.
- Make the cheesecake filling. While the apples are caramelizing, combine 8 ounces of softened cream cheese, 1/4 cup powdered sugar, and 1 teaspoon vanilla extract in a mixing bowl. Beat with an electric mixer on medium speed until the mixture is smooth, airy, and free of lumps. This step is pure magic; the cream cheese should become light enough to spread like a cloud. Watch Out: Over‑mixing can cause the filling to become too thin, making it seep out of the tacos. Stop as soon as the texture is silky.
- Brush and sweeten the tortillas. Heat a clean, dry skillet over medium‑high heat. While it warms, brush one side of each tortilla with melted butter, then sprinkle a generous pinch of cinnamon sugar on the buttered side. Place the tortilla butter‑side‑down in the hot skillet; you should hear a quick sizzle that sounds like a tiny fireworks show. Cook for 30‑45 seconds, or until the edges turn golden and the sugar begins to caramelize.
- Flip and crisp the other side. Using tongs, gently flip the tortilla to crisp the opposite side for another 30 seconds. The goal is a uniform golden‑brown color on both sides, with a slight crisp that gives a satisfying snap when you bite. If the tortilla starts to brown too quickly, lower the heat – patience is key.
- Assemble the tacos. Lay each tortilla flat on a plate, spoon a generous dollop of the cheesecake mixture onto the center, then top with a spoonful of caramelized apples. The cheesecake should spread slightly, hugging the apple pieces like a sweet embrace. If you’re feeling daring, drizzle a thin line of caramel sauce across the top now.
- Fold and serve. Fold each tortilla in half, pressing gently to seal the filling inside. The taco should hold its shape without spilling – if it starts to leak, give it a quick extra second in the skillet, seam side down, to seal the edge. This is the moment of triumph; the golden crust, the creamy interior, and the tart apple all come together in a single bite.
- Optional finishing touches. Sprinkle a pinch of extra cinnamon sugar on the outside for added sparkle, or add a dollop of whipped cream and a scattering of chopped nuts for extra texture. Serve immediately while the tacos are still warm, because the contrast between the hot crust and the cool cheesecake is what makes this dish unforgettable. Kitchen Hack: Keep a small plate of extra butter nearby; a quick brush before serving ensures the tacos stay glossy and don’t dry out.
That's it — you did it. But hold on, I've got a few more tricks that'll take this to another level…
Insider Tricks for Flawless Results
The Temperature Rule Nobody Follows
Never start with a cold skillet. Let your pan heat gradually over medium heat for at least two minutes before adding the butter. This ensures the butter melts evenly and the tortilla cooks uniformly, preventing hot spots that can burn one side while leaving the other soggy. I once tried to crank the heat up to “high” to save time, and the tortillas turned into blackened crisps – not the crunchy gold I was aiming for.
Why Your Nose Knows Best
When the tortillas are ready, you’ll smell a subtle nutty aroma mixed with caramel. That scent is your cue to flip – if you can’t detect that sweet, buttery perfume, give the tortilla a few more seconds. Trusting your nose beats watching a timer every single time.
The 5‑Minute Rest That Changes Everything
After you’ve assembled the tacos, let them sit for exactly five minutes before serving. This short rest lets the cheesecake filling firm up just enough to stay put, while the apples settle into a perfect glaze. Skipping this step leads to a runny interior that can make a mess on the plate.
Butter Brush Precision
Use a silicone pastry brush for the butter and cinnamon sugar. It holds just enough liquid to coat without drenching the tortilla, which means you get that even golden hue without excess sogginess. A regular brush can leave clumps, ruining the crispness.
The Secret of the “Double‑Flip”
If you want an extra‑crunchy edge, after the first flip, give the tortilla a quick second flip just before you remove it from the pan. This creates a micro‑crust on the outermost layer, making each bite sound like a tiny crackling firework.
Creative Twists and Variations
This recipe is a playground. Here are some of my favorite ways to switch things up:
Maple‑Pecan Delight
Swap brown sugar for pure maple syrup when caramelizing the apples, and finish each taco with a sprinkle of toasted pecans. The maple adds a deep, woodsy sweetness that pairs beautifully with the nutty crunch.
Chocolate‑Covered Dream
Drizzle melted dark chocolate over the assembled tacos and add a dusting of cocoa powder. The bitterness of the chocolate cuts through the sweet cheese, creating a sophisticated flavor profile perfect for date night.
Spiced Pumpkin Fusion
Add 2 tablespoons of pumpkin puree to the cheesecake mixture and a pinch of pumpkin pie spice. This turns the tacos into a fall‑centric treat, ideal for Thanksgiving leftovers.
Berry Burst
Replace the apples with a mix of fresh berries (blueberries, raspberries, blackberries) and a splash of lemon juice. The tartness of the berries offers a bright contrast to the creamy cheese.
Savory Sweet Switch
For a daring sweet‑savory combo, incorporate a thin layer of thinly sliced prosciutto inside the taco before adding the cheese. The salty meat balances the sweet apple, creating a flavor surprise that will wow adventurous eaters.
Storing and Bringing It Back to Life
Fridge Storage
Place any leftover tacos in an airtight container lined with parchment paper. They’ll keep fresh for up to 2 days. Before serving, reheat gently in a skillet over low heat, adding a splash of water to the pan and covering with a lid – this steams the interior back to a creamy consistency while reviving the crisp crust.
Freezer Friendly
Separate the components: store the cooked tortillas and the cheesecake filling in zip‑top bags, and freeze the caramelized apples on a tray before transferring to a bag. This way, you can reassemble fresh tacos in minutes. Frozen components stay good for up to 1 month.
Best Reheating Method
When you’re ready to eat, heat the tortillas in a dry skillet for 30 seconds per side, then quickly warm the cheesecake filling in the microwave (about 15 seconds). Warm the apples on the stove until they’re glossy again, then assemble. Adding a tiny splash of water to the skillet before reheating the tortillas helps retain that perfect crunch without drying out.