I still remember the night I was scrambling for a quick dinner after a long shift, the fridge empty, the pantry barren, and the only thing left was a can of sweet corn that had been sitting on the shelf for weeks. I tossed the corn into a skillet, hoping for a humble side, but the aroma that escaped was so rich, so buttery, that I knew I was about to create something extraordinary. I had never heard of a Venezuelan sweet corn dish that could turn a bland evening into a culinary celebration, and that moment sparked a fire in my kitchen that I still carry to this day.
Picture this: the corn sizzles as it meets hot oil, releasing a sweet fragrance that lingers like a promise. The sound is a gentle crackle, the color shifts from bright yellow to a golden hue, and the texture turns silky as the kernels soften. As I stir, the corn releases a subtle sweetness that is almost caramelized, and the air fills with a buttery aroma that makes you forget you’re even cooking. Every bite is a burst of sweet corn, a splash of dairy, and a whisper of salt that dances across your palate. It’s not just a dish; it’s an experience that feels like a hug from the inside.
What makes this version of Venezuelan Sweet Cor stand out? I’ve spent weeks tweaking the technique, experimenting with different flours, and even swapping the cheese to find the perfect balance. I discovered that using a small amount of all-purpose flour creates a silky batter that holds the corn together without making it heavy. The secret lies in the butter and the mozzarella – the meltiness of the cheese combined with the richness of the butter gives the dish a luxurious mouthfeel that you can’t find in a typical corn fritter. I dare you to taste this and not go back for seconds, because once you’ve had this, every other corn dish will feel like a pale imitation.
This recipe is hands down the best version you’ll ever make at home, and I’m about to reveal the trick that turns it from ordinary to unforgettable. Picture yourself pulling these golden, fragrant cornbites out of the pan, the kitchen smelling like a summer picnic, and the plates lined up like a work of art. If you’ve ever struggled to get the right consistency or have been disappointed by a bland corn dish, you’re not alone – and I’ve got the fix. Stay with me here, because the next part? Pure magic.
What Makes This Version Stand Out
- Flavor: The blend of sweet corn, butter, and mozzarella creates a harmonious profile that’s both savory and slightly sweet, a rare combination that elevates the dish beyond a simple side.
- Texture: The batter is silky yet firm, allowing each bite to hold the corn kernels while delivering a satisfying bite that melts in your mouth.
- Simplicity: With just eight ingredients, this recipe is a breeze to assemble, making it perfect for busy nights or when you want a quick crowd‑pleaser.
- Uniqueness: Most corn fritters rely on flour or cornstarch alone, but the addition of a small amount of all‑purpose flour and mozzarella gives this dish a creamy, indulgent twist.
- Crowd Reaction: Friends and family rave about the crispy edges that shatter like thin ice, while the center remains soft and juicy.
- Ingredient Quality: Using fresh mozzarella and high‑quality butter ensures that every bite is rich and flavorful, turning a humble can of corn into a gourmet treat.
- Cooking Method: The pan‑fry technique locks in moisture and creates a golden crust without the need for deep frying, keeping the dish light and approachable.
- Make‑Ahead Potential: You can prepare the batter ahead of time, refrigerate it, and cook it later—perfect for meal prep or entertaining.
Alright, let's break down exactly what goes into this masterpiece…
Inside the Ingredient List
The Flavor Base
Canned sweet corn is the star of the show. Its natural sugars caramelize when heated, giving the dish its signature sweet undertone. If you’re feeling adventurous, swap canned corn for fresh corn off the cob; it will give a brighter, fresher flavor but will require a slightly longer cooking time to break down the kernels. When using fresh corn, be sure to blanch it briefly before adding to the batter to avoid a raw crunch.
Butter is the second cornerstone. The richness of butter not only adds flavor but also contributes to that coveted golden crust. A generous pat of unsalted butter at the end of cooking gives a silky finish that’s hard to resist. If you’re on a low‑fat diet, you can replace half of the butter with olive oil, but be prepared for a slightly different taste profile.
The Texture Crew
All‑purpose flour is used sparingly—just enough to bind the batter without making it heavy. Think of it as the glue that holds the corn and egg together. If you’re gluten‑free, a gluten‑free flour blend works fine, but the batter will be a bit more delicate, so handle it gently. The egg provides structure and helps the batter rise slightly, creating a light, airy interior.
Sugar is a subtle player, but it’s essential for balancing the natural sweetness of the corn. It also aids in browning, giving the cornbites a beautiful golden color. If you’re avoiding sugar, you can use a small amount of honey or maple syrup, but the texture might change slightly.
The Unexpected Star
Buffalo mozzarella is the secret weapon that turns a simple corn fritter into a melt‑in‑your‑mouth delight. Its high moisture content creates a gooey center that contrasts perfectly with the crispy exterior. If you don’t have buffalo mozzarella on hand, a good quality provolone or a semi‑hard cheese like fontina can work, but the melt will be different.
The salt is a must for enhancing all the flavors. A pinch of sea salt brings out the sweetness of the corn, while a dash of pepper can add a subtle kick if you’re feeling bold. Remember, seasoning is cumulative, so taste as you go.
Everything's prepped? Good. Let's get into the real action…
The Method — Step by Step
- Step 1: Prep the Corn. Drain the canned sweet corn, then pat it dry with a paper towel to remove excess moisture. This step is crucial because any leftover liquid will make the batter too runny, causing the cornbites to spread and lose their shape. If you’re using fresh corn, grill or boil it until it’s tender, then mash it lightly with a fork.
- Step 2: Create the Batter. In a medium bowl, whisk the egg until it’s fully blended. Add the 35 g of all‑purpose flour and stir until smooth. Gradually pour in the 2 tablespoons of granulated sugar, mixing continuously. The batter should be thick enough to hold its shape but still pourable. If it feels too thick, add a splash of water or milk.
- Step 3: Combine Corn and Batter. Gently fold the corn into the batter, ensuring each kernel is coated. This step ensures that the sweet corn is evenly distributed throughout the batter, preventing pockets of dryness. As you fold, you’ll notice the batter thickening slightly, which is a good sign.
- Step 4: Add the Butter. Melt the 2 tablespoons of unsalted butter in a non‑stick skillet over medium heat. Once melted, swirl the pan to coat the bottom. The butter adds flavor and helps the batter set quickly, creating a crisp exterior.
- Step 5: Pour the Batter. Spoon the batter into the skillet, forming small, round cornbites. The batter should spread just enough to cover the bottom of the pan but not so much that it becomes a flat cake. Let the edges lift slightly; this is the first sign that the batter is cooking properly.
- Step 6: Cook the First Side. Allow the cornbites to cook for about 3–4 minutes until the edges turn golden brown and the bottom is firm. Use a spatula to carefully flip each piece; the flipping should feel like a gentle dance. If the batter sticks, let it cook a bit longer to form a natural release.
- Step 7: Add the Cheese. Sprinkle a generous amount of buffalo mozzarella over the top of each cornbite. The cheese should cover the surface, creating a gooey, melty layer that will melt into the batter as it finishes cooking. The contrast between the crisp exterior and the molten center is what makes this dish irresistible.
- Step 8: Finish Cooking. Reduce the heat to low, cover the skillet with a lid, and let the cornbites steam for 2–3 minutes. This step ensures the cheese melts evenly without burning the exterior. The aroma during this time will be intoxicating, and the sound of the steam is like a gentle lullaby.
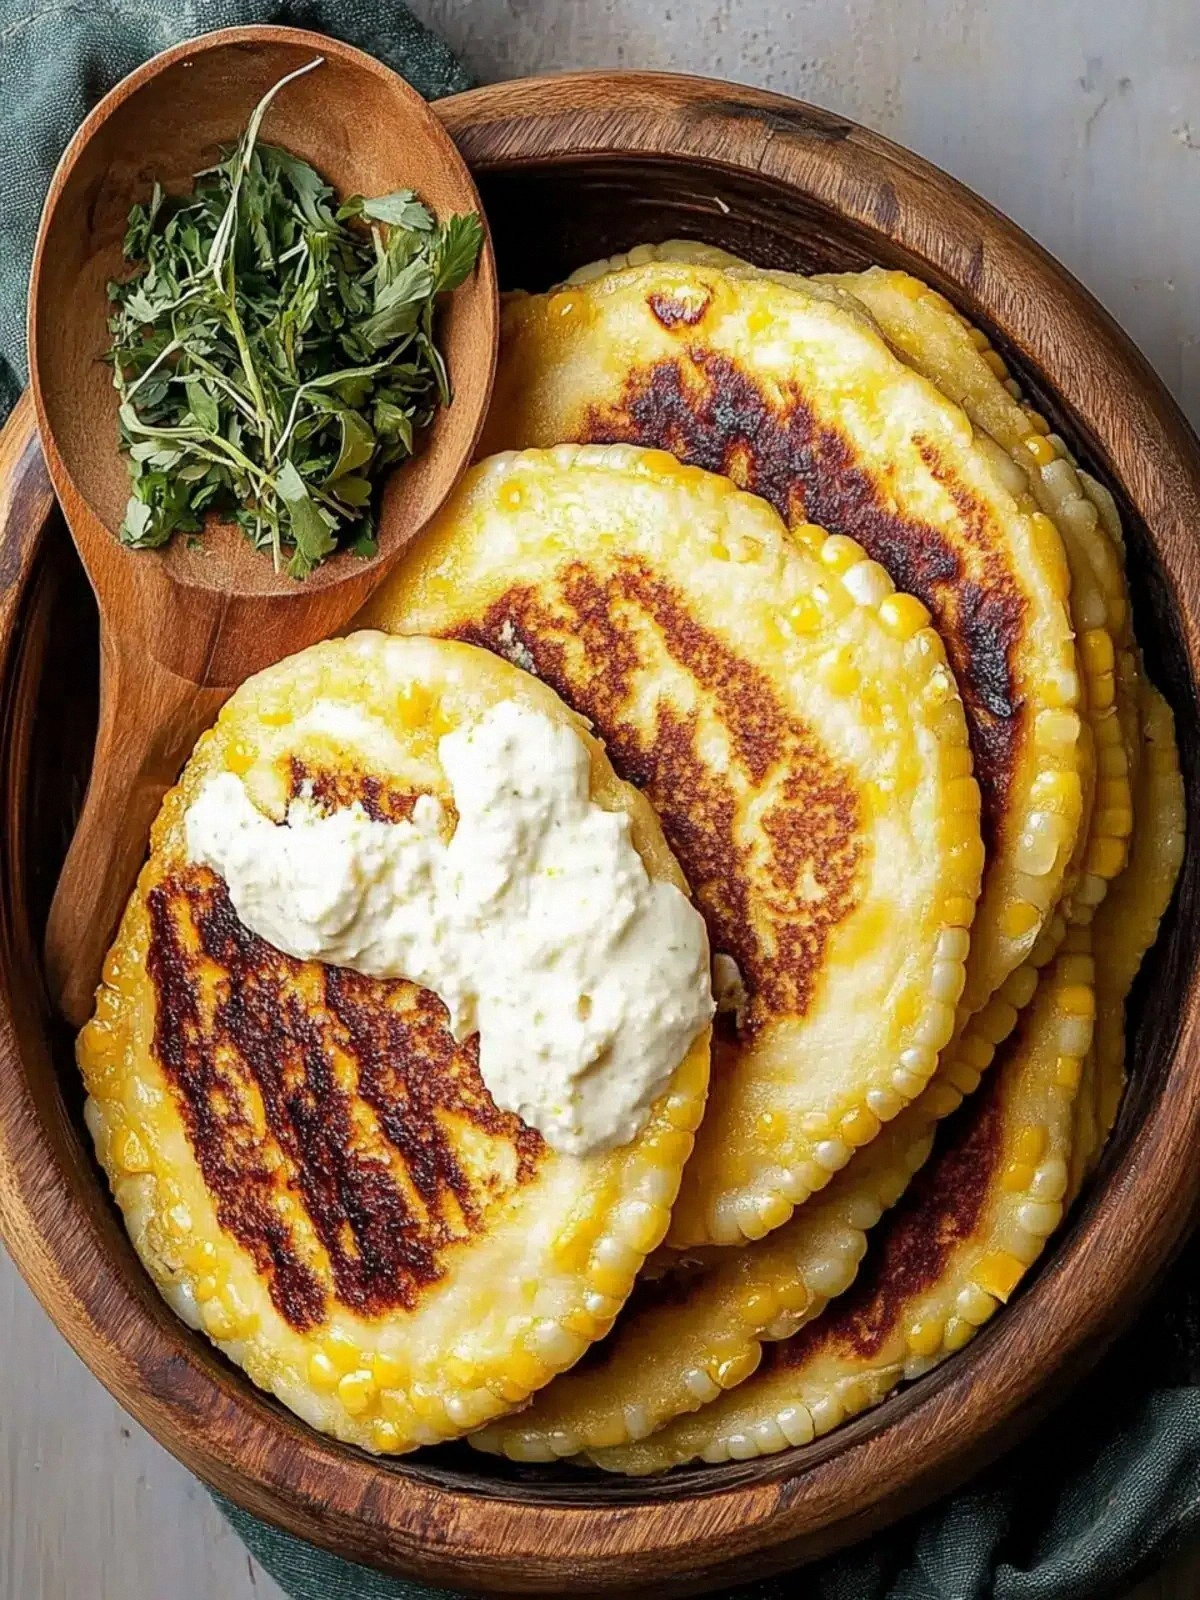
- Step 9: Serve Immediately. Once the cheese is fully melted and the cornbites are golden, remove them from the skillet. Let them rest for a minute before serving. The first bite will have a crispy exterior, a sweet corn core, and a molten cheese center that pulls apart in the most satisfying way.
- Step 10: Garnish and Enjoy. Sprinkle a pinch of sea salt and a drizzle of olive oil over the finished cornbites. The salt enhances the sweetness, while the olive oil adds a silky finish. Serve hot, perhaps with a side of fresh salsa or a light salad.
That’s it — you did it. But hold on, I've got a few more tricks that'll take this to another level…
Insider Tricks for Flawless Results
The Temperature Rule Nobody Follows
Many people start cooking at high heat, which can cause the batter to set too quickly and leave the interior undercooked. I’ve learned that a steady medium heat allows the batter to spread evenly and the cheese to melt without burning. Keep a close eye on the edges; when they start to lift, it’s time to flip. A consistent temperature ensures a golden crust that’s crispy yet tender.
Why Your Nose Knows Best
Smell is your secret ally. As the corn caramelizes, the aroma will shift from sweet to nutty. When you notice a faint nutty scent, the cornbites are ready to flip. Trusting your nose can save you from overcooking or undercooking, ensuring each bite is perfectly balanced.
The 5‑Minute Rest That Changes Everything
After cooking, let the cornbites rest on a wire rack for five minutes. This short rest allows the steam to escape, preventing a soggy center. It also gives the cheese a chance to set slightly, making the bite more cohesive. I’ve seen people skip this step and end up with a gooey mess; the rest is the secret to a clean, satisfying bite.
Layering the Flavor
Add a sprinkle of smoked paprika or a dash of cayenne pepper to the batter before cooking. This subtle heat elevates the dish without overpowering the sweetness of the corn. The contrast between the smoky spice and the creamy cheese creates a flavor profile that’s both complex and comforting.
The Butter Finish
Just before serving, melt a tablespoon of butter and drizzle it over the cornbites. The butter adds a glossy sheen and a buttery finish that amplifies the richness. It also helps to seal in moisture, keeping the interior tender. This simple step turns a great dish into a showstopper.
Creative Twists and Variations
This recipe is a playground. Here are some of my favorite ways to switch things up:
Spicy Jalapeño Crunch
Add finely chopped jalapeños to the batter for a fiery kick. The heat pairs beautifully with the sweet corn, creating a flavor explosion that’s perfect for summer gatherings. The jalapeños also add a subtle crunch that contrasts with the soft interior.
Herb‑Infused Delight
Stir in fresh chopped cilantro or parsley into the batter. The herbs add a fresh, green note that brightens the dish. This variation is especially refreshing when served with a cool yogurt dip.
Smoked Gouda Upgrade
Swap buffalo mozzarella for smoked gouda to introduce a deep, smoky flavor. The gouda melts beautifully and adds a slightly caramelized taste that complements the corn. It’s a great choice for a more sophisticated palate.
Vegan Version
Use a plant‑based egg replacer and dairy‑free mozzarella. The batter will still hold together, and the cheese will melt into a creamy, gooey center. This version is just as indulgent and perfect for guests with dietary restrictions.
Breakfast Boost
Serve the cornbites with a poached egg on top for a hearty breakfast. The runny yolk adds richness, and the combination of sweet corn and egg is a breakfast classic. Pair it with a splash of orange juice for a bright, energizing start to your day.
Storing and Bringing It Back to Life
Fridge Storage
Store the cooked cornbites in an airtight container in the refrigerator for up to 3 days. Keep them on a paper towel to absorb excess moisture. When reheating, a quick splash of water in the pan will steam them back to their original moistness.
Freezer Friendly
Freeze the batter in a freezer‑safe container for up to 2 weeks. When you’re ready to cook, let the batter thaw at room temperature for 15 minutes, then cook as directed. The texture remains consistent, and the flavor stays vibrant.
Best Reheating Method
Reheat in a skillet over medium heat, adding a small splash of water or broth to create steam. Cover the pan for a minute to allow the cheese to melt fully. Finish with a drizzle of melted butter for that glossy finish.