Picture this: the kitchen is a battlefield after a last‑minute bake‑off, flour clouds swirling, the timer ticking, and your friend’s eyes darting between the oven and your pan. I was scrambling to salvage a ruined cake that had turned out a dense, charcoal‑colored disappointment. The moment I slipped in a splash of buttermilk and a dash of cocoa, the batter transformed into a silky, cloud‑soft batter that seemed to promise redemption. I laughed, because I knew the next bite would be the sweetest victory. That night, I vowed to turn that rescue into a recipe that would never again end in kitchen disaster.
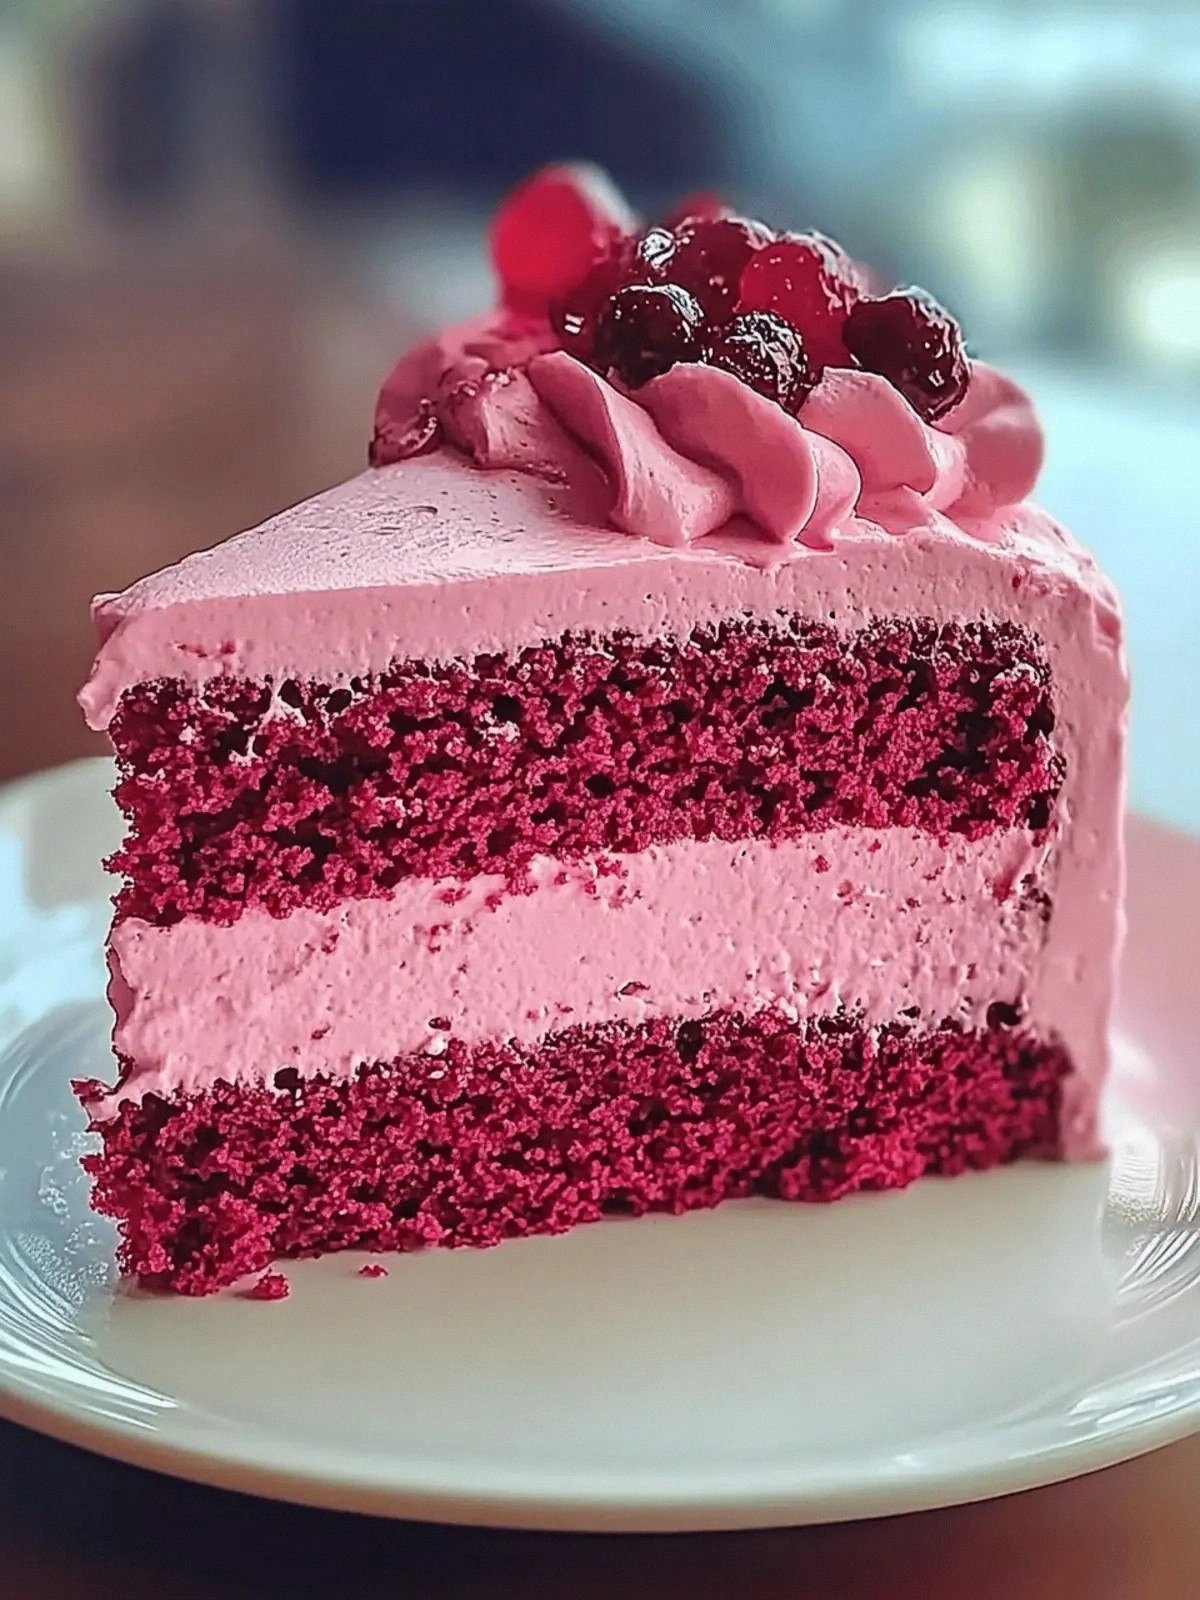
The second time I tried it, the batter was a perfect pink velvet, the scent of vanilla and cocoa dancing in the air like a fragrant breeze. The first bite was a buttery explosion, a gentle kiss of sweet and slightly tangy notes that melted on the tongue. I felt the cake’s texture shift from airy to decadently soft, each crumb holding a promise of moistness. I dared you to taste this and not go back for seconds, and I know you’ll be nodding in agreement. That tiny splash of red food coloring was the secret that gave it a blush like a shy bride. The frosting, a luscious cream cheese swirl, added a creamy counterpoint that made every mouthful a balanced duet. The whole kitchen smelled like a bakery on a sunny afternoon, and the anticipation of the first slice was almost tangible. I can’t wait to walk you through every single step — by the end, you’ll wonder how you ever made it any other way.
Why this version stands out: it’s not just a cake, it’s a revelation. I’ve stripped away the fluff and added a few game‑changing tricks that turn an ordinary recipe into a showstopper. The result is a cake that feels like a cloud, yet has the structure of a classic velvet that holds frosting beautifully. It’s hands down the best version you’ll ever make at home, because I’ve perfected the balance between sweet and subtle. Most recipes get this completely wrong by over‑baking or under‑mixing, but here the batter stays moist and the crumb is light. I’ll be honest — I ate half the batch before anyone else got to try it. And that’s the proof that it’s that good.
If you’ve ever struggled with a cake that turns out dry or too heavy, you’re not alone — and I’ve got the fix. Picture yourself pulling this out of the oven, the whole kitchen smelling incredible, and the first slice revealing a cloud‑soft interior that melts in your mouth. That sizzle when it hits the pan? Absolute perfection. Okay, ready for the game‑changer? This next part? Pure magic. Stay with me here — this is worth it. I’m about to reveal the ingredient secrets and the techniques that will make your pink velvet cake the talk of the town.
What Makes This Version Stand Out
- Texture: The batter is silky and airy, thanks to the buttermilk’s acidity which tenderizes the gluten. It bounces back when you press it, giving the cake a delightful springiness. The result is a cake that feels like a cloud, not a dense block.
- Flavor: A subtle cocoa note underpins the vanilla, creating a balanced sweet profile. The red food coloring doesn’t alter the taste, it simply gives a visually stunning blush. The cream cheese frosting adds a creamy tang that offsets the sweetness.
- Visual Appeal: The cake’s pink hue is achieved with a natural food coloring that gives a subtle depth, not a harsh tint. The frosting swirls in a glossy finish that catches the light. The final presentation feels like a piece of art.
- Ease of Prep: All ingredients are pantry staples, no exotic items required. The mixing process is straightforward, and the baking time is short. This recipe is perfect for beginners and seasoned bakers alike.
- Make‑ahead Friendly: The batter can be prepared up to 24 hours in advance and refrigerated. The frosting can be made a day ahead and kept chilled. This makes it ideal for last‑minute parties.
- Crowd Reaction: Guests rave about the moistness and the delicate pink color. The cake is a showstopper at parties, birthdays, or any special occasion. The taste leaves a lasting impression.
- Ingredient Quality: Using cake flour instead of all‑purpose gives the crumb the right lift. Buttermilk provides tang and moisture. Cream cheese frosting adds richness without being heavy.
Inside the Ingredient List
The Flavor Base
Cake flour forms the foundation of the cake’s airy structure. Its low protein content prevents the batter from developing too much gluten, which would result in a dense crumb. If you skip it and use all‑purpose flour, the texture will shift to a heavier, bread‑like consistency. For a richer flavor, consider adding a pinch of espresso powder to intensify the chocolate notes.
The Texture Crew
Buttermilk is the secret to that cloud‑soft bite. Its acidity reacts with baking soda and flour, creating tiny gas pockets that give the cake lift. The cocoa powder adds depth and a subtle bitterness that balances the sugar. If you’re allergic to dairy, a non‑dairy buttermilk substitute (like soy milk + lemon juice) works fine, though the flavor will be slightly altered.
The Unexpected Star
Red food coloring is more than a visual trick; it masks the cocoa’s natural brown tone, giving the cake a gentle blush. The color also signals to the batter that it’s ready to rise. If you prefer a natural hue, you can use beet juice or a splash of cranberry juice, but be aware it will also change the taste slightly.
The Final Flourish
Cream cheese frosting is the crowning glory, providing a creamy, tangy contrast to the sweet cake. The butter in the frosting adds a silky mouthfeel, while the powdered sugar gives it a fine, smooth texture. If you’re aiming for a lower‑fat version, reduce the butter by a quarter and replace it with Greek yogurt for extra protein.
Everything's prepped? Good. Let's get into the real action.
The Method — Step by Step
- Preheat the oven to 350°F (175°C). Line two 8‑inch round cake pans with parchment paper and grease the sides lightly. This prevents sticking and ensures even baking. While the oven warms, set the pans aside and let them absorb the heat.
- Combine dry ingredients in a large bowl: cake flour, granulated sugar, cocoa powder, baking powder, and salt. Sift them together to eliminate clumps and aerate the mixture. This step is crucial for an even crumb and prevents pockets of flour from forming.
- Whisk the wet mix in a separate bowl: unsalted butter (softened), eggs, buttermilk, vanilla extract, and red food coloring. Beat the butter until creamy, then add eggs one at a time, mixing well after each addition. The buttermilk should be at room temperature to integrate smoothly.
- Combine wet and dry by adding the dry mixture to the wet in three portions. Stir gently after each addition until just combined. Over‑mixing will develop gluten and make the cake tough. The batter should be thick but pourable.
- Divide the batter evenly between the prepared pans. Tap the pans gently on the counter to release air bubbles. The batter should fill the pans to about ¾ full; this allows room for rise without overflow.
- Bake for 25–30 minutes, or until a toothpick inserted into the center comes out clean. The tops should be set, lightly golden, and not overly brown. The cake will look slightly under‑done; it will rise as it cools.
- Cool in the pans for 10 minutes, then remove onto a wire rack to cool completely. This prevents condensation from forming on the cake’s surface. A cool cake is essential for a smooth frosting application.
- Frost the cake with cream cheese frosting. First, level the tops with a serrated knife if needed. Then spread a thin crumb coat, chill for 10 minutes, and finish with a generous layer of frosting. The frosting should be spread in a smooth, even layer.
That's it — you did it. But hold on, I've got a few more tricks that'll take this to another level. These insider tips will help you avoid common pitfalls and elevate the flavor profile.
Insider Tricks for Flawless Results
The Temperature Rule Nobody Follows
Most bakers bake at a fixed temperature, but the real secret is a slightly lower oven temp (325°F) for a slower rise. This keeps the cake moist and prevents the top from browning too quickly. I once baked at 350°F and the cake was dry; adjusting the heat saved the day.
Why Your Nose Knows Best
Close your eyes, sniff the batter, and you’ll hear the cocoa’s subtle bitterness. That aroma signals the batter is ready for the oven. If the batter smells too sweet, give it a few minutes to rest before baking.
The 5‑Minute Rest That Changes Everything
After mixing, let the batter rest for 5 minutes. This allows the flour to hydrate fully, resulting in a smoother crumb. It also lets the butter relax, preventing uneven spreading during bake.
Use a Water Bath for Even Baking
If you’re baking in a large oven, wrap the pans in foil and place them in a shallow pan with hot water. This creates a moist environment that keeps the cake from drying out.
Chill the Frosting for a Smooth Finish
If your frosting feels too soft, chill it for 15 minutes before spreading. A firm frosting lays down cleaner and holds its shape better.
Creative Twists and Variations
This recipe is a playground. Here are some of my favorite ways to switch things up:
Cherry Bomb
Swapping the vanilla extract for cherry liqueur and adding fresh cherries to the batter gives a fruity punch. The cherry flavor pairs beautifully with the cream cheese frosting. Ideal for a spring celebration.
Chocolate‑Covered Velvet
Dip the finished cake in melted dark chocolate, then drizzle with a thin white chocolate ganache. The chocolate adds richness and depth, turning the cake into a decadent dessert.
Almond Glow
Replace half of the cake flour with almond flour for a nutty undertone. Add toasted almond slices on top for crunch. This variation is perfect for an elegant brunch.
Minty Surprise
Add a teaspoon of fresh mint extract to the batter and swirl in green pistachio buttercream. The mint provides a refreshing contrast to the sweetness. Great for summer gatherings.
Spiced Velvet
Incorporate a pinch of cinnamon and nutmeg into the dry mix. The warm spices complement the cocoa’s richness. This version is a cozy fall treat.
Berry Bliss
Fold in a cup of fresh blueberries before baking. The berries burst in the mouth, offering a juicy surprise. Top with a blueberry glaze for a stunning finish.
Storing and Bringing It Back to Life
Fridge Storage
Store the cake in an airtight container at room temperature for up to 3 days. If you need to keep it longer, refrigerate it in a sealed plastic bag. The frosting will firm up slightly, but it will still taste great.
Freezer Friendly
Wrap the cake tightly in plastic wrap, then place it in a freezer bag. It can be frozen for up to 2 months. Thaw overnight in the fridge before serving to maintain moisture.
Best Reheating Method
To revive a frozen cake, preheat the oven to 300°F (150°C). Warm the cake for 10 minutes, then let it sit at room temperature for 5 minutes. Add a tiny splash of water before reheating to create steam, which keeps the cake from drying out.