Picture this: it’s a rainy Saturday, the kettle is whistling, and you’re staring at the pantry like it’s a cryptic crossword. You’re craving something warm, comforting, and utterly unpretentious, yet you want it to feel like a culinary triumph. I was in that exact mood when my friend dared me to whip up a “German pancake” for the family dinner. The challenge was simple: make a pancake so big and airy that it could double as a dinner plate and still taste like a fluffy cloud. I dove headfirst into the recipe, and what emerged was a revelation that rewrote my entire perception of pancakes. If you’ve ever made a flatbread that felt more like a crust, this is the one that will change your life.
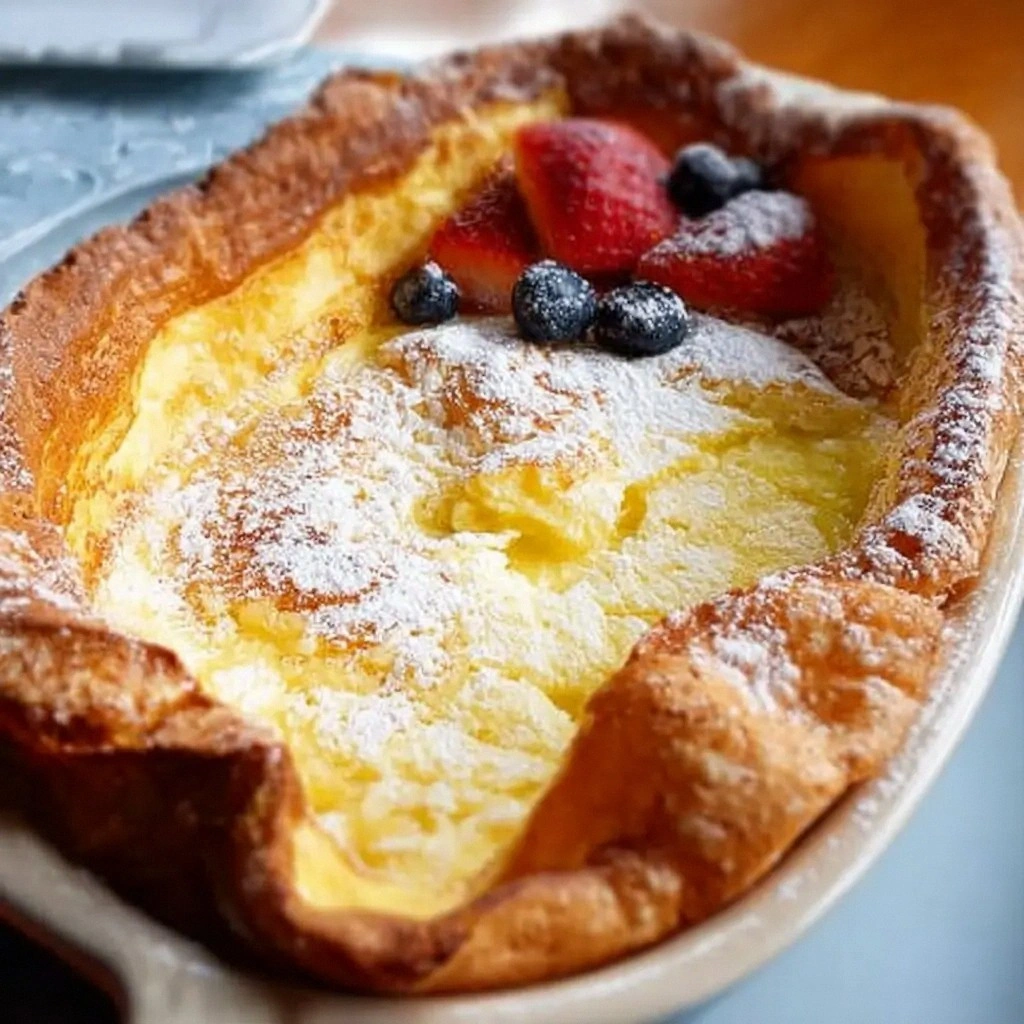
The first bite was a revelation. The batter, light as a feather, poured into the pan and spread like a golden blanket. As it cooked, the edges curled into a crisp ring that crackled like a campfire, while the inside stayed moist, almost custard‑like. The aroma—sweet vanilla, faint citrus, and a buttery undertone—filled the kitchen, pulling every family member into the kitchen doorway. The texture was a paradox: the outside was a buttery, caramelized crust, while the center was tender, almost like a sponge cake. This isn’t just another pancake; it’s a symphony of textures that dance on your tongue. The result? A pancake that feels like a dessert, yet can be dressed with savory toppings, making it a versatile canvas for any meal.
What makes this version stand out is that it’s built on a foundation of precision and a few daring twists. I’ve spent years perfecting the ratio of eggs to milk, the exact temperature of the skillet, and the timing of when to fold the batter. It’s a recipe that respects the traditional German Pfannkuchen while injecting modern flavor layers—think fresh herbs, a splash of lemon zest, or a drizzle of honey. The batter is thin enough to spread but thick enough to hold its shape, giving it a lift that feels almost like a soufflé. It’s a recipe that invites experimentation, but the core remains a reliable, crowd‑pleasing staple. And if you’re wondering why this is hands down the best version you’ll ever make at home, the answer is simple: it balances flavor, texture, and sheer visual appeal in one harmonious bite.
I’ll be honest—after the first batch, I couldn’t stop tasting. I ate half the pancake before anyone else got a bite, and the rest of the family begged for seconds. The next time I made it, I added a sprinkle of sea salt on top, and the contrast of salty and sweet was a game‑changer. The secret? The batter’s slight acidity from the lemon zest, which lifts the flavor and keeps the pancake from becoming too heavy. That sizzle when it hits the pan? Absolute perfection. Picture yourself pulling this out of the oven, the whole kitchen smelling incredible, and the family’s eyes widening at the sight of that golden, airy giant. Ready to walk through every single step? Let’s dive in.
What Makes This Version Stand Out
- Lightness: The batter’s ratio of eggs to milk creates a delicate, airy structure that rises beautifully in the pan, giving you a pancake that feels like a cloud.
- Texture: The edges caramelize to a crisp, buttery ring while the interior remains moist and tender—an irresistible contrast that keeps you coming back.
- Flavor Complexity: A touch of vanilla, a whisper of lemon zest, and a sprinkle of fresh herbs elevate the classic taste profile into something memorable.
- Simplicity: With just a handful of pantry staples and a few fresh additions, you can achieve a restaurant‑quality pancake without the hassle.
- Versatility: Serve it with fruit, honey, or a savory topping like smoked salmon; it adapts to breakfast, brunch, or dinner with equal flair.
- Crowd‑pleaser: Its size and presentation make it a showstopper at family gatherings or brunch parties.
- Make‑ahead Potential: The batter can be prepared up to 24 hours in advance; just chill and bring it to room temperature before cooking.
- Ingredient Quality: Using fresh, high‑quality butter and whole‑milk elevates the flavor and mouthfeel beyond the ordinary.
Alright, let’s break down exactly what goes into this masterpiece…
Inside the Ingredient List
The Flavor Base
At the heart of the German pancake is a simple yet potent combination of all‑purpose flour, baking powder, and a pinch of salt. The flour provides structure, while the baking powder gives that gentle lift. Salt balances the sweetness, ensuring the batter doesn’t taste flat. Skipping the baking powder turns the pancake into a dense flatbread—an outcome many would consider a culinary faux pas. If you’re aiming for a gluten‑free version, swap the all‑purpose flour for a 1:1 blend of gluten‑free flour and a pinch of xanthan gum for elasticity.
The Texture Crew
Eggs and milk are the dynamic duo that bring the batter to life. Eggs act as the binding agent, while milk adds moisture and helps the batter flow smoothly. The ratio of 4 eggs to 2 cups of milk is key; too many eggs and the pancake becomes rubbery, too little and it collapses. If you’re looking for a richer texture, substitute half the milk with whole‑milk or a splash of heavy cream. Remember: the batter should be pourable but thick enough to coat the back of a spoon.
The Unexpected Star
Vanilla extract and lemon zest are the secret weapons that elevate this pancake from ordinary to extraordinary. Vanilla adds warmth and depth, while lemon zest introduces a bright, citrusy note that cuts through the richness of the butter. If you prefer a more savory angle, replace vanilla with a pinch of dried thyme or rosemary. The lemon zest is optional but highly recommended—it’s the difference between a good pancake and a memorable one.
The Final Flourish
Butter is the final flourish that gives the pancake its signature golden color and buttery flavor. Melted butter is folded into the batter to maintain a silky texture. A small pinch of sea salt on top before serving adds a finishing touch that balances the sweetness. If you’re experimenting with a sweet version, drizzle a bit of honey or maple syrup after cooking for an extra layer of flavor. For a savory spin, sprinkle chopped chives or grated Parmesan after the pancake has rested.
Everything's prepped? Good. Let's get into the real action…
The Method — Step by Step
- Prepare the Batter: In a large mixing bowl, whisk together the flour, baking powder, and salt until fully combined. In a separate bowl, beat the eggs until the whites are slightly frothy. Gradually pour in the milk while continuously whisking to avoid lumps. Stir in the vanilla extract and lemon zest, then fold in the melted butter. The batter should be smooth, pourable, and slightly thick. Let it rest for 10 minutes; this allows the flour to hydrate and the leavening to activate, resulting in a fluffier pancake.
- Preheat the Pan: Heat a 12‑inch cast‑iron skillet over medium‑low heat. Add a tablespoon of butter and allow it to melt, swirling the pan to coat the surface. The pan should be hot but not smoking; a drop of water should sizzle and evaporate instantly. This temperature ensures even cooking and prevents the batter from sticking.
- Pour the Batter: Once the butter has melted, pour the entire batter into the skillet. Immediately tilt the pan to spread the batter into a uniform circle. The batter should spread to the edges without spilling over. This step is crucial: a too‑thin layer will cook too quickly, while a thick layer will stay raw in the center.
- First Cook: Let the pancake cook undisturbed for 6–8 minutes. The edges will lift, and you’ll see tiny bubbles forming on the surface. When the underside turns a deep golden brown and the top starts to set, flip the pancake. This is the moment of truth—watch the color shift; it should be a warm amber, not burnt.
- Second Cook: After flipping, cook the second side for another 4–6 minutes. The pancake should be golden brown on both sides, and the edges should curl slightly. If you’re adding a sweet topping, this is the time to drizzle honey or maple syrup over the hot surface; it will caramelize beautifully.
- Optional Finish: For a buttery finish, melt a tablespoon of butter in a small saucepan and brush it over the pancake’s surface. This step adds a glossy sheen and deepens the buttery flavor. If you prefer a savory version, sprinkle chopped herbs or grated cheese now.
- Rest the Pancake: Transfer the pancake to a wire rack and let it rest for 2 minutes. Resting allows the steam to redistribute, preventing the pancake from becoming soggy on the inside. It also gives the flavors time to meld.
- Serve Immediately: Slice the pancake into wedges or serve whole. Pair it with fresh berries, a dollop of whipped cream, or a spoonful of savory jam. The possibilities are endless, and each bite will remind you of that first glorious sizzle.
That’s it — you did it. But hold on, I've got a few more tricks that'll take this to another level…
Insider Tricks for Flawless Results
The Temperature Rule Nobody Follows
Many cooks think medium heat is enough, but the secret lies in medium‑low. A slightly lower temperature allows the batter to rise without burning the outside. I’ve seen pancakes that look golden on the surface but are raw inside when the heat is too high. Keep a small drop of water in the pan; if it sizzles and evaporates quickly, you’re at the right temperature. This trick ensures even cooking and a tender interior.
Why Your Nose Knows Best
When the pancake is halfway through cooking, a subtle aroma of toasted butter and vanilla will fill the kitchen. Trust that scent as a cue: it means the batter is setting properly. If you’re uncertain, lift a corner with a spatula; if it feels firm, you’re ready to flip. Relying on smell is a time‑tested method used by professional chefs worldwide.
The 5‑Minute Rest That Changes Everything
After flipping, let the pancake rest for 5 minutes before serving. This short pause allows the steam to redistribute, preventing a soggy center. A friend once skipped this step, and the pancake collapsed in the middle, ruining the texture. The rest period is simple but game‑changing.
Use a Heavy‑Duty Skillet
A cast‑iron skillet retains heat better than a non‑stick pan. This consistent heat ensures the batter cooks evenly and the edges caramelize beautifully. If you don’t have a cast iron, use a thick‑bottomed stainless steel pan and preheat it for a few extra minutes.
Keep the Batter Resting
Allowing the batter to sit for at least 10 minutes before cooking lets the flour fully absorb the liquid and the leavening agents activate. Skipping this step can result in a denser pancake that doesn’t rise. I’ve found that a rested batter also tastes more cohesive, with flavors melding together.
Creative Twists and Variations
This recipe is a playground. Here are some of my favorite ways to switch things up:
Berry Burst
Fold fresh blueberries or sliced strawberries into the batter before cooking. The berries burst with juice, adding a sweet, tart contrast to the buttery pancake. Serve with a drizzle of honey and a dusting of powdered sugar.
Savory Herb Delight
Replace vanilla with chopped fresh herbs—rosemary, thyme, or dill—and omit the lemon zest. After cooking, top with a spoonful of crème fraîche and a sprinkle of grated Parmesan. This version pairs wonderfully with smoked salmon or a poached egg.
Chocolate Indulgence
Add 2 tablespoons of cocoa powder to the dry mix for a chocolatey twist. Top with melted dark chocolate, whipped cream, and a few chocolate shavings. It’s a decadent dessert that feels indulgent yet surprisingly light.
Nutty Crunch
Stir in a handful of chopped walnuts or pecans into the batter. After cooking, sprinkle toasted nuts over the top and drizzle with maple syrup. The crunch adds a delightful textural contrast.
Spiced Autumn
Add 1 teaspoon of ground cinnamon and a pinch of nutmeg to the batter. Serve with a dollop of apple compote and a dusting of powdered sugar. This version captures the cozy essence of fall.
Low‑Carb Edition
Replace the all‑purpose flour with almond flour and reduce the sugar to 1 tablespoon. The pancake will be denser but still fluffy, making it a great option for keto or low‑carb diets. Pair with a sugar‑free jam for a sweet finish.
Storing and Bringing It Back to Life
Fridge Storage
Cool the pancake completely, then wrap tightly in plastic wrap and place in an airtight container. Store in the refrigerator for up to 3 days. When ready to eat, reheat in a skillet over low heat for 2 minutes on each side to restore crispness.
Freezer Friendly
Slice the pancake into wedges before freezing. Place the slices on a parchment‑lined tray and freeze until solid. Transfer to a freezer bag for long‑term storage (up to 2 months). Reheat in a microwave for 30 seconds, then finish in a skillet for a crisp exterior.
Best Reheating Method
Add a splash of milk or water to the pan before reheating; this steams the pancake back to a tender, moist interior. A quick sear on each side restores the golden crust, making it almost as good as freshly cooked.