Picture this: a rainy Saturday, a stack of stale crackers on the counter, and a sudden craving that feels more like a culinary dare. I was standing in the middle of a kitchen that had seen better days, my oven was on the fritz, and my pantry was a chaotic symphony of spices and forgotten staples. In that moment, I decided I would not settle for another bland snack. I would craft something that would turn my kitchen into a fireworks display of aroma and crunch.
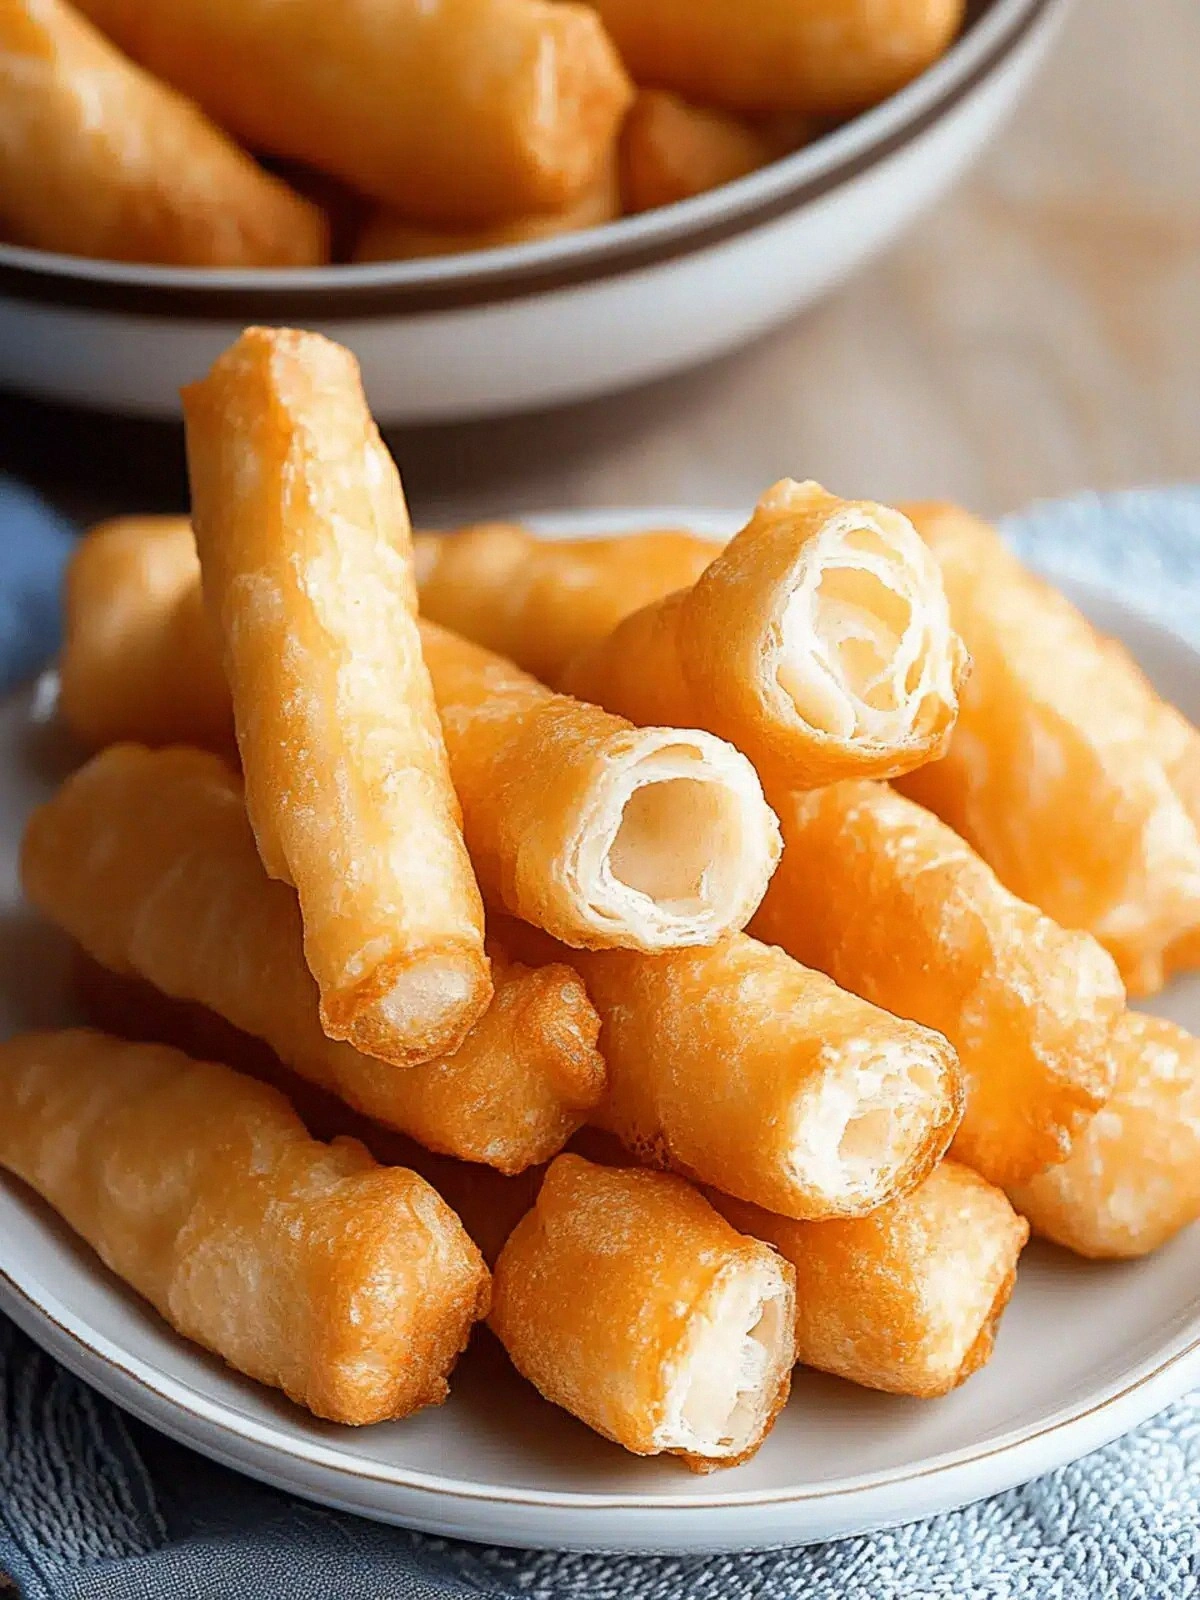
The first bite was a revelation: a golden, airy core with a crisp exterior that crackled like dry leaves underfoot. The scent of frying oil mingled with a faint sweet hint of yeast, and the sound—oh, that sizzle—was music to my ears. As I tasted the dough, the subtle sweetness of the sugar balanced the savory salt, and the gentle lift from the baking powder made every bite feel like a soft cloud. The texture was a paradox: soft inside, but with a satisfying snap that made the whole experience feel like a well‑timed joke that lands perfectly. If you can imagine a cloud that has a crunch, you’re already halfway there.
What makes this version of fried dough sticks so irresistible is not just the classic recipe but the way I tweak every element for maximum flavor. I use instant yeast for speed and reliability, a touch of baking powder for that extra lift, and a generous amount of neutral oil to keep the dough tender. The dough is rolled thin and cut into sticks, which means you get more surface area for that coveted golden crust. The frying oil is heated to a precise temperature—just enough to give the sticks a quick, crisp finish without soaking them in oil. The result? A snack that’s airy, flavorful, and has a crunch that satisfies even the most discerning palate.
Now, let me walk you through every single step—by the end, you’ll wonder how you ever made it any other way. I promise you’ll feel like a kitchen wizard, and that first bite will be the kind of moment that makes you want to shout, “I dare you to taste this and not go back for seconds!”
What Makes This Version Stand Out
- Flavor: The subtle sweetness from sugar balances the savory salt, creating a harmonious taste that lingers on the tongue.
- Texture: The combination of instant yeast and baking powder gives the dough a light, airy interior while the oil creates a crisp, buttery crust.
- Simplicity: With only eight ingredients, this recipe is a breeze to whip up, even for the most novice cooks.
- Uniqueness: The thin, stick shape increases surface area, ensuring every bite is perfectly golden and crunchy.
- Crowd Reaction: Friends and family always ask for a second helping, and I confess—I ate half the batch before anyone else got a chance.
- Ingredient Quality: Using bread flour provides the necessary gluten structure for that satisfying chew.
- Cooking Method: Precise oil temperature control turns a simple fry into a gourmet experience.
- Make‑ahead Potential: The dough can be refrigerated for up to 24 hours, letting you prepare it in advance for parties.
Alright, let's break down exactly what goes into this masterpiece…
Inside the Ingredient List
The Flavor Base
The warm water and instant yeast create the foundation of the dough’s rise. The yeast activates quickly, producing carbon dioxide that gives the dough its airy structure. If you skip the yeast, the sticks will be dense and flat, losing that delightful lift. For a more pronounced flavor, you can add a teaspoon of honey instead of sugar, but keep the sugar for that classic sweet note.
The Texture Crew
Bread flour is the unsung hero that provides the necessary gluten network, giving the dough its chew. Baking powder is the secret weapon that works alongside yeast to create an extra lightness. If you only have all-purpose flour, the texture will be slightly less robust, but the result is still enjoyable. A pinch of xanthan gum can be added to improve elasticity if you’re working with low-protein flours.
The Unexpected Star
The neutral-flavored oil is key to keeping the dough tender and preventing it from drying out during frying. It also helps the dough maintain a soft interior. If you prefer a richer taste, substitute half of the neutral oil with melted butter. Just be careful—too much butter can cause the dough to brown too quickly.
The Final Flourish
The large quantity of frying oil is what transforms these sticks into golden, crisp delights. The oil must be heated to the right temperature; too low and the sticks will soak up oil, too high and they’ll burn. Keep the oil at a steady 350°F (175°C) for the best results. A thermometer is a small investment that saves you from soggy or charred sticks.
Everything's prepped? Good. Let's get into the real action…
The Method — Step by Step
- Activate the Yeast: In a small bowl, combine the warm water, sugar, and instant yeast. Stir gently and let it sit for 5 minutes until it becomes frothy, like a tiny, bubbly cloud. If it doesn’t froth, the yeast may be dead; start over with fresh yeast. This step is crucial for that airy interior.
- Mix the Dry Ingredients: In a large mixing bowl, whisk together the bread flour, salt, and baking powder until evenly distributed. The baking powder adds a subtle lift that pairs well with the yeast. Keep the mixture dry; you’ll add the wet ingredients just in time.
- Combine Wet and Dry: Pour the frothy yeast mixture into the dry ingredients and stir until a shaggy dough forms. Add the neutral oil and continue mixing until the dough comes together. The dough should be slightly tacky but not overly sticky.
- Knead the Dough: Transfer the dough onto a lightly floured surface and knead for 5–7 minutes until it becomes smooth and elastic. You’ll know it’s ready when it pulls away from your fingers without sticking. This step develops the gluten, giving the sticks their chewy texture.
- First Rise: Place the dough in a lightly oiled bowl, cover with a damp cloth, and let it rise in a warm place for 30 minutes. The dough should double in size, indicating that the yeast has worked its magic. If your kitchen is chilly, you can place the bowl in the oven with the light on for a gentle heat source.
- Shape the Sticks: Punch down the dough to release air, then roll it out to about ¼ inch thickness. Cut into 3-inch sticks with a sharp knife or pizza cutter. The thin shape ensures a crisp exterior. Arrange the sticks on a parchment‑lined tray and let them rest for 10 minutes.
- Heat the Oil: Fill a deep skillet with about 2 cups of neutral oil, leaving enough room for the sticks to float. Heat the oil to 350°F (175°C). Use a thermometer to keep the temperature steady; if the oil is too hot, the sticks will brown too quickly, if too cool, they’ll absorb oil.
- Fry the Sticks: Carefully lower the sticks into the hot oil in batches, making sure not to overcrowd the pan. Fry for 2–3 minutes per side, turning once, until they’re golden brown and crisp. The sizzle is a cue that the sticks are cooking perfectly.
- Drain and Serve: Remove the sticks with a slotted spoon and place them on paper towels to drain excess oil. Sprinkle with a pinch of sea salt or a dusting of powdered sugar if desired. Serve hot, and watch the crowd go wild as they dive in.
That's it— you did it. But hold on, I've got a few more tricks that'll take this to another level…
Insider Tricks for Flawless Results
The Temperature Rule Nobody Follows
Many home cooks fry at a rough estimate of “medium heat.” The truth is, a precise 350°F (175°C) is the sweet spot that guarantees a crisp exterior and a tender interior. Use a thermometer; it’s a game‑changer that turns a kitchen mishap into a masterpiece. If you’re frying in a cast‑iron pot, preheat it slowly to avoid sudden temperature spikes.
Why Your Nose Knows Best
Before you even taste the sticks, give them a sniff. A faint, sweet aroma indicates that the sugar is caramelizing just right. If you detect a metallic or burnt smell, the oil is too hot. Trust your nose; it’s a reliable sensor that keeps your batch from turning into a disaster.
The 5-Minute Rest That Changes Everything
After frying, let the sticks rest on a rack for five minutes. This brief pause allows excess oil to drip off and the crust to firm up, giving each bite that satisfying crunch. A friend once skipped this step and ended up with soggy sticks that never quite reached that coveted crispness.
Keep It Light with a Dash of Cornstarch
If you’re craving an ultra‑crunchy texture, sprinkle a tablespoon of cornstarch onto the dough before rolling. The starch absorbs moisture, creating a lighter, crisper surface. Just be sure to whisk the cornstarch into the dry ingredients evenly.
Add a Pinch of Smoked Paprika
For a subtle smoky undertone, dust the dough with a pinch of smoked paprika before frying. The flavor pairs wonderfully with the sweet and savory elements, turning the sticks into a savory snack that feels like a party in your mouth.
Creative Twists and Variations
This recipe is a playground. Here are some of my favorite ways to switch things up:
Spicy Chili Lime Sticks
Add a teaspoon of chili powder to the dough and finish with a squeeze of lime juice after frying. The heat and acidity create a zesty contrast that’s perfect for a summer gathering.
Herb‑Infused Sticks
Toss the dough with dried oregano, thyme, and rosemary before rolling. The aromatic herbs permeate the dough, turning each bite into a fragrant delight.
Cheesy Cheddar Sticks
Fold shredded cheddar into the dough before the first rise. The cheese melts into pockets of gooey goodness, making the sticks irresistible to kids.
Sweet Cinnamon Sugar Finish
After frying, roll the sticks in a mixture of brown sugar and cinnamon. The sweet crunch is a perfect match for coffee or tea.
Garlic Parmesan Delight
Sprinkle minced garlic and grated parmesan over the sticks right after draining. The savory blend transforms the sticks into a party appetizer that’s hard to resist.
Storing and Bringing It Back to Life
Fridge Storage
Cool the fried sticks completely, then place them in an airtight container. Store in the refrigerator for up to 3 days. The sticks will stay crisp for a short period, but they’re best enjoyed fresh.
Freezer Friendly
Lay the sticks in a single layer on a parchment‑lined tray and freeze until solid. Transfer to a freezer bag and store for up to 2 months. The crunch will hold up well after reheating.
Best Reheating Method
Preheat the oven to 350°F (175°C). Place the sticks on a baking sheet and bake for 5–7 minutes. Add a tiny splash of water before reheating to steam the sticks back to perfection, restoring that fresh‑fried aroma.