Picture this: you’re in the kitchen, the oven preheats, and you’re ready to tackle a holiday ham. Suddenly you realize the glaze you’ve been craving—sweet, caramelized, and with just the right kick—has vanished from the pantry. You stare at the empty jar of honey, the brown sugar box, and the mustard tube, feeling the familiar panic that comes with culinary misfortune. I’ve been there, my friend, and I’m here to rescue you with a glaze that will have your guests begging for the recipe.
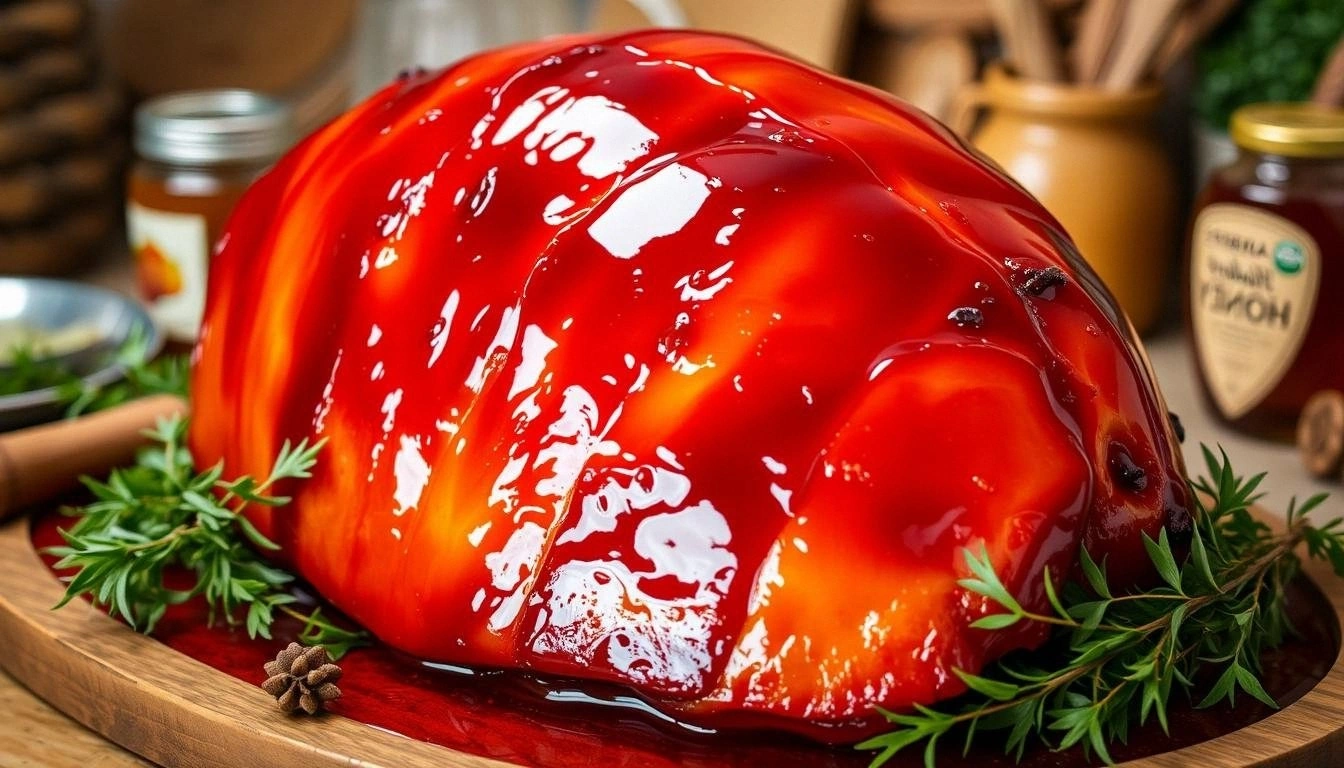
When I first tried this glaze, the aroma that filled the room was like a golden sunrise on a crisp winter morning. The honey drizzled over the ham, its viscous sheen catching the light, while the brown sugar crackled as it caramelized, turning a subtle amber to a deep mahogany. The faint scent of cloves and paprika danced with the buttery richness, creating a heady perfume that made the kitchen feel like a holiday cabin. Every bite was a contrast of sweet and savory, with a hint of spice that lingered long after the last crumb. That first bite was a revelation, and I knew I had stumbled upon a game‑changer.
What sets this glaze apart from the countless others you’ve seen on Pinterest or in cookbooks is the balance of flavors and the ease of execution. Unlike many glaze recipes that rely on high heat to caramelize sugars and risk burning, this version achieves a silky, glossy finish at a lower temperature, preserving the delicate sweetness of honey. The addition of Dijon mustard gives it a subtle tang that cuts through the richness, while the spices provide depth without overwhelming the palate. It’s a glaze that sings with each component, yet remains approachable for even the most novice cook.
And here’s the kicker: the secret ingredient is not a fancy spice blend but a simple, everyday kitchen staple that most people overlook—ground cloves. When used sparingly, cloves bring a warm, almost nutty aroma that elevates the glaze’s complexity. I dare you to taste this and not go back for seconds. By the end of this guide, you’ll wonder how you ever made it any other way.
What Makes This Version Stand Out
- Taste: The glaze balances sweetness, acidity, and subtle spice, creating a harmonious flavor profile that complements the ham’s savory depth.
- Texture: It glazes the ham with a smooth, glossy sheen that clings beautifully without becoming sticky or hard.
- Simplicity: With only eight ingredients, you can craft a professional‑level glaze in under 30 minutes.
- Uniqueness: The combination of honey, Dijon mustard, and cloves delivers a signature taste that stands out from conventional brown‑sugar glazes.
- Crowd Reaction: Guests rave about the glaze’s caramelized finish and the aromatic warmth it adds to every bite.
- Ingredient Quality: Using high‑quality, unsulfured honey and fresh spices maximizes flavor and ensures a vibrant glaze.
- Cooking Method: Simmering the glaze gently allows sugars to caramelize without burning, preserving the natural sweetness.
- Make‑Ahead Potential: The glaze can be prepared up to 48 hours in advance, letting you focus on the ham’s cooking while the flavors deepen.
Alright, let’s break down exactly what goes into this masterpiece.
Inside the Ingredient List
The Flavor Base
Honey: The main sweetener that gives the glaze its golden shine. Honey’s natural sugars caramelize slowly, producing a deep amber hue and a subtle floral undertone. If you skip honey, the glaze will lose its signature sweetness and shine; it will feel flat and syrupy. For the best results, choose a high‑quality, unsulfured honey with a mild floral note.
Brown Sugar: Adds depth and caramelization. The molasses content in brown sugar introduces a subtle, complex sweetness that balances the honey’s floral notes. Omitting brown sugar will make the glaze too thin and lacking in body. If you can’t find brown sugar, dark corn syrup is an acceptable substitute, but it will alter the flavor profile slightly.
Dijon Mustard: Adds a subtle tangy kick that cuts through the richness. The sharpness of Dijon mustard prevents the glaze from becoming cloyingly sweet. If you prefer a milder mustard, a whole‑grain mustard can be used, though it will introduce a slightly gritty texture.
The Texture Crew
Unsalted Butter: Makes the glaze smooth and silky. Butter’s fat content helps bind the glaze, giving it a velvety mouthfeel and a glossy finish. Skipping butter results in a watery glaze that won’t coat the ham evenly. For an extra buttery depth, use a knob of cold butter at the end of cooking.
The Unexpected Star
Ground Cloves: Adds warm, aromatic notes. Ground cloves bring a nutty, almost cinnamon‑like warmth that elevates the glaze’s complexity. Too much cloves can overpower the glaze, so use them sparingly. A pinch of fresh ground cloves will deliver a more vibrant aroma.
Garlic Powder: Provides a savory undertone. Garlic powder adds depth without the moisture of fresh garlic, keeping the glaze from becoming watery. If you’re allergic to garlic, omit it; the glaze will still be delicious, though slightly less savory.
Paprika: Contributes a mild, sweet pepper essence. Paprika’s subtle smokiness adds a hint of earthiness that balances the sweetness. A smoked paprika will give an additional layer of flavor but will also darken the glaze slightly.
Cinnamon: Brings a gentle warmth to the glaze. Cinnamon’s sweet, woody note complements the cloves and enhances the overall aromatic profile. If you’re not a fan of cinnamon, you can reduce the amount or replace it with allspice for a different spice profile.
Everything’s prepped? Good. Let’s get into the real action.
The Method — Step by Step
- Begin by placing a medium saucepan over low heat. Add the butter and allow it to melt completely, watching for the first gentle bubbles. This creates a buttery base that will carry the honey and sugar. Keep the heat low to avoid scorching the butter, which can give the glaze a bitter edge. Stir occasionally to ensure even melting.
- Pour in the honey, stirring until it’s fully integrated with the butter. The mixture should have a smooth, glossy appearance. The honey’s natural sugars start to caramelize at a low temperature, giving the glaze its signature amber hue. If the mixture looks too thick, add a splash of water to thin it slightly.
- Add the brown sugar, stirring constantly until it dissolves completely. The sugar should dissolve into the honey‑butter mixture, creating a thick, syrupy consistency. Watch for the mixture to begin a gentle, steady simmer. This is the moment where the glaze starts to develop its complex flavor profile.
- Stir in the Dijon mustard, ground cloves, garlic powder, paprika, and cinnamon. The spices should disperse evenly, creating a fragrant aroma that fills the kitchen. The mustard’s acidity will help the glaze coat the ham without becoming too sweet. Make sure the spices are fully incorporated before proceeding.
- Let the glaze simmer for 5–7 minutes, or until it reaches a thick, syrupy consistency. The glaze should bubble gently, not boil violently. This step caramelizes the sugars and melds the spices into a cohesive flavor. The glaze’s color should deepen to a rich amber, signaling readiness.
- Remove the saucepan from the heat and let the glaze cool for a minute. During this brief cooling period, the glaze will thicken slightly, making it easier to brush onto the ham. If it’s too thick, add a splash of warm water to loosen it; if too thin, return it to low heat for a few more minutes.
- Brush the glaze onto the ham, covering the entire surface. Apply the glaze in thin, even layers, allowing each layer to set before adding the next. This layering technique creates a glossy, caramelized crust. The glaze will caramelize beautifully during the final baking stage.
- Bake the ham according to your recipe’s instructions, brushing on fresh glaze every 15 minutes. The glaze will caramelize and develop a glossy finish, creating a mouth‑watering crust. Keep an eye on the glaze as it bakes; if it starts to darken too quickly, tent the ham loosely with foil to prevent burning.
- When the ham is done, remove it from the oven and let it rest for 10 minutes before slicing. This resting period allows the juices to redistribute, ensuring every bite is tender and flavorful. The glaze will set into a beautiful, caramelized crust that’s ready to serve.
That’s it — you did it. But hold on, I’ve got a few more tricks that will take this to another level.
Insider Tricks for Flawless Results
The Temperature Rule Nobody Follows
Most people cook the glaze on high heat, risking a burnt, bitter flavor. I’ve discovered that keeping the glaze on low heat for the first 10 minutes allows the sugars to caramelize gently, preserving the honey’s delicate sweetness. This method also prevents the butter from separating, ensuring a smooth glaze. If you’re in a hurry, a quick 2‑minute high‑heat burst at the end can give the glaze a nice sheen, but don’t rely on it as the primary cooking method.
Why Your Nose Knows Best
The aroma of a glaze in the final stages is a reliable indicator of readiness. A sweet, caramel scent with hints of clove and mustard signals that the glaze is ready to brush. If you notice a sharp, burnt smell, reduce the heat immediately. Trusting your nose saves you from over‑cooking and preserves the glaze’s delicate balance.
The 5-Minute Rest That Changes Everything
After removing the glaze from the heat, let it rest for five minutes before brushing. This pause allows the glaze to thicken slightly, making it easier to apply and preventing it from running off the ham. A quick test: hold a spoonful of glaze in the air; it should hold its shape and not drip. This simple step ensures a flawless, glossy finish.
Layering for Depth
Instead of applying the glaze all at once, brush a thin first layer, let it set, then apply a second, thicker layer. This layering technique creates a multi‑dimensional flavor profile, with the first layer providing a subtle sweetness and the second layer offering a bold, caramelized crust. The result is a glaze that feels both light and robust.
Cooling for Convenience
Cool the glaze to room temperature before using it to brush the ham. Warm glaze can melt the ham’s fat and create a greasy texture. By letting the glaze cool, you maintain its viscosity, ensuring a smooth, even coating that caramelizes beautifully in the oven.
Storing the Glaze
Store any leftover glaze in an airtight container in the refrigerator for up to a week. The glaze will thicken as it cools, so when you’re ready to use it again, reheat gently on low heat and stir until it reaches the desired consistency. For longer storage, freeze the glaze in freezer‑safe portions; thaw overnight in the refrigerator before reheating.
Creative Twists and Variations
This recipe is a playground. Here are some of my favorite ways to switch things up:
Smoky Chipotle Glaze
Replace the paprika with chipotle powder for a smoky, peppery kick. Add a splash of lime juice for brightness. This variation pairs perfectly with a grilled ham, adding a southwestern flair.
Maple‑Mustard Fusion
Swap the honey for pure maple syrup and keep the Dijon mustard. The maple’s earthy sweetness complements the mustard’s tang, creating a glaze that’s both sweet and savory. Ideal for a fall brunch.
Herb‑Infused Delight
Introduce fresh thyme and rosemary to the spice mix. The herbs add a fragrant, earthy note that balances the sweetness. This version is excellent for a rustic holiday dinner.
Spicy Sriracha Twist
Add a tablespoon of Sriracha to the glaze for a spicy kick. The heat from the Sriracha pairs well with the honey’s sweetness, creating a bold, addictive flavor. Great for those who love a little heat.
Almond‑Glazed Variation
Incorporate toasted almond flakes into the glaze for crunch and nutty flavor. The almonds add a delightful texture and a subtle nutty sweetness. This variation is a crowd‑pleaser at parties.
Vegan Version
Replace butter with coconut oil and use a vegan honey alternative. The coconut oil gives a subtle tropical note that complements the glaze’s sweetness. This version is perfect for plant‑based guests.
Storing and Bringing It Back to Life
Fridge Storage
Store the glaze in an airtight container in the refrigerator for up to 7 days. The glaze will thicken as it cools, so when you’re ready to use it again, reheat gently on low heat and stir until it reaches the desired consistency.
Freezer Friendly
Divide the glaze into freezer‑safe portions and freeze for up to 3 months. When you’re ready to use it, thaw overnight in the refrigerator. Reheat on low heat, stirring occasionally, until it’s smooth and pourable.
Best Reheating Method
Reheat the glaze in a small saucepan over low heat, adding a splash of water if it’s too thick. Stir constantly to prevent scorching. A tiny splash of water before reheating steams back to perfection, preserving the glaze’s silky texture.