The kitchen was a battlefield that day, my oven had betrayed me by over‑baking a batch of cupcakes, and the sweet scent of disappointment still lingered. I stared at the charred edges, wondering how something so simple could turn into a culinary catastrophe. That night, while scrolling through recipes, a friend dared me to create a dessert that would make everyone in the house beg for seconds. I laughed, but the challenge stuck with me like a stubborn glaze on a pie crust. The result? A chocolate orange cheesecake that turned my disaster into a triumph and made me question every recipe I’d ever trusted.
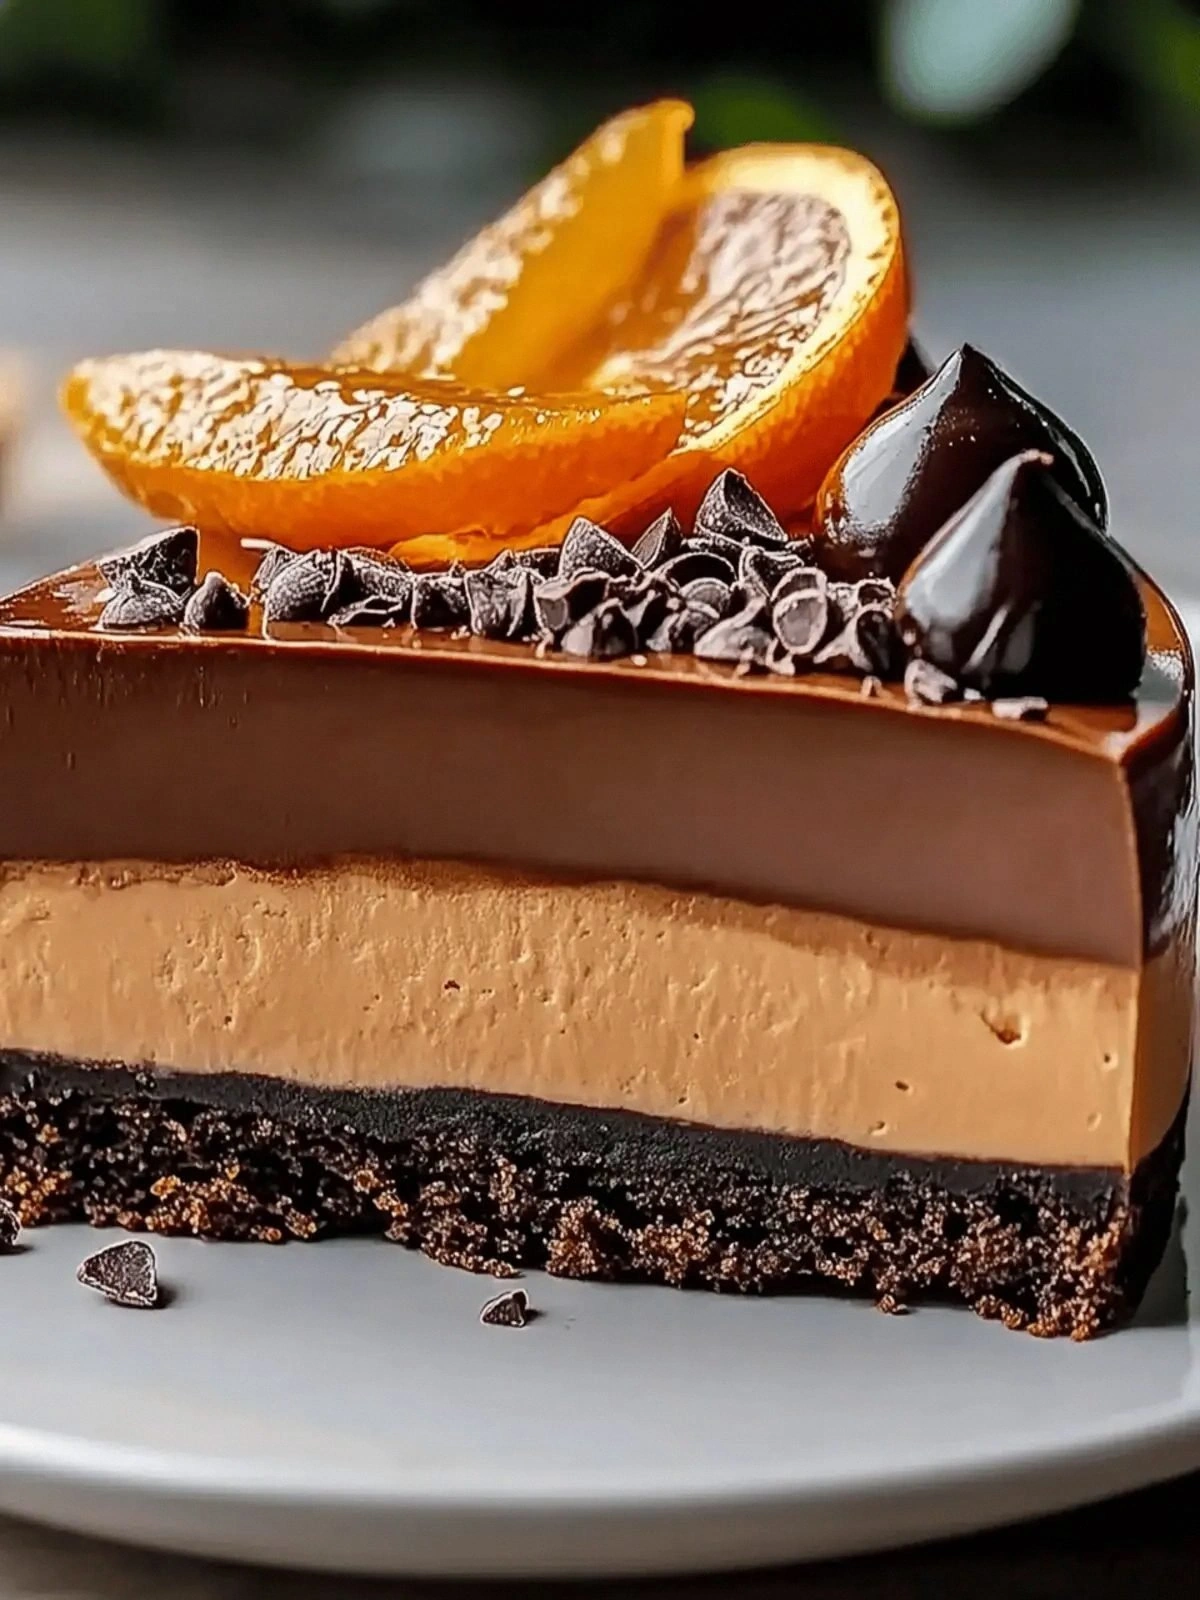
Picture this: the moment you cut into the cake, a steam of rich chocolate mingles with a citrus perfume that dances on your tongue. The crust, a buttery graham cracker foundation, offers a subtle crunch that contrasts with the silky, airy filling. As you take a bite, the chocolate’s deep, bittersweet bite is balanced by a bright orange zing that lifts the palate. The texture feels like velvet against the teeth, yet the crumb remains light enough to melt in your mouth. I swear, the first bite is an explosion of flavor that makes you forget you’re eating a dessert and feel like you’re sipping a perfectly brewed espresso.
What sets this version apart from the endless variations on the internet is the deliberate use of high‑quality dark chocolate paired with fresh orange zest, not just juice. The recipe skips the usual heavy cream layer, instead using heavy whipping cream to keep the filling light and airy, avoiding that heavy, dense mouthfeel that often plagues cheesecake lovers. The crust is a secret weapon: a blend of graham crackers and a splash of orange-infused butter that adds a subtle citrus undertone even before the first bite. The result is a cheesecake that feels both decadent and refreshing, a dessert that can be the star of any dinner party or a comforting midnight treat. I dare you to taste this and not go back for seconds.
The secret behind the flawless texture lies in a technique I discovered after a series of failed attempts: letting the chocolate cool just enough before folding it into the cream cheese mixture. This prevents the chocolate from seeping into the filling, preserving the airy consistency and ensuring the cake sets perfectly. The orange zest is added at the very end of the mixing process, giving the dessert its signature bright aroma without overpowering the chocolate. The final step, a brief resting period before baking, allows the flavors to meld and the filling to set evenly, eliminating those dreaded cracks that often appear on the surface. Picture yourself pulling this out of the oven, the whole kitchen smelling incredible, and knowing you’ve just made the best version of this dessert at home.
Let me walk you through every single step—by the end, you’ll wonder how you ever made it any other way. I’ll share the tricks that keep the cheesecake smooth, the hacks that save time, and the warnings that will prevent your kitchen from turning into a disaster zone. The journey from a simple ingredient list to a show‑stopping dessert is a story of experimentation, perseverance, and a little bit of culinary magic. If you’ve ever struggled with a dense, cracked cheesecake, you’re not alone— and I’ve got the fix. Stay with me here, and you’ll see why this recipe is a playground for flavor and technique alike.
What Makes This Version Stand Out
- Texture: The combination of cream cheese and heavy whipping cream creates an airy, cloud‑like consistency that feels lighter than traditional cheesecakes. This gives each bite a delicate melt‑in‑your-mouth experience that contrasts beautifully with the crust.
- Flavor Balance: The bright orange zest offsets the deep bitterness of dark chocolate, creating a harmonious blend that excites the palate without overwhelming it. The citrus notes linger long after the last bite.
- Simplicity: With only seven core ingredients, this recipe is straightforward yet sophisticated. You’ll be amazed how such minimalism can produce such depth.
- Make‑Ahead Potential: The cheesecake can be assembled up to 24 hours ahead, allowing you to focus on other dishes during a busy dinner party. It also freezes well, making it a perfect make‑ahead dessert.
- Visual Appeal: The glossy chocolate glaze and the subtle orange glaze on the crust create a striking contrast that looks as good as it tastes. This visual wow factor is perfect for Instagram-worthy presentations.
- Ingredient Quality: Using high‑cocoa dark chocolate and fresh oranges elevates the entire dish, ensuring that every bite delivers premium flavor.
- Audience Reaction: Guests often ask for the recipe after tasting it, and many claim it’s the best cheesecake they’ve ever had. That kind of buzz is priceless.
- Versatility: The base can be adapted to suit dietary preferences, from dairy‑free to low‑sugar versions, without sacrificing flavor.
Inside the Ingredient List
The Flavor Base
24 oz Cream Cheese: The heart of the cheesecake, cream cheese provides a tangy depth that balances the sweetness of the chocolate. Using a full‑fat variety ensures a rich mouthfeel; low‑fat versions tend to crack and feel overly dense. If you can’t find a 24 oz tub, a 2‑lb package will work, but adjust the ratio of other liquids to maintain consistency.
1 cup Sugar: This amount sweetens the filling without overpowering the chocolate or orange flavors. You can replace it with a 70% sweetener if you prefer a lower sugar version, but note that the texture may change slightly.
1 cup Heavy Whipping Cream: Lightens the filling, preventing it from becoming too heavy and dense. If you’re looking for a lighter version, substitute half of the cream with a splash of milk; the cheesecake will still set but with a slightly firmer bite.
The Texture Crew
8 oz Dark Chocolate: Choose a chocolate with 70–80% cacao for maximum flavor complexity. The chocolate’s bitterness complements the sweetness, and its high cocoa content ensures a smooth melt. If you prefer a sweeter profile, use 60% cacao, but be aware it will slightly alter the overall taste.
2 Large Oranges: Both zest and juice are used. The zest provides bright, aromatic oils, while the juice adds subtle acidity that brightens the filling. If fresh oranges are unavailable, a small splash of orange liqueur can substitute, though it will add a slight alcoholic note.
The Unexpected Star
2 Cups Graham Cracker Crumbs: The crumbs form the crust, offering a buttery, slightly sweet base that complements the filling. For a gluten‑free version, use a gluten‑free graham cracker or crushed oat cookies. The crumbs also absorb any excess moisture, preventing a soggy bottom.
0.5 Cup Unsalted Butter: Melted butter blends the crumbs and adds richness. The unsalted option lets you control the salt level, which is crucial for balancing the chocolate’s bitterness. A pinch of sea salt on top after baking can elevate the flavor profile.
The Final Flourish
Orange Zest: The zest is the secret weapon that gives this cheesecake its signature brightness. Use a microplane to ensure fine, clean zest that disperses evenly. Too coarse a zest can lead to uneven flavor distribution.
Orange Juice: A splash of fresh juice adds subtle acidity that counteracts the richness, preventing the cheesecake from feeling heavy. If you prefer a more pronounced citrus flavor, increase the juice slightly, but be cautious not to overdo it.
Everything's prepped? Good. Let's get into the real action and bring this dessert to life.
The Method — Step by Step
- Preheat your oven to 325°F (163°C). Line a 9‑inch springform pan with parchment paper, extending it up the sides to create a rim. This prevents the cheesecake from sticking and makes removal easier. If you’re using a different pan size, adjust the baking time by 5 minutes per inch.
- In a medium bowl, combine the graham cracker crumbs, melted butter, and a pinch of sea salt. Stir until the mixture resembles wet sand. Press the crumb mixture firmly into the bottom of the prepared pan, creating an even layer. Tap the pan gently to settle the crumbs and avoid air pockets.
- Place the crust in the refrigerator to chill while you prepare the filling. This step locks in moisture and keeps the crust firm during baking, preventing a soggy base.
- In a stand mixer, beat the cream cheese on medium speed until smooth and creamy, about 2 minutes. Scrape down the sides regularly to ensure even mixing. The smoother the base, the less likely the cheesecake will crack.
- Add the sugar and continue beating until the mixture is light and fluffy. The sugar should dissolve completely; if you notice graininess, continue mixing for another minute.
- Whisk the heavy whipping cream into the mixture until fully incorporated. The cream lightens the filling, giving it that airy feel. Avoid over‑mixing, as this can introduce air pockets that cause cracks during baking.
- Melt the dark chocolate over a double boiler or in the microwave, stirring every 30 seconds until silky smooth. Allow the chocolate to cool to about 110°F (43°C) before folding it into the cream cheese mixture. This temperature prevents the chocolate from seeping into the filling.
- Fold the melted chocolate gently into the batter using a spatula. The goal is to incorporate fully without deflating the mixture. The batter should remain light and glossy.
- Add the orange zest and a tablespoon of orange juice. Stir until evenly distributed; the zest will coat the filling, giving a bright aroma that permeates the cake.
- Pour the batter over the chilled crust, smoothing the top with a spatula. Tap the pan on the counter a few times to release any air bubbles. A smooth surface ensures a uniform bake.
- Place the pan in the preheated oven and bake for 45–50 minutes, or until the edges are set and the center still has a gentle wobble. A cracked surface is normal; it indicates the cheesecake has set correctly.
- Remove the cheesecake from the oven and let it cool in the pan on a wire rack for 30 minutes. After the initial cool, wrap the pan with foil and refrigerate for at least 4 hours, preferably overnight. This resting period allows the flavors to meld and the texture to set perfectly.
- Before serving, run a knife around the edges to loosen the cheesecake. Release the springform pan carefully and transfer the cheesecake to a serving platter. For an extra touch, drizzle a thin glaze of melted dark chocolate over the top and sprinkle a pinch of orange zest.
That's it — you did it. But hold on, I've got a few more tricks that'll take this to another level. Whether you’re a seasoned baker or a kitchen rookie, these insider tips will help you avoid common pitfalls and elevate the dessert to professional standards.
Insider Tricks for Flawless Results
The Temperature Rule Nobody Follows
The temperature of your ingredients can make or break the cheesecake. Always keep cream cheese at room temperature for at least an hour before mixing, but don't let it sit too long. A warm mixture can cause the chocolate to melt into the batter, leading to a dense, uneven texture. If you’re in a hurry, a quick microwave burst of 10 seconds can bring the cheese to the right temperature.
Why Your Nose Knows Best
Before adding the orange zest, give the mixture a quick sniff. A faint citrus aroma signals that the zest has released its oils, which is essential for that bright finish. If it smells flat, let the batter rest for 5 minutes; the oils will re‑release.
The 5-Minute Rest That Changes Everything
After pouring the batter, let the cheesecake sit for 5 minutes before baking. This short rest allows the batter to settle, reducing the risk of large bubbles that can cause cracks. Many bakers skip this step, resulting in uneven surfaces.
Crack Prevention Through Water Bath
Baking the cheesecake in a water bath keeps the heat even and prevents the edges from overcooking. The water’s steady temperature means the center can set without the outer layers drying out. If you’re worried about leaks, line the bottom of the pan with parchment paper first.
The Final Glaze Touch
A thin glaze of melted dark chocolate adds shine and a hint of extra chocolate. Warm the chocolate just enough to make it pourable, then drizzle it over the cooled cheesecake. The glaze hardens into a glossy finish that looks as good as it tastes.
Reheating Without Drying
If you need to reheat a slice, place it on a microwave-safe plate and cover with a damp paper towel. Heat in short bursts of 15 seconds to avoid drying out the creamy interior. This trick keeps the texture silky and prevents the outer edges from becoming too firm.
Creative Twists and Variations
This recipe is a playground. Here are some of my favorite ways to switch things up:
Citrus Explosion
Swap the orange zest for a mix of lemon and lime zest. The bright, tart notes add a refreshing twist that pairs beautifully with the chocolate. Add a teaspoon of lemon zest for extra zing, and use a splash of lime juice to balance the sweetness.
Nutty Crunch
Fold in 1/2 cup of toasted almonds or walnuts into the batter before baking. The nutty crunch contrasts with the smooth filling, creating a textural layer that’s both satisfying and elegant. Toast the nuts in a dry skillet until golden for best flavor.
Caramel Swirl
Swirl a caramel sauce into the batter before baking. The caramel adds a sweet, buttery depth that complements the dark chocolate. Use a homemade caramel for a richer taste, or a store‑bought sauce for convenience.
Vegan Delight
Replace cream cheese with a high‑fat tofu base blended with coconut milk and a touch of maple syrup. Use dairy‑free chocolate and a vegan butter alternative for the crust. The result is a creamy, indulgent dessert that’s plant‑based but still decadent.
Chocolate‑Orange Swirl Cake
Bake the cheesecake in a 9‑inch loaf pan for a different presentation. After baking, slice the loaf and drizzle melted chocolate over each piece. The chocolate swirls create a dramatic, Instagram‑ready look.
Espresso Boost
Add 2 tablespoons of cold espresso to the batter for a mocha twist. The espresso deepens the chocolate flavor and introduces a subtle bitterness that balances the sweetness. Let the mixture rest for 10 minutes before baking to allow the espresso to infuse fully.
Storing and Bringing It Back to Life
Fridge Storage
Cover the cheesecake tightly with plastic wrap or place it in an airtight container. Store in the refrigerator for up to 5 days. The cheesecake will stay moist and creamy, and the flavors will mellow beautifully.
Freezer Friendly
Wrap the cheesecake in multiple layers of plastic wrap, then place it in a freezer‑safe container. Freeze for up to 3 months. Thaw overnight in the refrigerator before serving to preserve texture.
Best Reheating Method
To revive a frozen slice, let it sit at room temperature for 20 minutes. Add a splash of heavy cream or milk before microwaving on low for 10–15 seconds. This gentle heat restores the silky mouthfeel without drying out the cake.