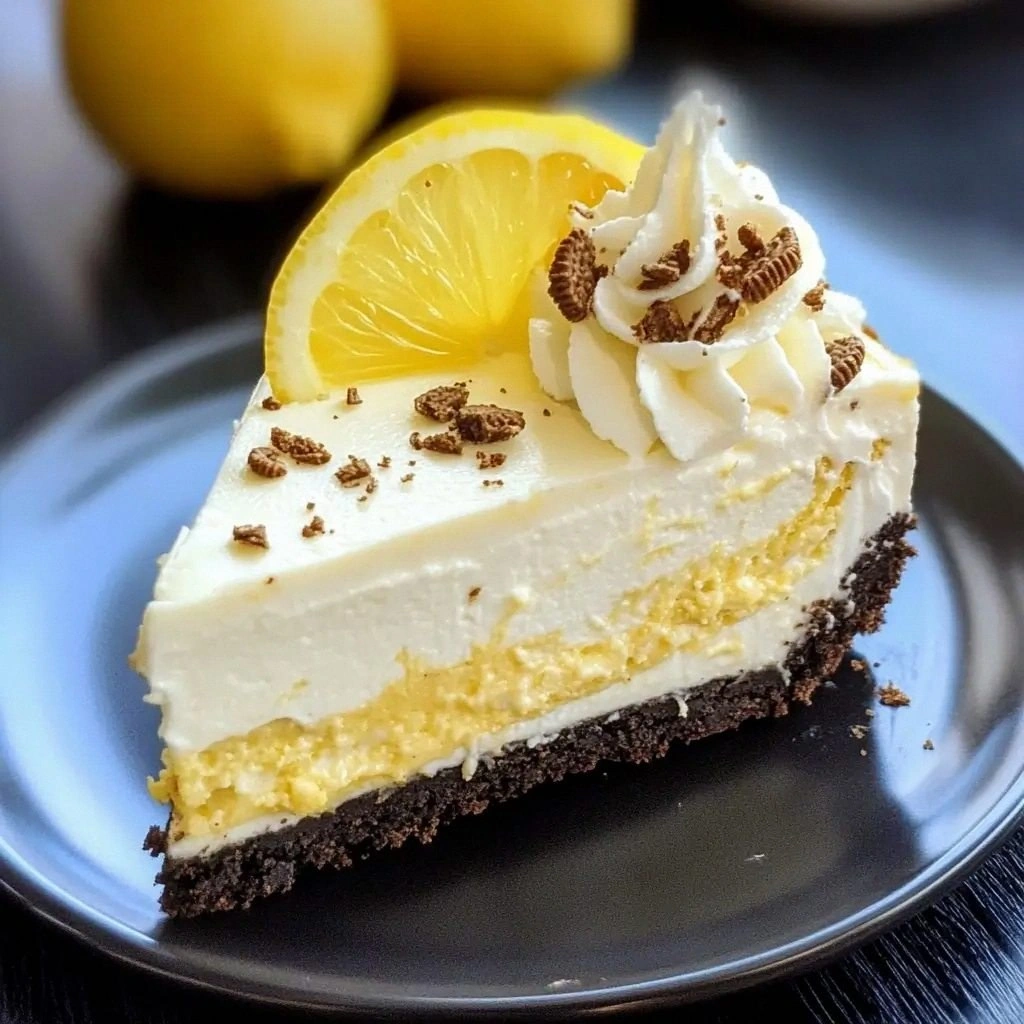
I was halfway through a week of bland, forgettable desserts when the kitchen lights flickered and a sudden craving for something tangy and indulgent hit me like a summer storm. I stared at my fridge, half expecting a plain chocolate cake, but the only thing that seemed to promise a flavor explosion was a box of Oreos and a bottle of fresh lemon juice. “Why not combine the two?” I muttered, and the idea settled in my mind like a perfect recipe waiting to be written. The result? A lemon‑Oreo cheesecake that balances zesty brightness with rich, creamy decadence in a way that makes every bite feel like a mini celebration.
Picture this: the buttery crust crackles under your fork, revealing a swirl of golden, citrusy filling that tastes like sunshine on a cloudy day. The air is thick with the buttery aroma of melted butter and crushed cookies, while the sharp scent of lemon zest cuts through the sweetness like a well‑placed guitar solo. As you cut into the cheesecake, the thick, velvety texture gives way to a light, airy finish, and the subtle crunch of Oreo crumbs adds a satisfying contrast. The first bite is a harmonious blend of sweet, tart, and slightly salty, each note dancing on your palate with a confidence that says, “I’ve got this.”
What makes this version stand out from every other recipe you’ll find online? It’s not just the combination of flavors—it’s the meticulous attention to texture, the balance of sweetness, the use of fresh ingredients, and a few secret tweaks that elevate it to a new level of indulgence. I’ve spent countless hours tweaking crust thickness, adjusting the ratio of cream cheese to yogurt, and mastering the perfect bake time so that the center remains silky while the edges set just right. The result is a cheesecake that feels like a dessert you’d reserve for special occasions, yet it’s simple enough to whip up on a weekday night. If you’ve ever struggled with a cheesecake that turns out too dense or too runny, you’re not alone—this recipe is designed to solve those problems once and for all.
And there’s a twist you won’t see in most tutorials: a splash of espresso powder that deepens the chocolate undertones of the Oreos and a dash of sea salt that amplifies the lemon’s brightness. These subtle additions give the cheesecake a professional edge that feels both sophisticated and approachable. I dare you to taste this and not go back for seconds; the layers of flavor will keep you coming back for more. Let me walk you through every single step—by the end, you’ll wonder how you ever made it any other way.
What Makes This Version Stand Out
- Flavor Balance: The harmony between sharp lemon zest and the creamy richness of cream cheese creates a taste profile that is both refreshing and indulgent. The subtle chocolate undertone from the Oreos adds depth without overpowering.
- Texture Mastery: A buttery, crunchy crust that provides a satisfying bite, while the filling is silky yet holds its shape—no gooey mess, no dry spots.
- Simplicity: With only a handful of ingredients and a straightforward process, you can achieve a show‑stopping dessert without the need for fancy equipment.
- Uniqueness: The espresso infusion and sea salt twist set this cheesecake apart from standard recipes, giving it a gourmet feel.
- Crowd‑Pleaser: Whether you’re serving a family dinner or a party, guests will rave about the bright citrus notes and the chocolatey crunch.
- Ingredient Quality: Using high‑quality cream cheese and fresh lemons ensures the best flavor extraction and overall mouthfeel.
- Make‑Ahead Friendly: The cheesecake can be prepared a day in advance and refrigerated, making it perfect for busy schedules.
- Visual Appeal: The glossy lemon glaze and Oreo shards on top create a stunning presentation that looks as good as it tastes.
Alright, let's break down exactly what goes into this masterpiece. And before we dive in, here’s a quick kitchen hack to streamline your prep.
Inside the Ingredient List
The Flavor Base
The foundation of this cheesecake begins with the crust, which is a blend of crushed Oreo cookies, powdered sugar, and melted butter. Each component plays a role: the Oreos provide a chocolatey crunch, the powdered sugar adds a hint of sweetness, and the butter binds everything together, giving the crust a buttery snap. If you skip the butter, the crust becomes dry and crumbly; the binding is essential for a cohesive base.
Next, the filling’s core is built around cream cheese, which offers a velvety texture and a rich, tangy base that balances the lemon’s brightness. The cream cheese must be softened to room temperature; otherwise, the batter will develop lumps, compromising the silky mouthfeel. For those who prefer a lighter option, swapping half the cream cheese for Greek yogurt adds protein and a subtle tang, but the texture will shift slightly.
The sugar in the filling sweetens the cream cheese while helping to stabilize the mixture. If you reduce the sugar too much, the cheesecake may turn out too tart for most palates, whereas an excess can cause the batter to be overly sweet and heavy. The eggs act as a binder, giving the cheesecake structure; they also introduce a delicate fluffiness when beaten properly. Be careful not to overmix once the eggs are added, as that can incorporate too much air and lead to cracks.
The Texture Crew
The addition of heavy cream and a touch of all‑purpose flour in the filling helps achieve that signature cheesecake consistency—smooth, but firm enough to slice cleanly. The heavy cream introduces richness and a slight glossy sheen, while the flour acts as a mild thickener, preventing the cheesecake from becoming too loose. If you’re aiming for a gluten‑free version, you can replace the flour with cornstarch, but be aware that the texture will shift slightly.
Fresh lemon juice and zest bring the zing that cuts through the richness, creating a balanced flavor profile. The juice’s acidity not only brightens the taste but also helps in setting the cheesecake slightly faster. The zest adds aromatic oils that give the dessert an intense citrus scent; omitting it will leave the cheesecake feeling flat. For an extra layer of flavor, a teaspoon of espresso powder can be added, which deepens the chocolate notes from the Oreos without altering the lemon’s brightness.
The Unexpected Star
A pinch of sea salt is the secret ingredient that elevates this cheesecake from good to unforgettable. Salt enhances the sweetness and sharpness of the lemon, while also bringing out the chocolate undertones from the Oreo crust. Skipping the salt will result in a bland, one‑dimensional dessert that fails to excite the palate. If you prefer a sweeter profile, replace the sea salt with a pinch of sugar, but be prepared for a sweeter, less balanced outcome.
The Final Flourish
A drizzle of lemon glaze on top not only adds a glossy, professional finish but also reinforces the citrus theme. The glaze is simply lemon juice thickened with a touch of cornstarch and powdered sugar; it sets into a smooth, glossy layer that contrasts beautifully with the crunchy crust. If you want to add a bit of visual drama, scatter a few whole Oreo cookies on top before baking; they’ll brown slightly and add texture. Finally, the optional garnish of fresh mint leaves provides a refreshing aroma that makes the dessert feel even more luxurious.
Everything's prepped? Good. Let's get into the real action.
The Method — Step by Step
- Preheat your oven to 325°F (160°C). Line a 9‑inch springform pan with parchment paper, extending it up the sides. This ensures a clean release later. While the oven heats, gather all your ingredients so you can keep the process smooth and uninterrupted.
- In a medium bowl, combine the crushed Oreo cookies, powdered sugar, and melted butter. Stir until the mixture is evenly moist and clumps together like damp sand. Press the mixture firmly into the bottom of the prepared pan, using the back of a spoon to create an even crust. This is the moment where your hands feel the crumbly texture; it’s almost like creating a miniature cookie dough.
- Set the crust aside while you prepare the filling. In a large mixing bowl, beat the softened cream cheese until smooth and creamy. Use an electric mixer on medium speed for about 2 minutes to break down any lumps. If you notice any dry patches, add a teaspoon of heavy cream to help it smooth out.
- Add the granulated sugar and continue beating until the mixture is pale and fluffy. The batter should have a light, airy appearance. At this point, incorporate the eggs one at a time, ensuring each is fully blended before adding the next. This gradual addition prevents curdling and keeps the batter silky.
- Fold in the sour cream, heavy cream, all‑purpose flour, and vanilla extract. Mix gently with a spatula, just until everything is incorporated. Be careful not to overmix; you want the batter to remain smooth and glossy. The flour’s role here is to provide a subtle structure that holds the cheesecake together.
- Whisk in the fresh lemon juice, lemon zest, espresso powder, and sea salt. The citrus and espresso create a complex flavor profile that will linger on the tongue. The salt’s role is crucial—it enhances the sweetness and balances the lemon’s acidity. Stir until the mixture is uniform; it should have a slightly translucent sheen.
- Pour the batter over the crust, smoothing the top with a spatula. Tap the pan gently on the counter to release any air bubbles and ensure even distribution. The batter should sit on top of the crust like a calm pond, ready to set into a perfect cheesecake.
- Place the springform pan in the oven and bake for 45 minutes, or until the edges are set and the center still has a slight wobble. The center should be just barely jiggly—this is the sweet spot for a creamy interior. If you’re unsure, perform the “tap test”: tap the pan lightly; if the center doesn’t move, it’s overbaked.
- Once baked, turn off the oven and crack the door open. Let the cheesecake cool in the oven for 1 hour with the door slightly ajar. This gradual cooling prevents the cheesecake from cracking due to sudden temperature changes. The slow cool down also allows the flavors to meld beautifully.
- After the hour, remove the cheesecake from the oven and let it cool completely at room temperature. Then refrigerate for at least 4 hours, preferably overnight, to allow the cheesecake to set fully and the flavors to deepen. During this time, the glaze will thicken, giving the top a glossy, professional finish.
- Before serving, drizzle the prepared lemon glaze over the top. The glaze should be poured in a thin stream, creating a glossy, citrusy sheen. Garnish with a few whole Oreo cookies and fresh mint leaves for an extra pop of color and aroma. Slice carefully with a warm knife, wiping the blade between cuts for clean slices.
That's it — you did it. But hold on, I've got a few more tricks that'll take this to another level.
Insider Tricks for Flawless Results
The Temperature Rule Nobody Follows
Many bakers think room temperature ingredients are enough for a smooth batter, but the secret lies in the temperature of the oven itself. Baking at a steady 325°F ensures that the cheesecake sets slowly and evenly. If your oven runs hot, consider using an oven thermometer to verify the actual temperature. This simple check can save you from a cracked, uneven dessert.
Why Your Nose Knows Best
During the baking process, the smell of the lemon and chocolate will intensify. Trust your nose as a guide: when the aroma is citrusy and slightly sweet with a hint of chocolate, you’re close to perfection. If the scent is too faint, the cheesecake may still be undercooked; if it’s overpoweringly sweet, it might be overdone.
The 5-Minute Rest That Changes Everything
After turning off the oven, let the cheesecake rest for exactly 5 minutes before opening the door. This brief pause allows the heat to distribute evenly, preventing sudden temperature shocks that cause cracks. Many people skip this step, which leads to uneven results.
Cool, Then Chill
Once the cheesecake has cooled to room temperature, refrigerate it for at least 4 hours. This chilling period allows the flavors to meld and the texture to firm up. If you’re in a hurry, a 2‑hour chill will suffice, but for the best mouthfeel, overnight is ideal.
Glaze Timing Is Everything
The lemon glaze should be prepared while the cheesecake is still warm. Pouring the glaze over a hot cheesecake helps it set into a glossy finish. If you wait too long, the glaze may become too thick and difficult to spread.
Serving Trick
When slicing, use a warm knife dipped in hot water and wiped dry. This prevents the cheesecake from sticking to the blade and ensures clean, even slices. A dull blade can crush the delicate layers, ruining the presentation.
Creative Twists and Variations
This recipe is a playground. Here are some of my favorite ways to switch things up:
Chocolate‑Lemon Swirl
Swirl melted dark chocolate into the batter before pouring it over the crust. The chocolate creates a marbled effect and adds a rich, bittersweet contrast to the bright lemon.
Berry Burst
Fold in fresh blueberries or raspberries into the batter. The berries add a juicy burst of flavor and a pop of color, turning the cheesecake into a fruit‑filled masterpiece.
Espresso‑Infused Delight
Increase the espresso powder to 2 teaspoons and add a tablespoon of instant espresso. The coffee flavor deepens the chocolate undertones, making this version a perfect dessert for coffee lovers.
Vanilla‑Oreo Fusion
Replace half of the cream cheese with mascarpone and add vanilla bean paste. The result is a lighter, creamier cheesecake with a subtle vanilla undertone that balances the lemon.
Almond‑Crunch Variation
Crush a handful of toasted almonds and fold them into the batter. The almonds add a nutty crunch and a subtle earthy flavor that pairs wonderfully with the lemon.
Salted Caramel Drizzle
Drizzle salted caramel over the finished cheesecake for a sweet‑salty twist. The caramel adds a buttery sweetness that complements the lemon’s tartness.
Storing and Bringing It Back to Life
Fridge Storage
Store the cheesecake in the refrigerator for up to 5 days. Keep it in an airtight container to prevent it from absorbing odors from other foods. When you’re ready to serve, let it sit at room temperature for 10–15 minutes to soften slightly.
Freezer Friendly
To freeze, wrap the cheesecake tightly in plastic wrap, then place it in a freezer bag. It can be stored for up to 3 months. Thaw overnight in the refrigerator before serving. A quick dip in the microwave can also bring it back to a creamy state.
Best Reheating Method
Reheat a slice in the microwave on low power for 15–20 seconds, or warm it in a 300°F oven for 5 minutes. Add a tiny splash of water before reheating; this steams the cheesecake back to its original silky texture, preventing it from drying out.