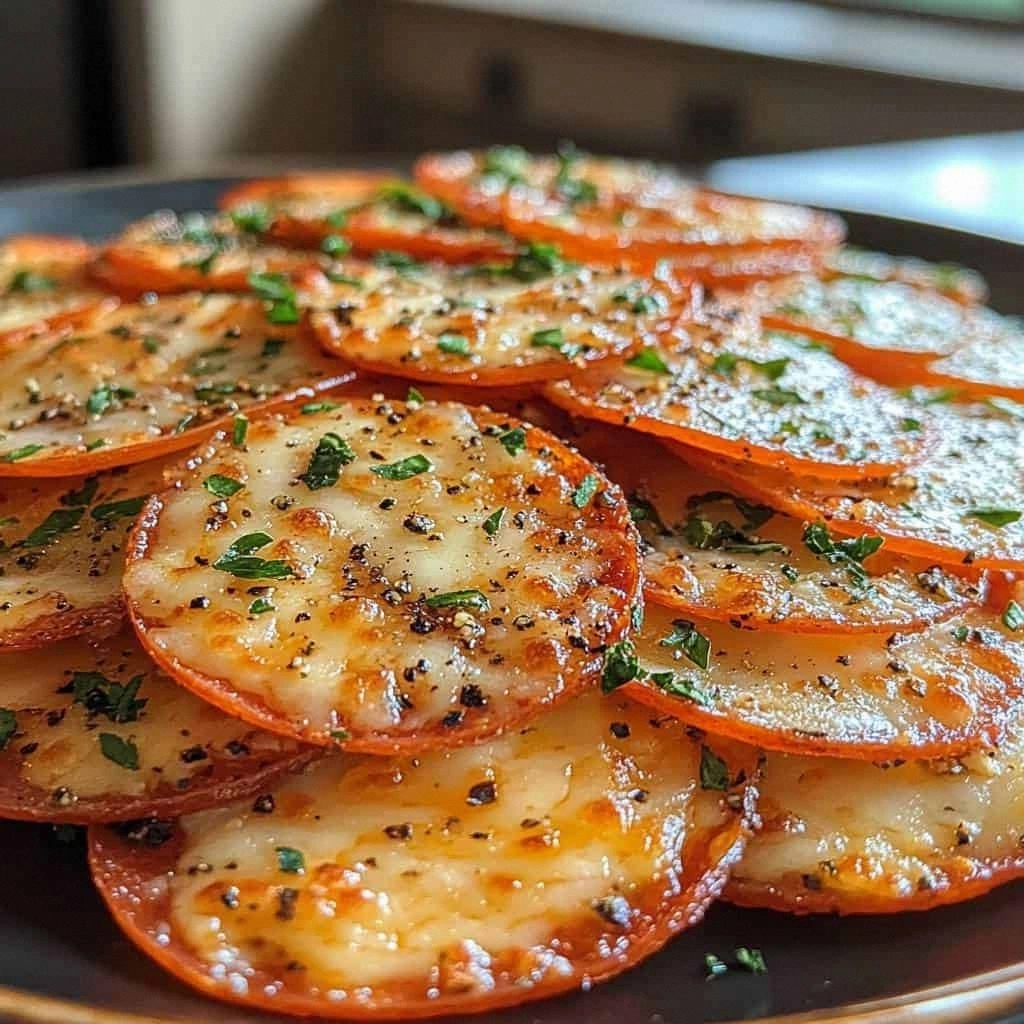
I'm standing in my kitchen at 11:47 PM, wearing mismatched socks and a ratty old t-shirt, staring at a baking sheet that looks like it hosted a miniature cheese volcano. The counter is littered with failed attempts — greasy puddles of disappointment that I tried to pass off as "rustic" to my roommate, who took one bite and asked if I'd accidentally dropped them in motor oil. But then, like some kind of culinary miracle, batch number seven emerges from the oven: golden-brown edges that crackle like autumn leaves, pepperoni that curls into perfect little cups holding pools of rendered fat, and a smell that makes my neighbor knock on the wall asking if I'm running an Italian restaurant. These are the pepperoni cheese crisps that changed everything.
Most recipes treat these like some kind of sad diet food — a joyless pile of baked cheese that tastes like cardboard had a baby with sadness. They'll tell you to use parchment paper (lies), to bake at 350°F (heresy), and to use pre-shredded cheese (blasphemy). I know because I've tried them all, and each one left me chewing something that resembled a salty frisbee. The breakthrough came when I stopped treating these like tiny pizzas and started treating them like what they really are: concentrated flavor bombs where every ingredient has to earn its place. We're talking about transforming three humble cheeses and some pepperoni into something that makes grown adults fight over the last piece like it's the last slice of pizza at 3 AM.
Picture this: you pull a tray from the oven, the cheese still bubbling like hot lava, edges caramelized to that perfect amber color that makes your brain scream "eat this now." The pepperoni has rendered its spicy oils, creating little pockets of flavor that burst when you bite down. The bottom is lacy and crisp, the kind of texture that shatters between your teeth like the top of a crème brûlée, except instead of sweet custard you get an umami punch that makes your taste buds do a happy dance. And the smell — oh, that smell — fills your entire kitchen with the scent of a Brooklyn pizzeria had a baby with a fancy cheese shop.
Let me walk you through every single step — by the end, you'll wonder how you ever made it any other way.
What Makes This Version Stand Out
Cheese Ratio Revolution: Most recipes use just mozzarella and call it a day. We're building a three-cheese foundation where each variety plays a specific role — mozzarella for stretch, cheddar for sharpness, and Parmesan for that nutty, crystalline finish that makes these absolutely addictive.
Pepperoni Placement Magic: Instead of just scattering pepperoni on top like amateur hour, we nestle half the slices between cheese layers and place the rest on top. This creates a textural symphony — some crispy, some chewy, all incredible.
Temperature Trickery: Here's where most recipes fail miserably. They bake too low, creating greasy cheese puddles. We start hot and finish hotter, driving off moisture while building those lacy, crispy edges that make these legendary.
Seasoning Strategy: Italian seasoning and garlic powder aren't just thrown in willy-nilly. We layer them at specific points to maximize bloom and prevent burning, creating depth that makes these taste like they came from an Italian grandmother's kitchen.
Make-Ahead Mastery: These actually get better after sitting for an hour. The flavors meld, the texture sets, and they become the perfect party snack that you can prep ahead without anyone knowing you weren't slaving over a hot oven all day.
Crowd Psychology: I've served these at game days, book clubs, and that awkward office party where nobody knows what to bring. They disappear faster than free samples at Costco, and I've witnessed grown adults hide the last few in napkins for the drive home.
Ingredient Integrity: We're not using just any cheese — we're talking about the good stuff that costs a dollar more but tastes like a million bucks. The difference between pre-shredded and hand-grated cheese here is the difference between a Honda and a Ferrari.
Alright, let's break down exactly what goes into this masterpiece...
Inside the Ingredient List
The Flavor Base: The Cheese Trinity
Mozzarella isn't just mozzarella here — we're talking about the low-moisture, whole milk variety that comes in a dense block, not the watery fresh stuff that'll turn your crisps into soup. This cheese is the backbone, providing that iconic stretch and mild, milky flavor that makes these immediately recognizable as pizza's cooler cousin. When it melts, it creates those Instagram-worthy cheese pulls that make people stop mid-scroll. Skip this and use fresh mozzarella, and you'll end up with a greasy puddle that tastes like disappointment and broken dreams.
Cheddar brings the attitude — specifically, a sharp white cheddar that's been aged at least 12 months. This isn't the time for mild, rubbery orange cheddar that tastes like plastic had a baby with sadness. We're talking about cheese with personality, with little calcium lactate crystals that crunch like savory Pop Rocks, adding tiny bursts of tangy intensity throughout each crisp. The cheddar provides the backbone of flavor that makes people say "wow, these are different" without being able to put their finger on exactly why.
Parmesan is the secret weapon that transforms these from good to legendary. Not the powdery stuff in the green can — we're talking about real Parmigiano-Reggiano that's been aged for 24 months, with those crunchy tyrosine crystals that form like little flavor diamonds. It grates into feathery wisps that melt into the most incredible umami-packed lace, creating those crispy edges that shatter like thin ice but taste like heaven. This is what makes the difference between "these are good" and "I need the recipe right now."
The Texture Crew: Pepperoni Perfection
Pepperoni selection is where most people go tragically wrong. Those generic bags of thin, flimsy slices from the deli section? Leave them for sad lunch sandwiches. We're hunting for the thick-cut, artisanal stuff with visible chunks of fat and spice, preferably from an Italian market where the guy behind the counter calls you "boss" and slices it to order. The thickness matters — too thin and they burn before the cheese sets, too thick and they create little grease lakes that drown the surrounding cheese.
The fat content is crucial here — you want pepperoni that's got about 30% fat, enough to render and flavor the cheese but not so much that you're essentially making meat oil crisps. Look for ones with a good balance of lean and fat, with visible pepper flecks and a deep red color that promises serious flavor. When you bite into one, it should snap cleanly, not bend like rubber, releasing a burst of spicy, garlicky oil that mingles with the melted cheese in the most incredible way.
The Unexpected Star: Seasoning Strategy
Italian seasoning often gets treated like an afterthought, but here it's practically a co-star. We're not talking about that ancient jar that's been in your spice cabinet since the Clinton administration — fresh, vibrant Italian seasoning with visible green flecks of oregano and basil that actually smell like something when you open the jar. The herbs need to be added at exactly the right moment to prevent burning but still bloom in the heat, releasing their essential oils into the melting cheese.
Garlic powder is the unsung hero that ties everything together, but timing is everything. Add it too early and it burns, turning bitter and acrid. Add it too late and it tastes raw and harsh. We sprinkle it on during the last two minutes of baking, just enough time for the heat to awaken its garlicky essence without crossing into burnt territory. This creates a background note that makes people say "there's something familiar here but I can't quite place it" in the best possible way.
The Final Flourish: Optional Upgrades
Red pepper flakes aren't just for heat — they add little pops of spicy complexity that keep your palate interested. But we're not dumping in a tablespoon and calling it a day. We add them strategically, some mixed into the cheese for background heat and some sprinkled on top for visual appeal and immediate impact. The trick is using good quality flakes that still have their essential oils intact, not the dusty, flavorless stuff that's been sitting in a pizza box for three years.
Fresh parsley might seem like unnecessary garnish, but it's the fresh note that cuts through all the richness, adding a bright, herbaceous pop that makes these feel balanced rather than like a heart attack on a plate. Plus, it makes them look like something you'd actually serve to guests rather than shame-eat over the sink at midnight.
Everything's prepped? Good. Let's get into the real action...

The Method — Step by Step
- Preheat your oven to 425°F with a rack positioned in the center — not the bottom where things burn, not the top where they stay pale and sad. This temperature is non-negotiable; it's hot enough to drive off moisture quickly while building those crispy edges, but not so hot that everything scorches before the cheese melts. While it's heating, grab a half-sheet pan and line it with a silicone baking mat. Parchment paper will betray you here, sticking to the cheese like it's got abandonment issues, but silicone mats release cleanly every time. Trust me on this — I've chiseled too many cheese casualties off parchment paper at 1 AM to ever go back.
- Grate all your cheese when it's still cold from the fridge — this isn't just about easier grating, it's about distribution. Cold cheese grates into distinct, fluffy mounds that you can scatter evenly across the pan, whereas room-temperature cheese clumps together like it's got social anxiety. Mix the mozzarella and cheddar in one bowl, but keep the Parmesan separate for now. The Parmesan goes on last because it melts and browns faster than the other cheeses, creating that incredible lacy crust on top. This isn't just cooking — it's architectural planning on a micro scale.
- Now here's where technique matters: grab small handfuls of the mixed cheese and drop them in little mounds across your silicone mat, spacing them about 3 inches apart. Each mound should be about 2 tablespoons of cheese — enough to spread into a nice round but not so much that you end up with cheese pancakes. Don't spread or press them down; let gravity do the work as they melt. This creates natural, organic shapes that look artisanal rather than factory-made. Picture yourself as a cheese artist, creating little dairy constellations across your baking sheet canvas.
- Time for the first layer of pepperoni: take half your slices and tear them into quarters, then tuck these pieces between and around the cheese mounds. This isn't just about distribution — it's about creating flavor pockets where the pepperoni fat can render and infuse the cheese from below. Think of it as building a meat foundation that will flavor everything from the ground up. The torn edges curl beautifully as they cook, creating tiny cups that hold rendered fat like miniature flavor vessels.
- Slide the pan into your preheated oven and set a timer for exactly 8 minutes. This is the moment of truth — walk away and resist the urge to peek every 30 seconds. The cheese needs uninterrupted heat to start melting and spreading into perfect rounds. At 8 minutes, you'll see the edges starting to bubble and turn golden, the cheese spreading into lacy rounds about 3 inches across. This is when you quickly open the oven, scatter the remaining pepperoni slices on top of each crisp, and close the door immediately. Every second the door is open is a second of lost heat and compromised crispiness.
- Continue baking for another 4-6 minutes, but here's the key: rotate the pan 180 degrees after 2 minutes for even browning. Most ovens have hot spots that'll leave you with half the batch pale and half burnt. Watch for the edges turning a deep amber color and the pepperoni starting to curl and crisp. The Parmesan goes on during the last 2 minutes — sprinkle it evenly over each crisp and let it melt into a lacy, golden crust that'll shatter like caramelized sugar when cooled.
- Remove the pan and immediately sprinkle the Italian seasoning over the hot crisps — the residual heat will bloom the herbs without burning them. Don't add the garlic powder yet; it's too delicate and will burn in the residual heat. Instead, let the crisps cool for exactly 2 minutes on the pan — this is when they set and develop their final texture. Then transfer them to a wire rack where they'll crisp completely as they cool. This cooling period is crucial — eat them too hot and they're chewy, wait too long and they stick to the mat like they've taken up permanent residence.
- The final flourish happens when they're just warm, not hot: sprinkle the garlic powder evenly over each crisp, then add red pepper flakes if you're using them. This timing ensures the garlic powder hydrates slightly from the residual warmth without burning, creating that perfect background note. If you're using parsley, now's the time — sprinkle it on while there's still enough warmth to slightly wilt it but not enough to turn it brown and sad. These final touches elevate these from "really good" to "I need to sit down and reevaluate my life choices because I just ate 30 of these."
That's it — you did it. But hold on, I've got a few more tricks that'll take this to another level...
Insider Tricks for Flawless Results
The Temperature Rule Nobody Follows
Here's the thing that separates the pros from the pretenders: cheese temperature management doesn't stop at grating. Your baking sheet should be room temperature when you start — a cold pan will make the cheese seize and create weird, lumpy textures instead of smooth, lacy rounds. But here's the counterintuitive part: once those crisps come out of the oven, they need to cool on a room-temperature surface, not a cold one. Temperature shock makes them weep oil and turn greasy, like they're crying dairy tears of sadness. I learned this the hard way when I tried to speed-cool them on a frozen pizza stone and ended up with what looked like cheese suffering from depression.
The ambient temperature of your kitchen matters more than you'd think too. If you're cooking in a freezing kitchen in winter, add 30 seconds to the cooking time. In a hot summer kitchen, pull them 30 seconds early. Cheese is basically a dairy thermometer, and it responds to environmental conditions like a moody teenager. My friend Sarah didn't believe me until she tried making these in her poorly insulated apartment in February and ended up with cheese gum instead of crisps. Now she texts me her kitchen temperature before every batch like I'm some kind of cheese whisperer.
Why Your Nose Knows Best
Forget timers — your nose is the most sophisticated piece of kitchen equipment you own. When these are perfectly done, your kitchen fills with a scent that's part pizza parlor, part fancy cheese shop, part "I need to call my mother and apologize for every time I said her cooking was boring." It's a complex aroma that starts with the nutty scent of browning cheese, adds the spicy-sweet perfume of rendering pepperoni, and finishes with the herbal notes of Italian seasoning blooming in the heat. When you smell that symphony, you've got about 90 seconds before they're perfect.
But here's what nobody tells you: the scent changes as they cool. Straight from the oven, they smell intensely of pepperoni and garlic. As they cool, the cheese aromas develop and deepen, becoming more complex and nutty. This is why the ones that have been sitting for 10 minutes often taste better than the ones you eat immediately — it's like they're aging in fast-forward. I had a batch that I forgot about (don't judge, it was a long day) and discovered an hour later. They'd developed this incredible depth of flavor that made the fresh ones taste one-dimensional by comparison.
The 5-Minute Rest That Changes Everything
Patience isn't just a virtue here — it's the difference between good and mind-blowing. When these first come out of the oven, they're still soft and pliable, like cheese leather. But something magical happens during the 5-minute rest: the cheese proteins continue to set and crystallize, the flavors meld and deepen, and the texture transforms from merely crispy to shatteringly perfect. It's like the difference between a fresh bagel and one that's had time to develop its full flavor potential. During this rest, the cheese undergoes what's technically called "synersis" — basically, it's reorganizing itself into the optimal structure for maximum crunch and flavor.
This is also when you can rescue any that are slightly underdone. The residual heat continues cooking them gently, so if you pull them when they still look a touch pale, they'll finish to perfect golden-brown during the rest. It's like having a safety net made of dairy. My cousin Mike, who treats recipes like mere suggestions, always pulls his too early because he's impatient. But even his undercooked batches finish perfectly during the rest, turning what should be a disaster into something that still makes people fight over the last piece.
Creative Twists and Variations
This recipe is a playground. Here are some of my favorite ways to switch things up:
The Breakfast Bomb
Swap the Italian seasoning for everything bagel seasoning, use hot cappicola instead of pepperoni, and add a whisper of smoked paprika. These taste like the best parts of a breakfast sandwich distilled into crispy form. The everything seasoning toasts in the cheese fat, creating little seeds and aromatics that crunch like savory sprinkles. They're incredible crumbled over scrambled eggs or just eaten straight while standing at the kitchen counter in your pajamas, pretending you're a responsible adult who doesn't eat 15 of these before 9 AM.
The Mediterranean Mash-up
Replace half the cheddar with crumbled feta, use sliced soppressata instead of pepperoni, and add a pinch of lemon zest with the final herbs. The feta doesn't melt like other cheeses, instead creating little salty pockets that burst with tangy flavor. The lemon zest adds brightness that makes these feel almost refreshing, despite being essentially fried cheese. They're dangerously good with a cold beer and make excellent impromptu appetizers when your book club shows up early and you need something that looks sophisticated but takes zero effort.
The Heat Seeker's Dream
Use habanero jack cheese instead of cheddar, swap in spicy chorizo for the pepperoni, and add a final dusting of ancho chili powder. These pack serious heat but in a way that builds slowly, letting you appreciate the flavors before the fire kicks in. The habanero cheese adds fruity, floral notes that complement the smoky chorizo perfectly. Warning: these are addictive despite the heat. I've seen people who claim they "don't like spicy food" polish off a dozen of these, tears streaming down their face, asking for the recipe between gulps of milk.
The Fancy Pants Version
Use imported fontina instead of mozzarella, aged gouda instead of cheddar, and top with paper-thin prosciutto instead of pepperoni. Add fresh thyme leaves instead of Italian seasoning and finish with a drizzle of truffle oil. These are what you serve when you want to impress people who think they know food. They're sophisticated but still scratch that crispy, salty itch that makes cheese crisps so addictive. The fontina melts into incredible stretchy pools, while the aged gouda provides those crunchy tyrosine crystals that make each bite texturally fascinating.
The Veggie Victory
Replace pepperoni with thinly sliced shiitake mushrooms that you've tossed with olive oil, smoked salt, and a touch of liquid smoke. Use smoked gouda for half the cheddar and add caramelized onion powder to the seasoning mix. These satisfy that umami craving without any meat, and the shiitakes develop an almost meaty texture when they roast in the cheese fat. Even devoted carnivores devour these, though they will ask "are you sure there's no meat in here?" approximately six times before believing you.
The Dessert Plot Twist
Use aged white cheddar only, replace pepperoni with candied bacon, add a pinch of brown sugar to the seasoning, and finish with a dusting of cinnamon. These walk that magical line between sweet and savory that makes people make involuntary happy sounds. The aged cheddar provides the sharp backbone, the candied bacon adds sweet-salty-smoky notes, and the cinnamon ties it all together in a way that shouldn't work but absolutely does. They're incredible crumbled over vanilla ice cream or just eaten while contemplating how weird and wonderful food chemistry can be.
Storing and Bringing It Back to Life
Fridge Storage
Here's where most people go wrong — they toss these in a plastic container and wonder why they turn into a soggy mess. Instead, let them cool completely, then layer them in an airtight container with parchment paper between each layer. They'll stay crispy for up to 3 days, though honestly, I've never had a batch last more than 24 hours because people keep finding them and making them disappear. The key is making sure they're completely cool before storing — any residual warmth creates condensation, which is the enemy of crispiness. If you notice them starting to soften, you can revive them by spreading them on a baking sheet and putting them in a 200°F oven for 5-7 minutes.
Freezer Friendly
Surprisingly, these freeze exceptionally well if you do it right. Arrange them in a single layer on a baking sheet and freeze until solid, then transfer to a freezer bag with parchment between layers. They'll keep for up to 2 months, though the texture will be slightly different — more brittle, less shattery. To reheat, don't thaw them first. Put them directly into a 350°F oven for 6-8 minutes from frozen. They won't be quite as perfect as fresh, but they're still miles better than any store-bought cheese cracker. Pro tip: freeze them in portions so you're not thawing and refreezing, which can make them greasy.
Best Reheating Method
The microwave is your enemy here — it'll turn them into rubbery discs that taste like cheese-flavored cardboard. Instead, use a dry skillet over medium heat for 2-3 minutes per side. This restores the crispiness while warming them through. The skillet method also re-renders any remaining fat, making them almost as good as fresh. If you're doing a large batch, the oven is your friend: spread them on a wire rack set over a baking sheet and heat at 250°F for 8-10 minutes. The wire rack allows hot air to circulate underneath, preventing the dreaded soggy bottom that ruins the texture. Add a tiny splash of water to the baking sheet (not touching the crisps) to create a little steam that prevents over-browning while they reheat.