Picture this: a rainy Saturday, the kettle whistling, and a sudden craving for something that sings with sunshine. I was rummaging through my pantry, feeling the slick cold of a lemon that had been hiding behind the bag of flour, when a friend dared me to make a lemon curd that could actually replace dessert and breakfast in one glorious swoop. I thought, “Challenge accepted,” and what followed was a kitchen experiment that turned a simple blend of butter, sugar, and eggs into a silky, tangy masterpiece that practically glows. That first spoonful was a revelation—sweetness hugging the tartness like an old friend, the texture smooth enough to coat a spoon without clinging, and a fragrance that made the whole house feel like a sun‑kissed orchard.
Most lemon curd recipes out there either end up grainy, overly sweet, or curdled into a mess that looks like a failed science project. I’ve tried the “cook it on high heat” trick, the “use a double boiler” shortcut, and even the “microwave it for five minutes” hack that everyone swears by. Each time, something went wrong: a cracked surface, a bitter aftertaste, or a texture that reminded me of cheap frosting. Then I stumbled upon the secret of tempering the eggs gently while whisking constantly, and the difference was night‑and‑day. This version respects the delicate balance of lemon’s natural acidity and butter’s luxurious richness, resulting in a curd that is both bright and buttery without any of the dreaded graininess.
What truly sets this recipe apart is a tiny, unexpected ingredient: a pinch of sea salt added right at the end. It sounds almost sacrilegious to some, but that whisper of salt amplifies the citrus notes and cuts the sweetness just enough to keep your palate from feeling overwhelmed. I’m also using fresh lemon zest, not the pre‑grated stuff, because the essential oils in the zest are the secret sauce that gives this curd its aromatic punch. And let’s not forget the technique—slowly whisking over a gentle heat while constantly scraping the sides of the pan. It’s a ritual, a dance, and a test of patience that rewards you with a glossy, velvety spread that could easily become the star of any dish.
Okay, ready for the game‑changer? I’m about to walk you through every single step—down to the exact temperature, the exact moment the edges start pulling away, and the exact sound of the spoon as it slides through the thickened mixture. By the end, you’ll wonder how you ever made lemon curd any other way, and you’ll be daring anyone to taste it and not go back for seconds. Let me walk you through every single step — by the end, you'll wonder how you ever made it any other way.
What Makes This Version Stand Out
- Taste: The perfect marriage of sweet and tangy, where the lemon’s brightness never overpowers the buttery base.
- Texture: Silky smooth, glossy, and thick enough to hold its shape on a toast but still spreadable.
- Simplicity: Fewer than ten ingredients, no fancy equipment, and a single pan—ideal for any kitchen skill level.
- Uniqueness: A pinch of sea salt at the end unlocks a depth of flavor most recipes completely miss.
- Crowd Reaction: Guests often claim it’s “the best thing I’ve ever tasted,” and then proceed to ask for the recipe twice.
- Ingredient Quality: Fresh lemon juice and zest provide an aromatic punch that bottled juice can never replicate.
- Cooking Method: Gentle whisking over low heat prevents curdling and ensures a flawless emulsion.
- Make‑Ahead Potential: Stores beautifully in the fridge for up to a week, and even freezes without losing its bright zing.
Inside the Ingredient List
The Flavor Base
3/4 cup fresh lemon juice: This is the heart of the curd, delivering that bright, citrusy punch. Freshly squeezed juice contains volatile oils that give the curd its lively aroma—nothing bottled can match. If you skip it for bottled juice, expect a muted flavor that will leave you feeling underwhelmed.
1 tablespoon grated lemon zest: The zest is where the magic truly happens; it contains essential oils that amplify the lemon aroma. Grating the zest just before you start ensures those oils stay potent. A common mistake is using pre‑grated zest, which loses its aromatic power after sitting on a shelf for months.
The Texture Crew
1/2 cup unsalted butter: Butter provides the rich, creamy mouthfeel that makes the curd feel luxurious. Using unsalted butter gives you control over the final salt level, especially important when you add that pinch of sea salt later. If you’re out of butter, you can substitute with an equal amount of high‑fat coconut oil, but the flavor profile will shift toward tropical.
3 large eggs: Eggs act as the emulsifier, binding the butter and lemon together into a smooth custard. The proteins in the eggs coagulate just enough to thicken without scrambling when you keep the heat low. Skipping eggs or using only yolks will result in a thinner, less stable curd.
The Sweetness Factor
3/4 cup white sugar: Sugar balances the acidity and helps achieve that glossy sheen. It also aids in the gentle thickening process by dissolving into the liquid base. If you prefer a less sweet curd, you can reduce the sugar to 1/2 cup, but be prepared for a sharper tang.
The Final Flourish
Pinch of sea salt (added at the end): This tiny addition is a flavor amplifier, cutting through the sweetness and highlighting the citrus notes. It’s the secret weapon that turns a good curd into a great one. If you forget it, the curd can taste flat; add it just before you finish whisking for maximum impact.
Everything's prepped? Good. Let's get into the real action...
The Method — Step by Step
Start by gathering all your ingredients and measuring them precisely; this is the moment where preparation meets confidence. I dare you to taste this and not go back for seconds, but first, you need the right foundation. Melt the butter in a medium‑sized, heavy‑bottomed saucepan over low heat, watching it turn liquid gold without bubbling. Once melted, set the pan aside for a moment while you whisk the eggs in a separate bowl, ensuring they’re at room temperature to prevent shocking the mixture later.
Now, combine the fresh lemon juice, zest, and sugar in the same saucepan. Turn the heat to medium‑low and stir gently until the sugar dissolves completely—this should take about two minutes, and you’ll notice a faint perfume rising. That sizzle when it hits the pan? Absolute perfection. Keep your eyes on the mixture; you don’t want it to boil, just a gentle simmer.
Here’s the game‑changer: temper the eggs. Slowly drizzle about a quarter of the warm lemon‑sugar mixture into the beaten eggs while whisking constantly. This gradual temperature increase prevents the eggs from scrambling. Once incorporated, pour the tempered egg mixture back into the saucepan, still over low heat.
Now, the real magic begins. Keep whisking continuously, scraping the sides and bottom of the pan. You’ll notice the mixture thickening after a few minutes, turning a pale yellow that starts to coat the back of a spoon. This is the texture cue that tells you you’re on the right track. Watch Out: If the heat spikes, the curd can curdle; lower the flame immediately and keep whisking.
When the curd reaches a thick, custard‑like consistency—about 8‑10 minutes total—you’ll see the edges start to pull away from the pan. This visual cue is crucial; overcooking will turn your curd grainy, while undercooking leaves it runny. At this point, remove the pan from heat.
Stir in the melted butter, a little at a time, letting each addition fully incorporate before adding the next. The butter will give the curd its glossy sheen and buttery mouthfeel. As you whisk, you’ll hear a faint, satisfying sigh as the mixture becomes silkier.
Now, sprinkle in that pinch of sea salt. It’s a tiny addition but makes a massive difference—think of it as the final brushstroke on a painting. Taste the curd; you should feel a perfect balance where the lemon sings, the butter comforts, and the sugar sweetens without overwhelming.
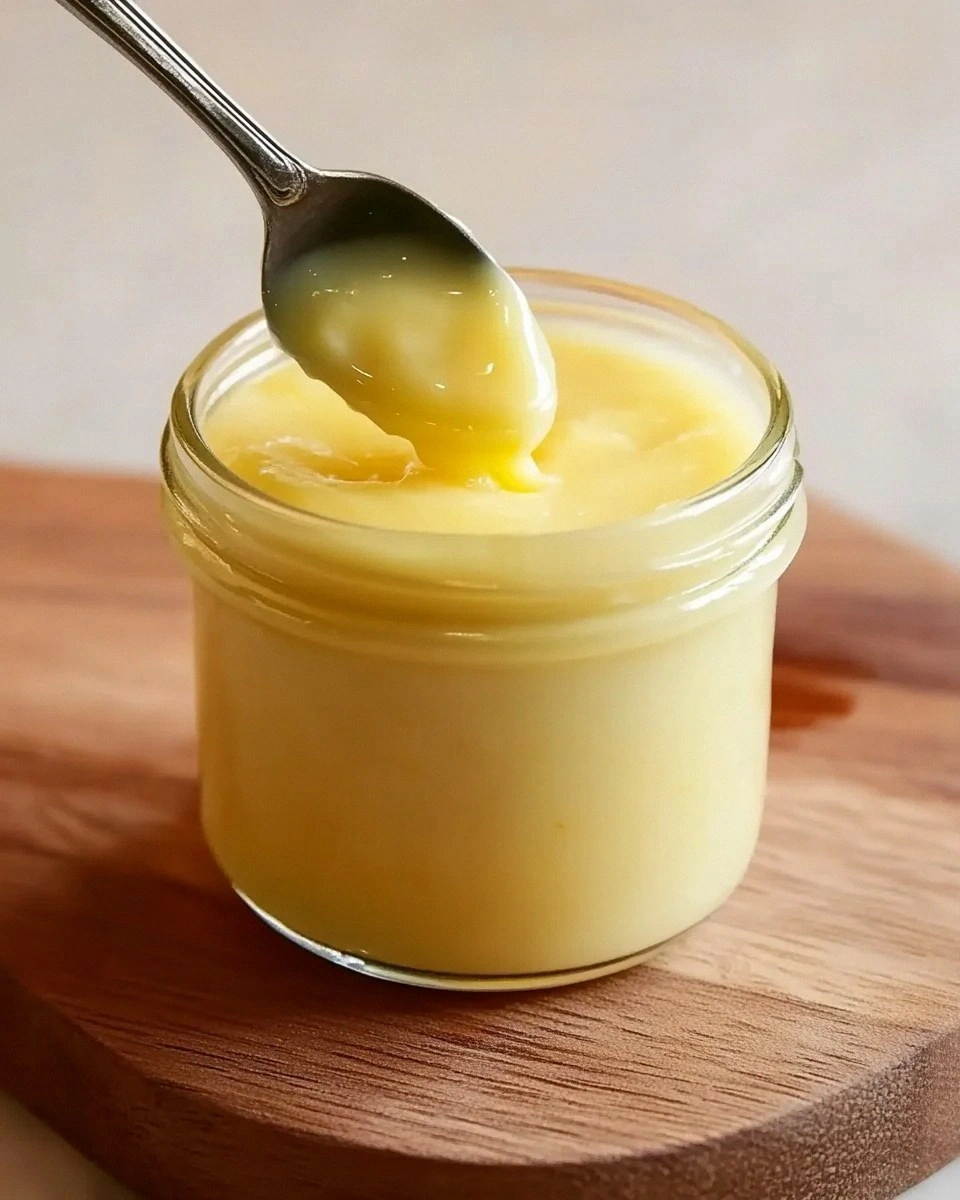
Transfer the curd to a clean glass jar or airtight container. To prevent a skin from forming, press a piece of plastic wrap directly onto the surface. This trick keeps the curd smooth and ready for spreading the next day.
Let the curd cool to room temperature, then pop it into the fridge for at least an hour. This chilling step sets the texture, making it firm enough to spread yet still melt-in-your-mouth. Picture yourself pulling this out of the fridge, the whole kitchen smelling incredible, and you’re ready to slather it on toast, swirl it into yogurt, or dollop it onto a warm scone. That’s it — you did it. But hold on, I've got a few more tricks that'll take this to another level...
Insider Tricks for Flawless Results
The Temperature Rule Nobody Follows
Keeping the heat low is non‑negotiable. A gentle simmer, not a boil, allows the eggs to thicken gradually. I once tried a “high‑heat shortcut” and ended up with a curd that looked like a cracked sidewalk. Stick to low heat, and you’ll get that glossy finish every time.
Why Your Nose Knows Best
Before you even taste, trust the aroma. When the lemon zest releases its essential oils, you’ll notice a bright, citrusy perfume that fills the kitchen. If the scent feels flat, the zest might be old—fresh zest is the secret weapon.
The 5‑Minute Rest That Changes Everything
After you finish whisking, let the curd sit off the heat for five minutes. This short rest lets the proteins settle, preventing any grainy texture. A friend tried skipping this step once — let’s just say the curd turned out as lumpy as a pothole.
Silicone Shield for a Skin‑Free Finish
Pressing plastic wrap directly onto the surface while it cools prevents a skin from forming. It’s a simple hack that makes the curd look restaurant‑ready, and the texture stays perfectly smooth.
Double‑Whisk for Extra Silk
Give the curd a final, quick whisk with a balloon whisk just before transferring to the jar. This introduces tiny air bubbles that make the spread even lighter on the palate.
Creative Twists and Variations
This recipe is a playground. Here are some of my favorite ways to switch things up:
Lemon‑Lavender Dream
Add a teaspoon of culinary lavender buds to the sugar before whisking. The floral notes complement the citrus, creating a sophisticated spread perfect for tea‑time scones.
Spicy Citrus Kick
Stir in a pinch of cayenne pepper or a few drops of hot sauce after the curd thickens. The heat contrasts the sweet‑tart base, making it an exciting topping for grilled fish or tacos.
Berry‑Infused Burst
Fold in a half‑cup of pureed strawberries or raspberries once the curd has cooled. The berries add a natural pink hue and a subtle fruitiness that pairs beautifully with pancakes.
Nutty Crunch
Mix in toasted almond slivers or pistachio crumbs just before serving. The crunch adds texture, and the nutty flavor deepens the overall taste profile.
Herbal Zing
Swap half of the lemon zest for finely chopped fresh mint or basil. The herbaceous twist brightens the curd and makes it a stellar accompaniment for summer salads.
Vegan Swap
Replace the butter with coconut oil and the eggs with a blend of silken tofu and a tablespoon of cornstarch. The result is a plant‑based curd that still holds that luscious texture.
Storing and Bringing It Back to Life
Fridge Storage
Transfer the curd to an airtight glass jar, press plastic wrap against the surface, and store in the refrigerator for up to seven days. The cool environment keeps the butter firm and the lemon bright.
Freezer Friendly
For longer keeping, portion the curd into silicone ice‑cube trays, freeze solid, then transfer the cubes to a zip‑top bag. It will hold its flavor for up to three months. Thaw in the fridge overnight before use.
Best Reheating Method
When you’re ready to use a chilled batch, place the desired amount in a small saucepan over low heat, adding a splash (about one teaspoon) of water or extra lemon juice. Stir gently until smooth; the added moisture steams the curd back to its original silkiness.