I still remember the carnage from last Tuesday night like it was yesterday. There I stood, hungry enough to eat my own shoe, staring at a fridge that held nothing but a sad bag of potatoes, ground beef that was one day away from expiring, and the dregs of four different cheeses. Classic "college kid" scenario, except I'm allegedly a grown-up with a mortgage and a spice rack that costs more than my first car. In that moment of culinary desperation, I muttered the fateful words: "How hard can a cheeseburger-potato thingy really be?" Fast forward forty-five minutes and I'm holding a skillet that looked like Mount Vesuvius erupted inside it—potatoes glued to cast iron like they'd been welded there, beef burnt on the outside and somehow still mooing on the inside, and a cheese sauce that separated into an oily puddle so depressing it could've starred in its own soap opera. I ate it anyway, standing over the sink, questioning every life choice that led me here.
But here's the twist: that epic failure lit a fire in my food-obsessed brain. I became a woman possessed, determined to crack the code on the ultimate loaded cheeseburger potato skillet. I tested fifteen different spud varieties (yes, Yukon Golds flex harder than Russets here), experimented with every cheese-to-liquid ratio known to mankind, and discovered a sequence of steps that turns humble ingredients into pure comfort-food sorcery. The breakthrough came at 2:13 a.m. when I added the cheese sauce off the heat and folded it in like I was making risotto—suddenly the sauce clung to every cranny like velvet pajamas on a winter night. One bite and I knew I'd created the kind of dish that makes grown adults fight over the last crispy potato bit stuck to the pan.
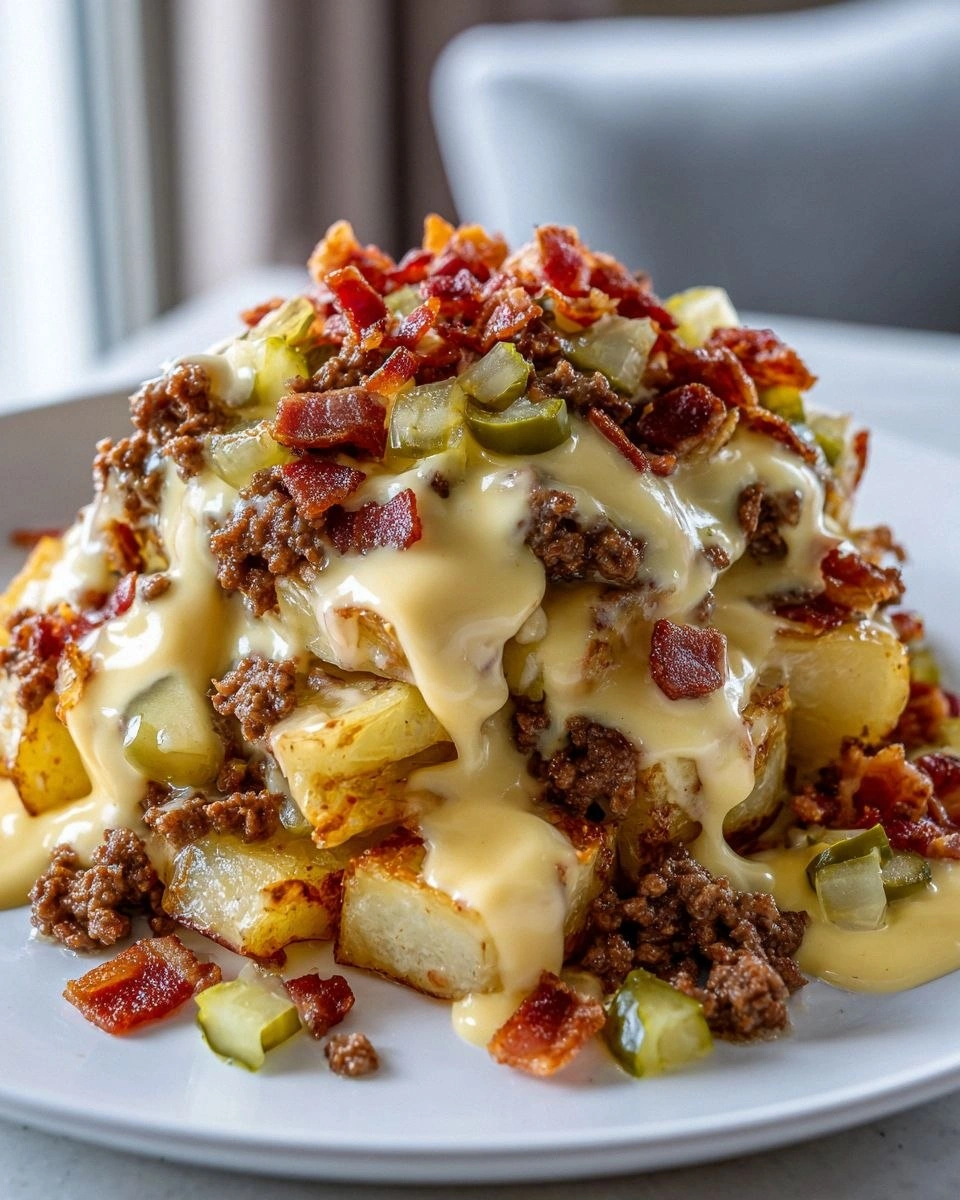
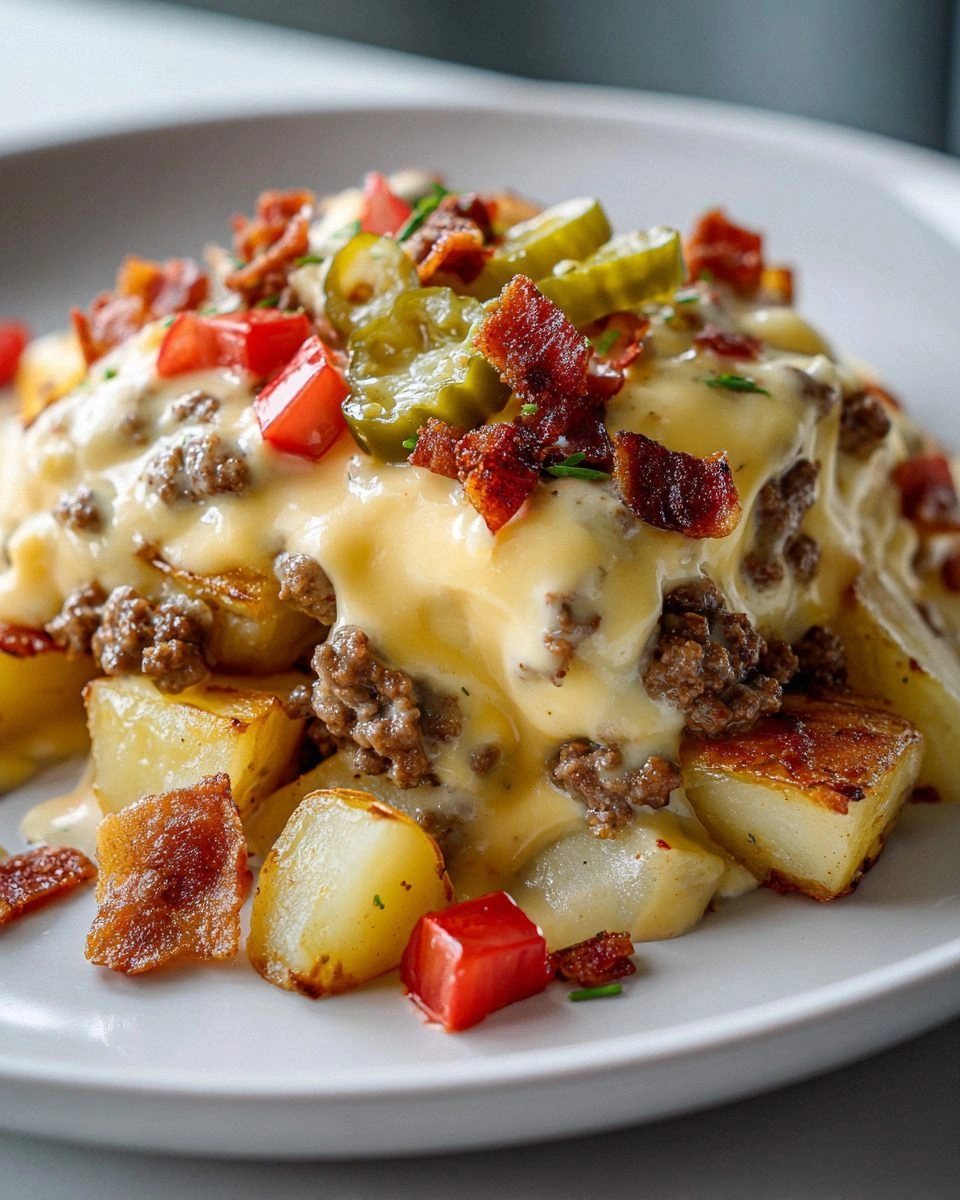
Picture this instead: you lift your skillet from the oven, the ceramic top clinking against the cast iron, and that first waft of beefy, cheesy glory hits your face. The potatoes sport golden edges that shatter like thin ice under your fork, revealing fluffy clouds inside. Ground beef mingles with onions that melted into sweet submission, all enrobed in a cheese sauce so silky it should probably have its own agent. That first bite? It's the edible equivalent of sliding into a hot tub after shoveling snow—every stress molecule melts away. I dare you to taste this and not go back for seconds; I double-dog-dare you to walk past the stove without "testing" just one more spoonful. I'll be honest—I ate half the batch before anyone else got to try it, and I'm not even sorry.
Let me walk you through every single step—by the end, you'll wonder how you ever made it any other way.
What Makes This Version Stand Out
Crunch-to-Cream Ratio: Most recipes drown the potatoes until they're mushy casualties. Here we par-cook, then roast the cubes uncovered so they develop a crackly shell that stands up to the sauce like a champ. The result? Textural contrast so addictive you'll find yourself chasing those crispy corners with military precision.
Two-Stage Cheese Strategy: Forget grainy, broken sauces. We build a béchamel base, then whisk in sharp cheddar for depth and a touch of smoked gouda for intrigue. The secret is pulling it off the heat before adding cheese—keeping those proteins relaxed and the sauce glossy enough to make a food stylist weep tears of joy.
Umami Bomb Layering: Worcestershire in the beef, tomato paste for caramelized sweetness, and a whisper of soy sauce in the potatoes. It's the culinary equivalent of surround-sound flavor—every bite has depth that keeps your palate guessing in the best possible way.
One-Skillet Wonder: From stovetop sear to oven roast to broiler finish, everything happens in a single pan. Translation: fewer dishes, more couch time, and the built-up fond (those sticky brown bits) becomes built-in gravy magic.
Make-Ahead Magic: Prep the components on Sunday, stash them in the fridge, and you can assemble a week-night feast in under twenty minutes. Future-you will want to build a statue in honor of past-you's brilliance.
Feed-a-Crowd Flexibility: Whether you're cooking for a hungry family of four or your weekly game-night crew, this skillet scales like a dream. Just grab a bigger pan and let the comfort-food Olympics begin.
Kid-Approved, Adult-Adored: Little ones love the familiar cheeseburger vibe, while grown-ups appreciate the smoky nuances and that whisper of Dijon. It's the rare dish that makes everyone push their plates forward for seconds without negotiation.
Alright, let's break down exactly what goes into this masterpiece...
Inside the Ingredient List
The Flavor Base
The potatoes aren't just filler—they're the edible equivalent of a warm hug. Go with baby Yukon Golds; their thin skin crisps like a potato chip while the interior stays creamy enough to sop up sauce. Cut them into half-inch cubes—any smaller and they'll steam instead of roast; any larger and they become unwieldy boats that won't integrate with the beef. A quick soak in cold water while you prep the rest pulls out excess starch, ensuring each cube develops those crave-worthy crunchy jackets.
Ground beef is the canvas, so skip the bargain-bin stuff. An 80/20 blend gives you enough fat for flavor without turning your skillet into an oil slick. If you're feeling fancy, swap half the beef for ground chuck—its deeper beefiness plays beautifully with the smoky cheese. Whatever you do, don't press it down like you're making a giant burger; let it sit undisturbed for that glorious Maillard crust to form. That caramelized layer is liquid gold, carrying the entire dish from "good" to "I need this recipe tattooed on my arm."
The Texture Crew
Sharp white cheddar brings the zing, but the real MVP is a modest handful of smoked gouda. It melts like a dream and whispers campfire vibes that make people ask, "What's that incredible flavor?" Grate it yourself—pre-shredded cellulose-coated cheese refuses to melt smoothly and will sabotage your sauce faster than you can say "grainy disaster." If smoked gouda isn't in the cards, a bit of young fontina or even Monterey Jack will keep things creamy, though you'll lose that subtle smoky wink.
Whole milk forms the backbone of our sauce, but I sneak in two tablespoons of evaporated milk for body. It sounds odd, but the concentrated proteins create a velvety thickness you can't get from plain dairy. Need it richer? Swap half the milk for half-and-half; need it lighter? Stick with milk and add an extra teaspoon of flour. The sauce is forgiving—just remember to season aggressively at the end, because dairy loves to dilute salt.
The Unexpected Star
Dijon mustard is my stealth ingredient. A single teaspoon doesn't scream "mustard!"—it just amplifies the cheese and adds a gentle, tangy backbone that keeps the dish from feeling like a brick in your stomach. If you're cooking for mustard-phobes, whisk it in off the heat; the flavor integrates seamlessly without leaving telltale specks. No Dijon? A half teaspoon of dry mustard or even a splash of pickle brine can fill the acidic gap, though the flavor profile will shift slightly.
Worcestershire sauce is the umami fairy dust. It deepens the beef, marries beautifully with cheddar, and adds layers of savory mystery that keep everyone guessing. A friend once tried skipping it and texted me mid-bite: "This is good... but it tastes like it's missing a secret." Don't be that friend. If you're gluten-free, coconut aminos plus a pinch of allspice mimic the complexity without the wheat.
The Final Flourish
Fresh chives look adorable, but their real purpose is a bright, oniony snap that cuts through all the richness. Slice them just before serving; a brief massage between your fingers releases their oils and makes the green pop visually. No chives? Thinly sliced scallion greens or even a whisper of dill fronds work, though you'll change the personality from classic burger joint to garden party.
Paprika isn't just a pretty dusting—use smoked paprika for a sultry top note or sweet Hungarian for gentle warmth. Mix a pinch into the potatoes before roasting and save a little to sprinkle over the finished dish. The heat from the skillet blooms the spice, releasing aromas that'll have neighbors knocking to check if your kitchen is on fire (in the best possible way).
Everything's prepped? Good. Let's get into the real action...
The Method — Step by Step
- Start by placing your oven rack in the lower-middle position and preheating to 425°F. While the oven hums to life, scrub the potatoes and dice them into half-inch cubes—no need to peel because those thin Yukon skins transform into potato-candy when roasted. Drop the cubes into a bowl of ice water for five minutes; this quick bath pulls out surface starch, guaranteeing each piece will emerge from the oven with shatter-crisp jackets instead of sad, steamed exteriors. Drain thoroughly and roll them around on a clean kitchen towel to wick away moisture—water is the enemy of browning, and we're after serious crunch here.
- Heat a 12-inch cast-iron skillet over medium-high heat for two full minutes. You want the pan screaming hot so the beef sears, not steams. Add the ground beef, breaking it into three or four big chunks, then—this is key—leave it alone for three entire minutes. I know, I know, every instinct screams to stir, but patience equals crust. When you see the edges turning deeply caramelized and smell that nutty aroma, flip the pieces and repeat on the other side. Break it up into pea-sized bits, season with salt, pepper, and a generous splash of Worcestershire, then transfer the beef to a bowl, leaving those gorgeous brown bits stuck to the pan.
- Immediately toss the drained potatoes into the same skillet with two tablespoons of the rendered beef fat. If your 80/20 beef didn't give off enough liquid gold, supplement with a glug of canola or a pat of butter. Stir to coat, then let them sit undisturbed for four minutes; that sizzle when they hit the pan? Absolute perfection. Sprinkle with smoked paprika, garlic powder, and a whisper of onion powder—think of this as the seasoning foundation that will echo through every layer of the finished dish.
- Slide the skillet into the preheated oven and roast for fifteen minutes. During this time the potatoes will partially cook through, absorb the smoky paprika, and start developing those crackly edges. Meanwhile, dice half an onion finely and shred your cheeses if you haven't already. Multitasking keeps the whole process fluid and prevents the dreaded "standing around waiting" trap that makes weeknight cooking feel like a chore.
- After fifteen minutes, pull the skillet, give the potatoes a confident flip with a thin metal spatula, and scatter the chopped onion around. Return to the oven for another ten minutes. This flip ensures even browning and exposes fresh surfaces to the heat, while the onion will soften into sweet, jammy pockets that weave through the final dish. Keep an eye out—when the potatoes sport golden-brown freckles and the onions look translucent, you're ready for layering.
- While the potatoes finish, start the cheese sauce. Melt two tablespoons of butter in a small saucepan over medium heat until it just stops foaming—this signals the water has evaporated and you're ready to build a silky roux. Whisk in two tablespoons of flour and cook, stirring constantly, for a full ninety seconds. You're aiming for a pale, nutty color and a smell reminiscent of toasted hazelnuts. Rush this step and your sauce will taste like raw flour; linger too long and the roux will darken past the point of creamy harmony.
- Slowly pour in one cup of cold whole milk, whisking like your life depends on it. Cold milk prevents lumps, and vigorous whisking keeps the starch granules suspended so they can do their thickening magic. Add the evaporated milk, a pinch of salt, a crack of black pepper, and the Dijon. Bring the mixture to a gentle simmer, then drop the heat to low. The sauce should coat the back of a spoon; if it's too thick, loosen with a splash more milk—think heavy cream consistency, not pudding.
- Off the heat, whisk in the shredded cheddar and gouda a handful at a time, letting each addition melt before adding the next. Keep the heat off—this is crucial—because high temperatures cause cheese proteins to tighten and break, gifting you grainy soup instead of velvet. Taste and adjust salt; the sauce should be assertively seasoned because it will mellow once folded into the potatoes and beef. If you've done it right, the spoon will leave visible ribbons that slowly disappear, a sign you've achieved queso nirvana.
- Remove the skillet from the oven, scatter the seared beef back over the potatoes, and drizzle the entire pan with your molten cheese sauce. Resist the temptation to stir—let the sauce settle into every crevice like liquid gold finding its level. Switch the oven to broil, slide the skillet under the flame for two to three minutes, and watch through the glass like it's must-see TV. You're looking for bronzed bubbles and tiny charred freckles that scream "eat me now."
- Let the skillet rest for five minutes—yes, five—because molten cheese lava will obliterate your tongue and nobody wants to explain that injury in the ER. Garnish with a snowfall of fresh chives and a final dusting of paprika for color. Serve directly from the pan; this is casual, spoon-in-hand food that tastes like Friday night even if it's only Tuesday. And now the fun part: scoop from the bottom so every serving gets a mosaic of crispy potatoes, juicy beef, and that dreamy sauce that stretches like a cheese pull straight out of a commercial.
That's it—you did it. But hold on, I've got a few more tricks that'll take this to another level...
Insider Tricks for Flawless Results
The Temperature Rule Nobody Follows
Room-temp cheese melts into silk; fridge-cold cheese clumps like wet sand. Pull your cheese from the refrigerator twenty minutes before you plan to use it. If you're an impatient soul (hello, kindred spirit), give it a quick 10-second zap in the microwave on 20 percent power—just enough to knock the chill off without starting to melt. Your sauce will reward you with glossy smoothness that pours like liquid velvet instead of seizing into grainy disappointment. A friend tried skipping this step once—let's just say it didn't end well, and she now owns a T-shirt that reads "Trust the temp."
Why Your Nose Knows Best
Don't trust the clock; trust your senses. When the potatoes smell like the best French fry you've ever had, they're ready for the next step. Same with the roux—butter goes from nutty to burnt in under thirty seconds, so keep your face over the pan (hair tied back, please) and wait for that toasted-hazelnut aroma. Your nose is a more accurate timer than any gadget on your counter, and once you cook by scent you'll wonder why you ever slaved over arbitrary numbers.
The 5-Minute Rest That Changes Everything
I know, the skillet looks incredible straight from the broiler, but give it a five-minute breather before serving. During this pause the sauce thickens just enough to cling instead of puddle, the cheese cools to tongue-safe temperatures, and the potatoes absorb a final kiss of flavor. Cover loosely with foil to keep it warm; use the time to set out plates or pour drinks. Future-you won't burn taste buds, and present-you gets to serve a dish that looks intentional instead of molten chaos.
Season in Layers, Not Just at the End
Salt the potatoes before roasting, the beef while it sears, the sauce while it simmers, and the finished dish right before serving. Each component needs to taste slightly over-seasoned on its own; when they marry together the flavors balance perfectly. Skimp early and you'll wind up with bland spuds swimming in salty sauce—a tragedy I wouldn't wish on my worst enemy. Taste as you go; your palate is the final arbiter of deliciousness.
Cast Iron Care for Non-Stick Success
After washing, dry your skillet over low heat for two minutes, then wipe with the tiniest film of oil while it's still warm. This micro-seasoning keeps potatoes from gluing themselves to the surface and ensures your next meal slides out like it's on a Teflon trampoline. Store the pan uncovered in a dry spot; trapped moisture leads to rust, and nobody wants rusty flakes in their cheese sauce. Treat your cast iron like a pet: feed it (oil), give it attention (heat), and it will love you back for decades.
Creative Twists and Variations
This recipe is a playground. Here are some of my favorite ways to switch things up:
Bacon-Bomb Breakfast Edition
Swap the ground beef for crumbled breakfast sausage and fold in crispy bacon shards just before broiling. Crack four eggs right onto the surface during the last two minutes of broiling for runny yolks that become instant sauce. Add a handful of shredded hash browns to the potato mix for extra crunch. Brunch guests will construct a shrine in your honor.
Green Chile Cowboy Skillet
Replace half the cheddar with pepper Jack, fold in a drained can of Hatch green chiles, and add a teaspoon of ground cumin to the beef. Finish with fresh cilantro and a squeeze of lime. Serve with warm tortillas instead of forks for a Southwestern vibe that pairs beautifully with cold cerveza.
Mediterranean Mash-Up
Use ground lamb seasoned with oregano and a pinch of cinnamon. Swap the cheese sauce for a quick lemon-garlic yogurt drizzle, and top with diced tomatoes, cucumbers, and a shower of fresh mint. It tastes like a gyro and a cheeseburger had a beautiful, beautiful baby.
Buffalo Blue Cheese Blaze
Stir two tablespoons of Buffalo wing sauce into the finished cheese, then fold in shredded rotisserie chicken instead of beef. Finish with a crumble of blue cheese and a drizzle of ranch. Game-day crowds demolish this version faster than you can say "touchdown."
Truffle Swank Upgrade
Add a whisper of truffle oil to the cheese sauce (think droplets, not glugs) and substitute aged Gruyère for the gouda. Top with a scattering of crispy prosciutto shards. Suddenly Tuesday dinner feels like a downtown bistro, and your sweatpants are totally acceptable attire.
Veggie Power Play
Trade the beef for a mix of sautéed mushrooms and lentils seasoned with smoked paprika and soy sauce. Use vegetable stock in the sauce and load up on roasted red peppers and spinach. Even carnivores inhale this version, then ask for the recipe with a bewildered look that says, "Wait, there's no meat?"
Storing and Bringing It Back to Life
Fridge Storage
Transfer leftovers to airtight glass containers (plastic absorbs cheesy odors faster than gossip spreads). The potatoes will keep for up to four days, though the texture is best within the first 48 hours. To prevent condensation, let the skillet cool completely before covering; trapped steam turns crispy bits soggy, and nobody likes a limp potato. Store the sauce separately if possible—reheat it gently with a splash of milk for maximum velvet revival.
Freezer Friendly
Freeze individual portions in zip-top bags pressed flat for quick thawing. The cheese sauce may separate slightly upon defrosting, but a vigorous whisk while reheating brings it back together. Use within two months for peak flavor, and always label with the date—future-you has enough mysteries to solve without playing "guess the freezer artifact."
Best Reheating Method
Skip the microwave unless you enjoy rubbery beef and weeping sauce. Instead, spread leftovers in a shallow baking dish, add a tablespoon of water or milk, cover with foil, and warm at 350°F for 15 minutes. Remove the foil for the final five to re-crisp the top. Add a tiny splash of water before reheating—it steams back to perfection and keeps everything moist without diluting flavor.