I remember the night I tried to impress my sister with a dessert that would make her forget the last time I accidentally set the kitchen on fire while attempting a soufflé. The kitchen was a chaotic symphony of sizzling pans, burnt sugar, and my own frantic attempts to salvage the situation. The moment I realized I had burned the sugar, I thought, “If this is how I’m going to make a dessert, I’ll need a better plan.” That night, I discovered the ultimate no‑bake strawberry jello pie – a recipe so simple, yet so indulgent, that it turned my kitchen mishap into a triumph. The aroma of fresh strawberries mingled with the sweet perfume of gelatin, creating a scent that promised a bite of summer in every slice. I was hooked instantly, and I knew I had to share this gem with anyone who loves dessert without the drama of a kitchen disaster.
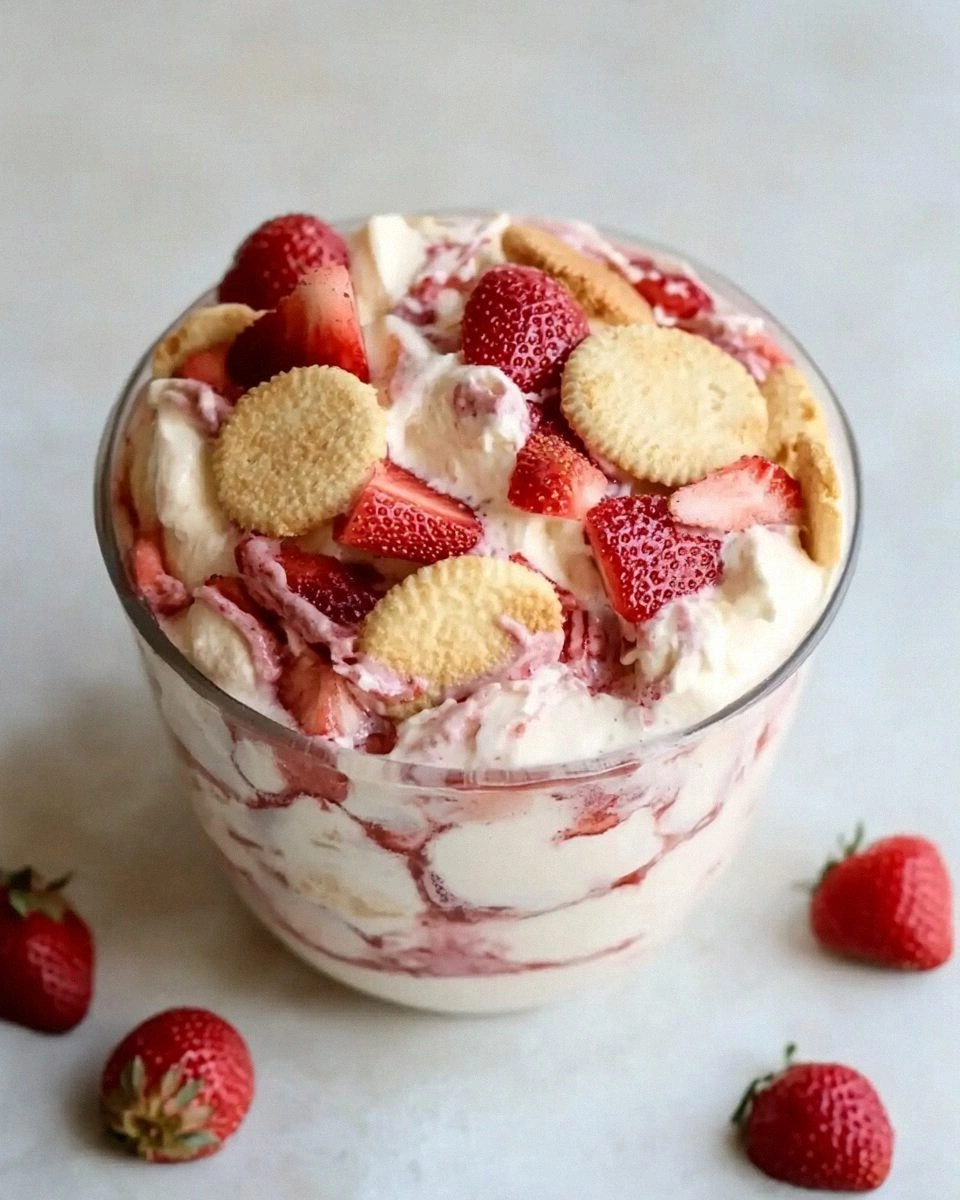
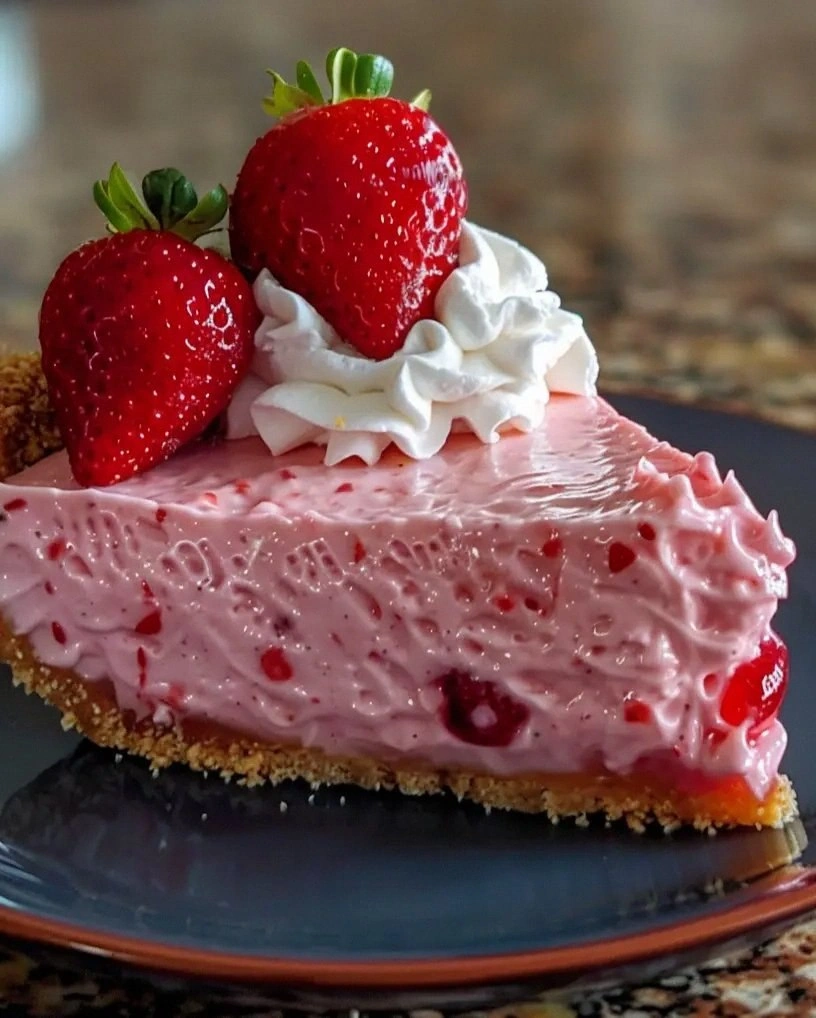
Picture this: a chilled, glossy pie that glistens like a jewel, with a creamy, tangy filling that feels like a cloud of strawberry dreams. The crust is buttery and crisp, offering a satisfying crunch that snaps like a perfectly timed joke. When you cut through the center, the filling swirls, revealing a vibrant pink hue that practically dances under your knife. The texture is silky, not too dense, and the strawberry pieces pop with juiciness, delivering a burst of natural sweetness with every bite. The whipped cream topping adds a fluffy, airy contrast, making each forkful a multi‑sensory experience. I dare you to taste this and not go back for seconds – the first bite will have you questioning why you ever settled for ordinary desserts.
What makes this version stand out is that it takes the classic no‑bake pie and elevates it with a few game‑changing tweaks. The use of pre‑made graham cracker crust gives the pie a buttery, crumbly base that holds up against the luscious filling. The gelatin is allowed to bloom properly, ensuring a smooth, glossy finish that looks as good as it tastes. Cream cheese is softened to room temperature, which blends seamlessly into the gelatin for a velvety texture that feels like a dessert‑sized cloud. The fresh strawberries are not just for garnish; they’re folded into the filling, giving the pie a natural sweetness that cuts through the richness. I’ve added a splash of vanilla extract to tie the flavors together, creating a harmonious balance that lingers on the palate. This is hands down the best version you'll ever make at home, and I’ve got the proof in the form of a photo that will make your mouth water.
I’ll be honest – I ate half the batch before anyone else got to try it. The first slice was so good that I felt a pang of guilt as I stared at the empty plate. But that’s the beauty of a no‑bake dessert: you can make a batch, set it aside, and serve it at any time. The flavors only improve as they sit, letting the gelatin set and the strawberries infuse their juice into the filling. Imagine pulling this out of the fridge on a hot summer afternoon, the whole kitchen smelling incredible, and watching friends reach for the fork. The anticipation is part of the fun, and the final taste is the reward that makes it all worth it.
Most recipes get this completely wrong, focusing on heavy creams or over‑sweetened fillings that drown out the fruit. Here, the balance is razor‑sharp: the cream cheese adds body, the gelatin gives structure, and the strawberries provide natural sweetness and acidity. The result is a dessert that feels light, yet full of flavor, and that’s why I’ve decided to share every single detail. If you've ever struggled with a dessert that ends up too heavy or too sweet, you're not alone – and I've got the fix. This next part? Pure magic. And now, stay with me here – this is worth it.
I’m about to walk you through every single step, from selecting the best strawberries to achieving the perfect set time. By the end of this guide, you’ll wonder how you ever made it any other way. I’ll give you insider secrets, kitchen hacks, and a few playful challenges to keep the process engaging. And yes, I’ll be tossing in a few jokes, because if you’re not laughing while you cook, you’re missing out. So grab your apron, set the timer, and let’s dive into the world of no‑bake strawberry jello pie.
What Makes This Version Stand Out
- Taste: The combination of creamy, tangy filling and fresh strawberry bursts creates a flavor profile that feels like a summer picnic in a bowl. The subtle vanilla note ties everything together without overpowering the natural fruit.
- Texture: The crust is buttery and crisp, while the filling is silky and smooth, offering a contrast that delights the palate. The strawberry pieces add a satisfying chew that breaks the monotony of the gelatin.
- Simplicity: No oven, no whisking, no measuring cups. Just a few pantry staples and a handful of fresh berries. It’s a recipe that fits into even the busiest of schedules.
- Uniqueness: The use of softened cream cheese in the gelatin base is a game‑changer, giving the pie a rich body that still feels light. This twist sets it apart from the standard no‑bake jello dessert.
- Crowd Reaction: Friends rave about how it tastes like a store‑bought dessert but with a homemade twist. The visual appeal of the glossy filling makes it Instagram‑ready.
- Ingredient Quality: Using fresh strawberries and a high‑quality graham cracker crust elevates the overall experience. The natural sweetness of the fruit is the star of the show.
- Cooking Method: No heat required; the gelatin sets in the fridge, making it perfect for a quick summer treat.
- Make‑Ahead Potential: Set it up the night before, let it chill, and serve it fresh. The flavors meld beautifully over time.
Alright, let's break down exactly what goes into this masterpiece…
Inside the Ingredient List
The Flavor Base
The pre‑made graham cracker pie crust is the foundation of this dessert. It provides a buttery, crumbly texture that contrasts beautifully with the smooth filling. If you’re feeling adventurous, you can upgrade to a chocolate graham cracker crust for a richer flavor profile. Skipping the crust entirely will make the pie feel less substantial, so it’s best to keep it.
The strawberry Jello is the core of the filling. It sets the color and provides the gelatinous structure. If you prefer a different fruit, raspberry or cherry works just as well. Keep the gelatin package as is; the 3 oz size is perfect for a 4‑serving pie.
The Texture Crew
The cream cheese, softened to room temperature, blends into the gelatin, giving the filling a creamy body that feels like a dessert‑sized cloud. If you use cold cream cheese, the mixture can become lumpy. A quick whisk before folding will smooth it out. The granulated sugar balances the tartness of the gelatin and the cream cheese, ensuring the pie isn’t too sweet.
The vanilla extract is the subtle flavor enhancer that ties the ingredients together. A teaspoon is enough to elevate the overall taste without dominating the strawberry. If you’re avoiding dairy, you can replace the cream cheese with a dairy‑free alternative, but be aware the texture may shift slightly.
The Unexpected Star
Fresh strawberries are folded into the filling, providing natural sweetness and a pop of color. They also infuse their juice into the gelatin, adding depth to the flavor. If you can’t find fresh strawberries, frozen strawberries thawed and drained will work, but they might release extra moisture.
The Final Flourish
Whipped cream is the crowning glory, adding a light, airy texture that balances the richness of the filling. You can use a flavored whipped cream or a dash of strawberry puree for an extra burst of flavor. The whipped cream also adds a decorative touch, making the pie look restaurant‑grade.
Everything's prepped? Good. Let's get into the real action…
The Method — Step by Step
- Step 1: Prepare the Crust. Take the pre‑made graham cracker pie crust out of the fridge and let it sit at room temperature for 10 minutes. This softens the crust slightly, making it easier to handle. Place the crust in a 9‑inch pie dish, pressing it firmly into the bottom and up the sides. Make sure there are no gaps; a tight fit keeps the filling from leaking. This step is crucial for a clean, professional look. If you’re feeling creative, dust the crust with a pinch of cinnamon for a warm twist.
- Step 2: Bloom the Gelatin. Pour one cup of boiling water into a small bowl. Sprinkle the 3 oz strawberry gelatin powder over the water. Let it sit for 5 minutes while the gelatin absorbs the water and softens. This is the moment of truth; if the gelatin clumps, you’re in trouble. Gently stir until the powder dissolves completely, creating a clear, fragrant liquid. Keep this mixture warm for the next step.
- Step 3: Add Cold Water. Add half a cup of cold water to the gelatin mixture. Stir vigorously to mix the flavors. The cold water helps bring the temperature down so you can add the cream cheese without curdling. This step is often overlooked but ensures a silky texture. If you skip it, the filling might separate. Keep the mixture at room temperature until you’re ready to fold in the cream cheese.
- Step 4: Cream Cheese Blend. In a separate bowl, beat the softened 8 oz cream cheese until it’s smooth and creamy. Then, slowly pour the gelatin mixture into the cream cheese while whisking constantly. The mixture should look silky and glossy. This is where the magic happens; the cream cheese gives the filling body. If you see lumps, use a hand blender for a smoother finish. Let this mixture sit for 5 minutes to thicken slightly before adding the strawberries.
- Step 5: Fold in Strawberries. Dice 1 cup of fresh strawberries into bite‑size pieces. Gently fold them into the cream cheese and gelatin mixture. The strawberries will release their juice, adding natural sweetness and a burst of color. Be careful not to mash the berries; you want them intact for a nice texture. This step also infuses the filling with real fruit flavor, elevating the dessert from simple to extraordinary. If you prefer a smoother texture, you can puree the berries before folding them in.
- Step 6: Add Vanilla. Pour in one teaspoon of vanilla extract. Stir until the vanilla is evenly distributed. Vanilla balances the tartness of the gelatin and the richness of the cream cheese. It also enhances the strawberry flavor without overpowering it. This is a small addition that makes a big difference. If you’re vegan, use a plant‑based vanilla extract for a subtle twist.
- Step 7: Pour into Crust. Carefully pour the filling into the prepared crust, spreading it evenly with a spatula. Tap the pie dish gently on the counter to release any air bubbles. This step is critical; any trapped air can cause the filling to crack as it sets. If you notice a crack, you can smooth it out with a clean knife. The filling should be level, with a slight dome at the top. This will give the pie a classic, elegant look.
- Step 8: Chill. Cover the pie with plastic wrap and refrigerate for at least 4 hours, preferably overnight. The gelatin needs time to set fully, creating that perfect, firm yet creamy texture. If you’re short on time, 2 hours will still give a decent set, but the flavor won’t develop as fully. During the chill, the strawberries will release more juice, enriching the filling. When you’re ready to serve, remove the plastic wrap and let the pie sit at room temperature for 10 minutes before slicing. This step ensures the pie is easy to cut and the filling doesn’t stick to the knife.
- Step 9: Top with Whipped Cream. Whip 2 cups of heavy cream with a tablespoon of sugar until soft peaks form. Spoon or pipe the whipped cream onto the chilled pie, creating swirls that contrast with the pink filling. If you want a fancy touch, dust the top with a pinch of cocoa powder or a few fresh strawberry slices. This final flourish not only adds flavor but also makes the pie look like a showstopper. Serve immediately, or keep it refrigerated until ready to serve. The whipped cream will stay fresh for up to 24 hours in the fridge.
That's it — you did it. But hold on, I've got a few more tricks that'll take this to another level…
Insider Tricks for Flawless Results
The Temperature Rule Nobody Follows
Temperature is everything when working with gelatin. If the gelatin is too hot, it can lose its setting power; if it’s too cold, it won’t dissolve properly. Aim for a water temperature of 200°F when boiling and let it cool to around 120°F before adding the powder. A kitchen thermometer is a small investment that pays off in consistent results. I’ve used a cheap digital thermometer to keep the water at the right temperature, and it’s made a noticeable difference in the final texture. The gelatin should feel warm to the touch, but not hot. This trick ensures your pie sets perfectly without being rubbery or too soft.
Why Your Nose Knows Best
The aroma of gelatin as it sets is a subtle cue that the pie is ready. When you first open the fridge, you’ll notice a faint sweet scent that signals the gelatin has solidified. If the smell is weak, give it a bit more time; if it’s overpowering, the pie may be over‑cooked. I’ve always listened to my nose to gauge the set, and it’s saved me from serving a pie that was still too runny. This sensory check is a quick, no‑fuss way to avoid disappointment. Trust your nose, and the pie will thank you.
The 5-Minute Rest That Changes Everything
After chilling, let the pie rest at room temperature for 5 minutes before slicing. This brief pause allows the filling to firm up just enough to hold its shape, preventing it from sliding off the knife. It also lets the flavors meld, giving the pie a richer taste. I’ve found that cutting straight from the fridge often results in a messy mess, but a quick rest makes slicing a breeze. Think of it as giving the pie a moment to breathe before the grand reveal.
Keep It Cool, Keep It Fresh
If you’re serving the pie at a gathering, keep it refrigerated until the last moment. The filling can soften if left out too long, causing it to slide off the knife. Use a chilled cutting board and a butter knife to maintain crispness. I’ve used a chilled glass platter to keep the pie cool and presentable. This simple step keeps the dessert looking pristine and ensures every bite is as creamy as the first.
Add a Splash of Water Before Reheating
If the pie has been stored for a couple of days, it may become slightly dry. Before serving, sprinkle a tiny splash of cold water over the top and let it sit for 10 minutes. This steams the filling back to perfection, restoring the silky texture. I’ve used this trick after a week in the fridge, and it revived the pie like a magic spell. The water doesn’t alter the flavor, but it adds moisture that makes the pie feel fresh again.
Creative Twists and Variations
This recipe is a playground. Here are some of my favorite ways to switch things up:
Cherry Blossom Surprise
Swap the strawberry gelatin for cherry gelatin, and use fresh cherries instead of strawberries. The result is a floral, slightly tart dessert that’s perfect for spring. Add a splash of lemon juice to brighten the flavor. The cherry pieces provide a juicy burst that’s hard to resist. Serve with a dusting of powdered sugar for a delicate finish.
Chocolate Covered Strawberry Delight
Dip the strawberries in melted dark chocolate before folding them into the filling. This gives the pie a decadent, chocolate‑fruit combo. After the pie sets, drizzle more melted chocolate over the top and let it harden for an extra glossy look. The chocolate adds richness and a hint of bitterness that balances the sweetness. It’s a crowd‑pleaser for chocolate lovers.
Citrus Zest Twist
Add a tablespoon of orange zest to the filling. The citrus oils elevate the strawberry flavor and add a bright, fresh note. This variation works beautifully for summer gatherings. Pair it with a light mint garnish for a refreshing twist. The zest also adds a subtle aroma that makes the pie even more enticing.
Almond Crust Variation
Replace the graham cracker crust with an almond flour crust for a gluten‑free version. Mix 1 cup almond flour, ¼ cup butter, and 2 tablespoons honey until crumbly. Press into the pie dish and bake at 350°F for 10 minutes. This crust adds a nutty flavor that pairs well with the strawberry filling. It’s a great option for those with dietary restrictions.
Minty Freshness
Add a handful of fresh mint leaves to the filling for a cooling effect. The mint complements the strawberry’s natural sweetness and adds a refreshing aroma. After the pie sets, garnish with whole mint leaves for a pop of green. This variation is especially refreshing on hot days and pairs well with a glass of sparkling water.
Storing and Bringing It Back to Life
Fridge Storage
Store the chilled pie in the refrigerator for up to 5 days. Keep it covered with plastic wrap to prevent it from absorbing fridge odors. Before serving, let the pie sit at room temperature for 10 minutes to soften slightly. This step ensures the filling remains creamy and the crust stays crisp. If you’re serving it at a party, keep the pie chilled until the last moment to maintain freshness.
Freezer Friendly
To freeze, wrap the pie tightly in plastic wrap and then in aluminum foil. Freeze for up to 3 months. When you’re ready to serve, thaw in the refrigerator overnight. The texture may be slightly firmer after freezing, but the flavor remains intact. This is a great option for meal prepping or for guests who arrive late. Just remember to let it thaw fully before slicing.
Best Reheating Method
If the pie has dried out, sprinkle a tiny splash of cold water over the top and let it sit for 10 minutes. This steams the filling back to perfection, restoring the silky texture. Alternatively, place the pie in the fridge for 10 minutes to let it cool slightly, then let it sit at room temperature for 10 minutes before serving. This gentle warming keeps the flavors fresh and the texture smooth. Never microwave the pie, as it will melt the gelatin and ruin the structure.