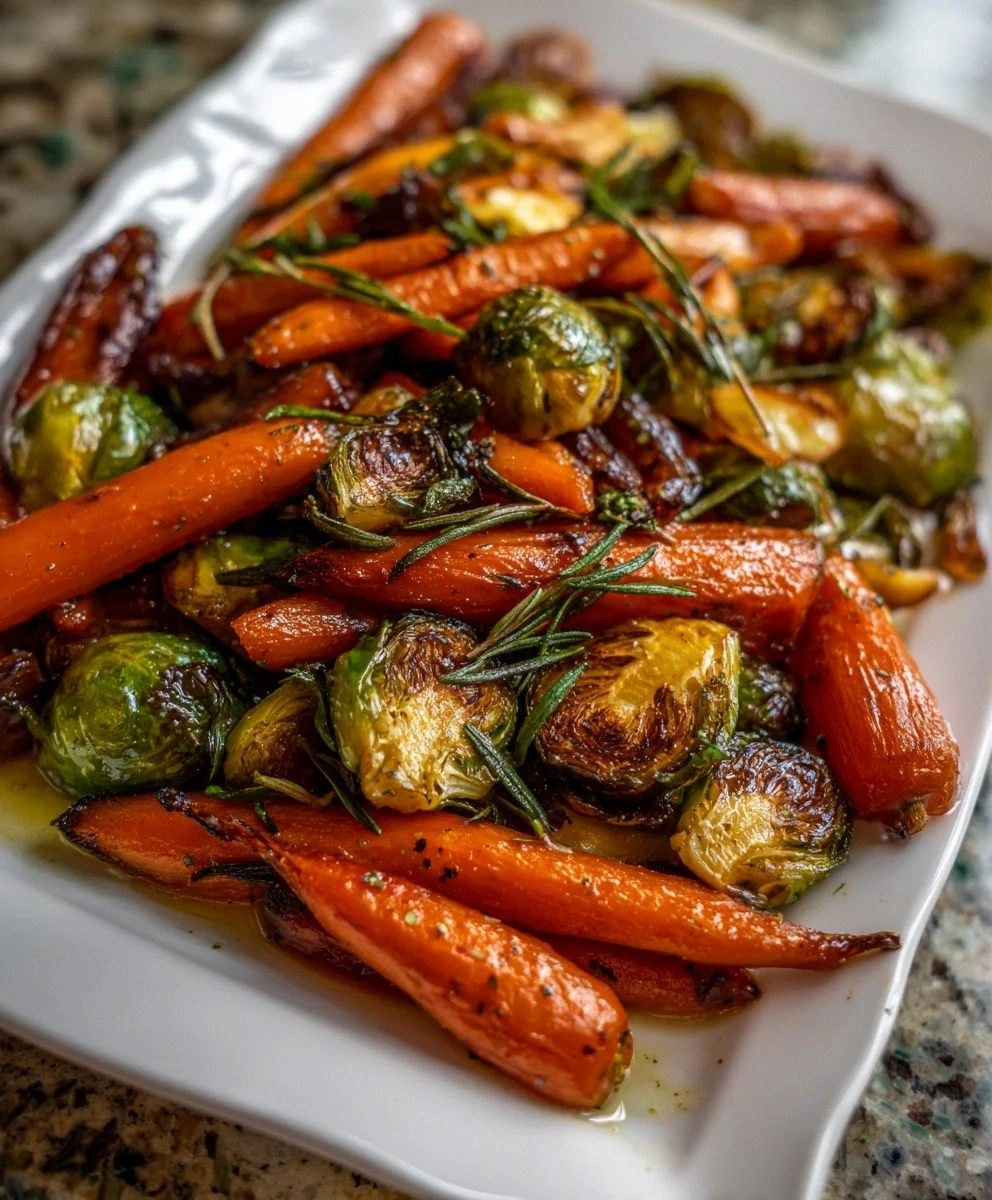
I still remember the Thanksgiving when I tried to impress my in-laws with a fancy roasted vegetable medley that required seven different pans, three timers, and a level of coordination I simply do not possess. The carrots were mushy, the Brussels sprouts were burnt on the outside and raw in the middle, and the maple glaze I attempted to make on the stovetop crystallized into a sticky mess that glued itself permanently to my favorite saucepan. My mother-in-law, bless her heart, politely picked at the least-charred pieces while my husband desperately tried to change the subject to football. That disaster sent me on a mission to create a foolproof method that would deliver perfectly tender vegetables with that gorgeous maple caramelization — all without turning my kitchen into a war zone.
After months of testing, tweaking, and eating more Brussels sprouts than any human should consume, I finally cracked the code. The secret? Your slow cooker — that humble appliance gathering dust in your cabinet — is about to become your best friend for vegetable glory. This method is so ridiculously simple that you'll feel like you're cheating, but the results are so stunning that nobody will believe you didn't slave over a hot stove for hours. The vegetables emerge with that perfect balance of tender-crisp texture, coated in a glossy maple glaze that makes them look like they came from a five-star restaurant.
Here's the game-changer: instead of fighting with your oven's hot spots or trying to coordinate multiple pans, everything cooks together in one pot while you go about your day. The slow cooker creates this magical steamy environment that perfectly cooks the vegetables, then the glaze reduces down to create that irresistible sticky-sweet coating. The first time I served this at a dinner party, my guests literally fought over the last spoonfuls. My friend Sarah, who claims to hate Brussels sprouts, asked for the recipe three times and now makes this dish weekly. Even my picky nephew, whose vegetable consumption is normally limited to French fries, asked for seconds.
What makes this recipe absolutely addictive is the way the maple syrup transforms during the slow cooking process. It develops these complex, almost smoky undertones while the natural sugars caramelize just enough to create depth without overwhelming sweetness. The butter (or olive oil, if you're dairy-free) helps the glaze cling to every ridge and crevice of the vegetables, ensuring each bite delivers maximum flavor. Trust me when I say that once you taste these vegetables, you'll never look at carrots or Brussels sprouts the same way again. Let me walk you through every single step — by the end, you'll wonder how you ever made it any other way.
What Makes This Version Stand Out
- One-Pot Wonder: Forget about juggling multiple pans and trying to coordinate timing. Everything goes into your slow cooker and emerges perfectly cooked. This means fewer dishes, less stress, and no more vegetables going cold while you frantically try to finish everything else.
- Texture Perfection: Most recipes turn carrots and Brussels sprouts into mushy sadness. This method preserves that ideal tender-crisp bite that makes vegetables actually crave-worthy. The Brussels sprouts maintain their structure while developing those gorgeous caramelized edges.
- Maple Magic: Real maple syrup creates a complex glaze that transforms during the slow cooking process. It develops these incredible smoky-caramel notes that fake pancake syrup could never achieve. The result tastes like you spent hours reducing a fancy gastrique, but it's literally just maple syrup doing its thing.
- Completely Foolproof: I dare you to mess this up. The slow cooker is forgiving, the timing is flexible, and even if you add ingredients slightly out of order, everything still turns out delicious. This is the recipe that converts people who claim they "can't cook vegetables."
- Make-Ahead Champion: Prep everything the night before, store in the fridge, and just hit start in the morning. It's perfect for holidays, dinner parties, or those days when you know you'll be too busy to think about cooking later.
- Universal Crowd-Pleaser: I've served this to vegetable skeptics, picky eaters, and people who normally run screaming from Brussels sprouts. Everyone goes back for seconds. The sweet-savory balance hits that perfect note that appeals to kids and adults alike.
- Ingredient Flexibility: Don't have baby carrots? Use regular ones. Dairy-free? Swap the butter for olive oil. Only have dried thyme? It still works beautifully. This recipe adapts to whatever you have on hand without losing its magic.
Alright, let's break down exactly what goes into this masterpiece...
Inside the Ingredient List
The Flavor Base
Baby carrots are the unsung hero of convenience cooking, but don't let their humble reputation fool you — they're actually young carrots harvested before reaching full size, not misshapen regular carrots shaped into "babies" like urban legend claims. Their natural sweetness concentrates beautifully during slow cooking, and their uniform size means no peeling or chopping required. If you prefer regular carrots, choose slender ones and cut them into two-inch pieces on a diagonal — the angled cut creates more surface area for the glaze to cling to. The key is avoiding those thick, woody carrots that taste like you're eating a tree branch.
Brussels sprouts are having a moment, and for good reason. These miniature cabbages develop an incredible nutty flavor when cooked properly, but they're often unfairly maligned due to childhood trauma of boiled, sulfur-smelling disasters. The secret is using fresh sprouts (not frozen) and trimming them properly — remove any yellowed outer leaves and cut off the woody stem end. Halving them exposes more surface area for caramelization and helps them cook faster, preventing that dreaded mushy center. If you're cooking for sprout skeptics, try shredding them instead — the texture becomes more like a warm slaw that even converts the most stubborn vegetable hater.
The Sweet Science
Pure maple syrup is non-negotiable here — I'm talking about the real stuff that comes from trees, not the corn syrup impostor masquerading as "pancake syrup" in most grocery stores. Real maple syrup contains over 24 different flavor compounds that develop complexity during cooking, creating notes of vanilla, caramel, and even subtle smokiness. The Grade A Dark Color, Robust Taste variety (formerly Grade B) is perfect for cooking because its stronger flavor stands up to heat and other ingredients. Avoid anything labeled "maple-flavored" or "breakfast syrup" unless you want vegetables that taste like a cheap diner.
Unsalted butter gives you control over the final seasoning and creates that luxurious mouthfeel that makes the glaze cling to every surface. The milk solids in butter help emulsify the glaze, preventing the maple syrup from becoming too thin or watery. If you're dairy-free, use a high-quality olive oil instead — it won't have quite the same richness, but it will still create a beautiful glaze. Just avoid coconut oil unless you want your vegetables to taste like a tropical vacation.
The Flavor Enhancers
Salt might seem basic, but it's absolutely crucial for bringing out the natural sweetness in both the vegetables and the maple syrup. Without proper seasoning, your dish will taste flat and one-dimensional even if you use the best ingredients. I prefer kosher salt for cooking because its larger crystals are easier to control, but sea salt adds a nice crunch if you're finishing the dish. Don't be shy here — vegetables need more salt than you think, especially when cooked in a slow cooker where flavors can become muted.
Black pepper provides the subtle heat that balances the sweetness of the maple syrup. Freshly ground is worth the extra effort — pre-ground pepper loses its volatile oils within minutes of grinding, taking on a dusty, bitter flavor. You want that bright, slightly floral heat that makes your tongue tingle pleasantly. The pepper also helps cut through the richness of the butter, preventing the dish from becoming cloying.
Garlic powder and onion powder create layers of savory flavor that complement the natural sweetness of the vegetables without overwhelming them. These dried forms are actually preferable to fresh in this application because they distribute evenly and won't burn during the cooking process. Fresh garlic would turn bitter in the slow cooker, while powdered garlic melds seamlessly with the other flavors. Think of these as the supporting actors that make the stars shine brighter.
The Finishing Touch
Fresh thyme brings an herbaceous note that ties everything together with its subtle lemony, slightly minty flavor. The tiny leaves distribute throughout the dish, ensuring every bite has that fresh herb brightness. If you only have dried thyme, use about one-third the amount since dried herbs are more concentrated. Other herbs like rosemary or sage would overwhelm the delicate balance, while thyme enhances without competing.
Everything's prepped? Good. Let's get into the real action...
The Method — Step by Step
- Prep Your Vegetables: Start by rinsing your baby carrots under cold water to remove any debris — don't skip this step even if they look clean, because nobody wants gritty vegetables. If you're using regular carrots, peel them and cut them on a bias into two-inch pieces, making sure they're roughly the same size as your Brussels sprout halves. For the Brussels sprouts, trim off the woody stem end and remove any yellowed or damaged outer leaves, then cut them in half from top to bottom. The key is keeping everything around the same size so they cook evenly — if some sprouts are tiny, leave them whole.
- Season Generously: In your slow cooker insert, toss the prepared vegetables with the salt, pepper, garlic powder, and onion powder until everything is evenly coated. Don't be shy with the seasoning — remember that slow cookers can mute flavors, so you want to be slightly more aggressive than you would with stovetop cooking. Use your hands to really massage the seasonings into all the nooks and crannies of the vegetables. This is also the moment to taste a raw carrot and adjust your salt level — it should taste pleasantly salty.
- Add the Maple Magic: Pour the maple syrup over the seasoned vegetables, making sure to scrape out every last drop with a spatula — this liquid gold is too precious to waste. Add the butter or olive oil, then use your hands to toss everything together until every vegetable is glistening with the sweet mixture. The vegetables should look like they're wearing a light coating of maple armor, not swimming in liquid. If it seems dry, don't panic — the vegetables will release moisture as they cook.
- Arrange Strategically: This next part? Pure magic. Arrange the Brussels sprouts cut-side down in a single layer on the bottom of the slow cooker if possible — this helps them develop those gorgeous caramelized edges. Scatter the carrots on top, creating layers that will cook at slightly different rates. The vegetables on the bottom will get more direct heat and develop deeper color, while the top layer stays beautifully tender.
- Set and Forget: Cover the slow cooker and set it to low for 4-5 hours or high for 2-3 hours. The exact timing depends on your specific slow cooker and how tender you like your vegetables. Here's the game-changer: unlike oven roasting, you can't really overcook these — they'll just get more tender and the flavors will deepen. Set a timer for the minimum time, then check for doneness by piercing a carrot with a fork.
- The Glaze Reduction: Once the vegetables are fork-tender, remove the lid and switch to high if you were on low. Let it cook uncovered for another 15-20 minutes to reduce the liquid into a glossy glaze that clings to every surface. This is the moment when everything comes together — the maple syrup thickens and transforms into this incredible coating that makes you want to lick the insert clean. Stir gently once or twice during this final reduction to ensure even glazing.
- Fresh Herb Finish: Just before serving, sprinkle the fresh thyme leaves over the vegetables and give everything one final gentle toss. The heat will release the herb's essential oils, creating this amazing aroma that fills your kitchen. If you're using dried thyme, add it about 30 minutes before the end of cooking so the flavors have time to meld properly.
- Serve With Confidence: Transfer to a serving dish or serve directly from the slow cooker insert — these vegetables look gorgeous either way. Make sure to spoon some of that incredible glaze over the top so it pools invitingly around the vegetables. Watch as your guests' eyes light up when they taste that first bite of perfectly tender, maple-glazed perfection.
That's it — you did it. But hold on, I've got a few more tricks that'll take this to another level...
Insider Tricks for Flawless Results
The Temperature Rule Nobody Follows
Here's what separates good cooks from great ones: understanding carryover heat. Your vegetables will continue cooking even after you turn off the slow cooker, so pull them when they're just slightly firmer than you want the final result to be. For most slow cookers, this means checking them about 15 minutes before you think they're done. The residual heat will finish the job perfectly, leaving you with vegetables that have that ideal tender-crisp texture instead of falling-apart mush. I'll be honest — I learned this the hard way after serving Brussels sprouts that disintegrated into green mush at a potluck dinner.
Why Your Nose Knows Best
Your sense of smell is your secret weapon for perfect timing. When the maple glaze is almost ready, your kitchen will fill with this incredible aroma that smells like fall mornings and cozy evenings. It's a sweet, slightly nutty scent with hints of caramel that makes your mouth water instantly. When you start smelling this, it's time to check your vegetables — they're probably just about done. This olfactory cue is more reliable than any timer, because every slow cooker is slightly different and the exact timing can vary based on how full your cooker is.
The 5-Minute Rest That Changes Everything
Once your vegetables are perfectly glazed, resist the urge to serve them immediately. Let them rest for five minutes with the lid off — this allows the glaze to set slightly and prevents that dreaded watery pool on your serving plate. During this brief pause, the maple coating thickens and becomes even more glossy and luxurious. The vegetables also cool just enough to be the perfect temperature for eating, releasing their full flavor profile that would be muted when piping hot. Trust me, this tiny patience investment pays off in presentation and taste.
The Size Matters Secret
Cutting your vegetables into uniform sizes isn't just about even cooking — it's about creating the perfect glaze-to-vegetable ratio. When everything is roughly the same size, each piece gets an equal coating of that incredible maple glaze. If you have mixed sizes, the smaller pieces become over-glazed and sticky-sweet, while larger ones stay bland. Take an extra minute to sort your Brussels sprouts by size and adjust your cutting accordingly. This attention to detail is what separates restaurant-quality results from home-cooking mediocrity.
The Stirring Sweet Spot
Here's a confession: my first attempts at this recipe failed because I stirred too much. During the initial cooking phase, resist the urge to peek and stir every time you walk past the slow cooker. Every time you lift the lid, you release precious heat and steam that your vegetables need to cook properly. Stir only once, about halfway through, to redistribute the vegetables and ensure even cooking. Then leave them alone until the final glazing stage. This hands-off approach is what allows those gorgeous caramelized edges to develop undisturbed.
Creative Twists and Variations
This recipe is a playground. Here are some of my favorite ways to switch things up:
The Holiday Showstopper
Add a handful of dried cranberries and some toasted pecans during the final 15 minutes of cooking for a festive twist that screams holiday dinner. The cranberries plump up beautifully and add these gorgeous ruby jewels throughout the dish, while the pecans provide a satisfying crunch and rich, buttery flavor. The tart cranberries balance the sweet maple perfectly, creating a sophisticated flavor profile that elevates this from everyday side dish to special occasion worthy. Your Thanksgiving guests will think you're a culinary genius.
The Spice Route Adventure
For an exotic twist that will have everyone guessing your secret ingredient, add a pinch of ground cardamom and a tiny dash of cinnamon along with the other seasonings. These warm spices complement the maple syrup beautifully, creating this mysterious, complex flavor that tastes like something from a Moroccan spice market. The key is restraint — you want just enough to intrigue, not overwhelm. Start with 1/8 teaspoon of each and taste before adding more. This version pairs beautifully with roasted chicken or lamb.
The Bacon Lover's Dream
Cook 4-5 strips of bacon until crispy, crumble them, and stir them in during the final glazing stage. The salty, smoky bacon creates an incredible contrast with the sweet maple glaze, while the crispy bits add textural interest that makes this absolutely addictive. Use the bacon fat to replace half the butter for an even deeper smoky flavor. Even people who claim they don't like vegetables will devour this version — it's like candy that happens to be good for you.
The Asian-Inspired Fusion
Replace half the maple syrup with hoisin sauce and add a teaspoon of grated fresh ginger along with the seasonings. The hoisin adds umami depth while the ginger provides a bright, spicy note that cuts through the richness. Finish with a sprinkle of toasted sesame seeds and sliced green onions instead of thyme. This version pairs amazingly with grilled salmon or teriyaki chicken, and it will completely change how you think about vegetable side dishes.
The Harvest Festival Mix
Add cubed butternut squash and halved pearl onions to create a true harvest medley. The squash adds creamy sweetness while the pearl onions provide these wonderful little pops of flavor throughout. Cut everything to roughly the same size as your carrots and Brussels sprouts for even cooking. This hearty version can stand alone as a vegetarian main dish, especially when served over creamy polenta or wild rice. It's like autumn in a bowl.
The Heat Seeker's Version
Add a pinch of cayenne pepper or a diced jalapeño (seeds removed for less heat) along with the other seasonings. The subtle heat creates an incredible contrast with the sweet maple glaze, making each bite exciting and keeping people coming back for more. The capsaicin in the peppers also helps balance the sweetness, preventing the dish from becoming cloying. Start small — you can always add more heat, but you can't take it away.
Storing and Bringing It Back to Life
Fridge Storage
These vegetables keep beautifully in the refrigerator for up to 5 days, making them perfect for meal prep or holiday cooking ahead. Store them in an airtight container with some of the glaze spooned over the top to keep everything moist. The flavors actually deepen and improve after a day or two in the fridge — it's like the vegetables are marinating in their own delicious sauce. Make sure the container is completely cool before refrigerating to prevent condensation that could dilute the glaze.
Freezer Friendly
While you can freeze these vegetables, I recommend doing it before the final glazing stage for best results. Freeze the cooked vegetables with a small amount of the cooking liquid in freezer bags for up to 3 months. When ready to serve, thaw overnight in the refrigerator, then reheat in a skillet with fresh maple syrup to recreate that glossy glaze. The texture won't be quite as perfect as fresh, but it's still miles better than most frozen vegetable options.
Best Reheating Method
The microwave works in a pinch, but for best results, reheat in a skillet over medium heat with a tiny splash of water. The water creates steam that gently warms the vegetables without drying them out, while the direct heat helps revive the glaze. Stir occasionally until heated through, about 5-7 minutes. If the glaze seems thin, let it cook for a minute or two longer to reduce again. This method restores them to almost-fresh glory, with that perfect glossy coating intact.