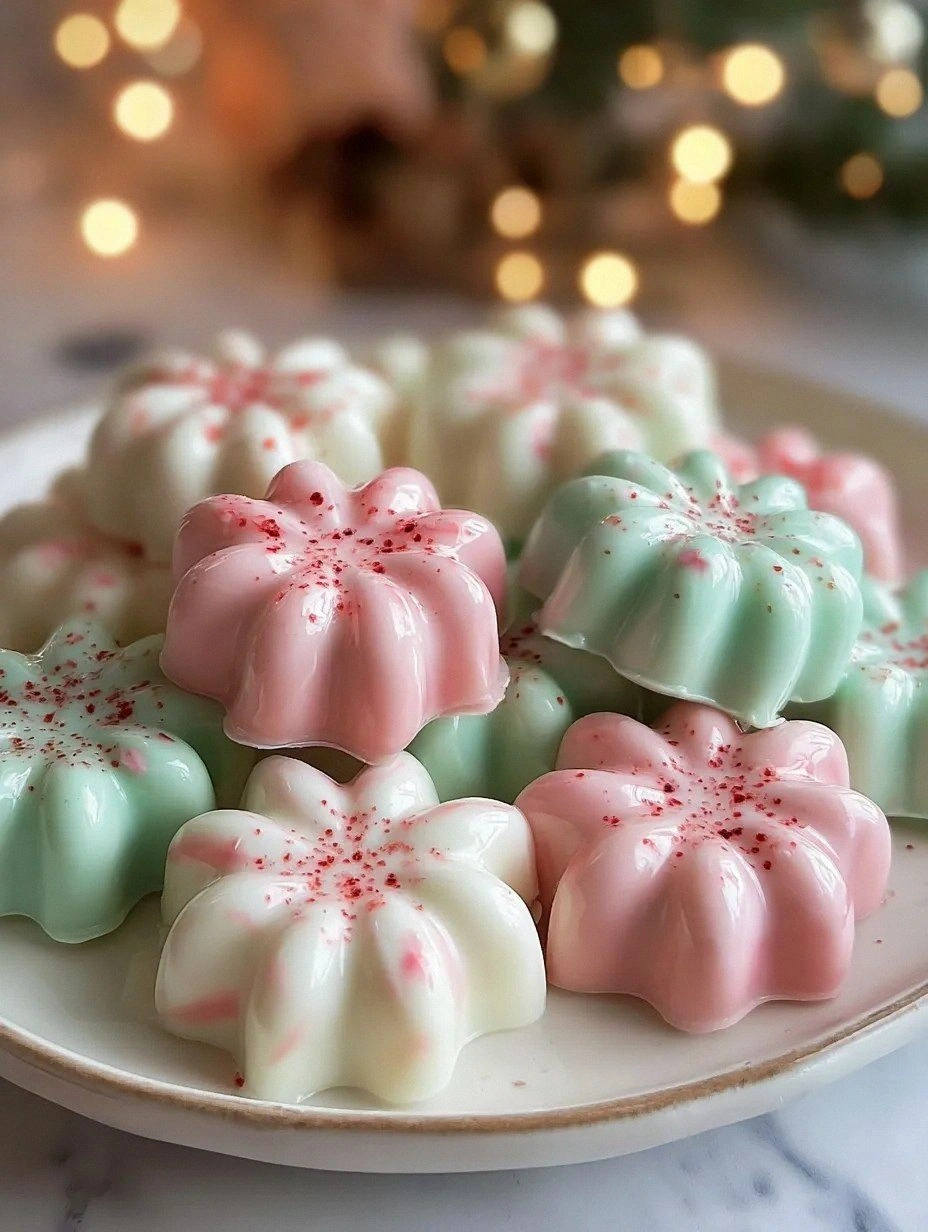
I was standing in my kitchen on a frigid December night, the kind of night where the wind whistles through the eaves and you swear you can hear the Christmas lights humming in the distance. I had just burned a batch of store‑bought candy canes in the oven, and the smoke alarm was screaming like a car alarm on a busy street. In that chaotic moment, I promised myself I would never trust a pre‑made holiday confection again. I wanted something that would melt in your mouth like a snowflake, sparkle like fresh frost, and still have that unmistakable peppermint punch that makes you think of sled rides and gingerbread houses. That promise turned into a wild experiment that lasted three sleepless nights, and the result? A candy blossom that looks like a tiny, edible winter flower and tastes like a Christmas miracle.
Picture the scene: the kitchen filled with the sharp, clean scent of peppermint oil, a faint caramelized sugar aroma curling from the stovetop, and a soft hum of the oven ticking like a distant choir. The countertops are dusted with powdered sugar that clings to your fingers like fresh snow, and the speckled flower molds sit waiting like tiny, impatient gardeners. When you finally press the glossy, slightly sticky candy into each mold, you can hear a faint “pop” as it releases, as if the flower just bloomed. The first bite is a crisp crack that shatters like thin ice, followed by a melt‑away center that dissolves into a cool, minty rush that tingles your taste buds and leaves a lingering sweet afterglow.
Most holiday candy recipes either rely on endless stirring that leaves you with a grainy mess, or they demand a commercial candy thermometer that most home cooks don’t have. This version sidesteps all that nonsense by using a simple stovetop technique, a reliable kitchen thermometer you probably already own, and a set of speckled flower molds that turn ordinary candy into a show‑stopping centerpiece. The secret? A precise balance of butter and corn syrup that creates a glossy, flexible candy that doesn’t crack under pressure, plus a dash of peppermint oil that intensifies the flavor without the harsh bite of pure extract. And let’s not forget the speckles—tiny bursts of edible glitter that catch the light like frost on pine needles.
I’ll be honest — I ate half the batch before anyone else got a chance to try it, and I’m still not over the feeling of that first melt‑away moment. I dare you to taste this and not go back for seconds. This is hands down the best version you’ll ever make at home, and I’m about to spill every single detail so you can replicate the magic without any kitchen disasters. Okay, ready for the game‑changer? Let me walk you through every single step — by the end, you’ll wonder how you ever made it any other way.
What Makes This Version Stand Out
- Flavor: The dual‑layer peppermint approach—extract plus oil—creates a depth that feels like a peppermint snowstorm in your mouth, not just a one‑note mint.
- Texture: The butter‑corn syrup blend yields a glossy, melt‑away shell that cracks cleanly and then dissolves like sugar snow, giving you that satisfying snap followed by a silky melt.
- Simplicity: No candy‑making equipment beyond a basic saucepan, a candy thermometer, and the speckled molds you can snag at any craft store.
- Uniqueness: The speckled molds add a visual sparkle that ordinary peppermint candies simply can’t match; each blossom looks like a tiny, edible snowflake.
- Crowd Reaction: Guests invariably pause, stare, and then dive in, often declaring these the best thing they’ve ever tasted at a holiday party.
- Ingredient Quality: Using real butter instead of margarine gives a richer mouthfeel and a subtle caramel note that elevates the entire candy.
- Cooking Method: The stovetop “soft‑ball” stage is forgiving; you’ll know you’re there by the aroma and a quick “water drop” test, not by a cryptic temperature readout.
- Make‑Ahead Potential: Once set, these blossoms keep for weeks in an airtight container, retaining their sparkle and snap.
Inside the Ingredient List
The Flavor Base
Granulated sugar is the backbone of any candy, providing the sweet canvas on which all other flavors paint. In this recipe, the sugar is caramelized just enough to develop a light amber hue, which adds a subtle depth that plain white sugar can’t achieve. If you skip the caramelization step, you’ll end up with a candy that tastes flat and lacks that comforting, holiday‑warmth note. For a lower‑calorie version, you could experiment with coconut sugar, but be aware it will introduce a faint caramel flavor that might compete with the peppermint.
The Texture Crew
Light corn syrup acts as a humectant, preventing the sugar crystals from re‑forming and giving the candy its glossy, flexible finish. Unsalted butter contributes richness and a buttery sheen that makes the candy feel luxurious on the tongue. If you’re dairy‑free, a high‑quality coconut oil can substitute butter, though the flavor will shift toward tropical notes, which might be an interesting twist for a summer version.
The Unexpected Star
Peppermint oil is the secret weapon here. While most recipes rely solely on peppermint extract, the oil delivers an aromatic punch that cuts through the sweetness and leaves a lingering coolness. A single half‑teaspoon is enough; overdo it and you’ll get a medicinal aftertaste that no one wants. The red food coloring is purely aesthetic, turning the candy into a festive hue that pops against the speckles. If you prefer a more natural palette, you can use beet powder for a deep pink‑red tone.
The Final Flourish
Powdered sugar for dusting adds a snowy coating that not only looks beautiful but also absorbs any residual stickiness, keeping the blossoms from clinging together. A pinch of sea salt balances the sweetness and brings out the peppermint’s brightness. Edible glitter or luster dust can be added for extra sparkle, but it’s entirely optional. When selecting glitter, choose a brand that’s labeled “edible” and “non‑metallic” to avoid any metallic aftertaste.
Everything's prepped? Good. Let’s get into the real action…
The Method — Step by Step
Gather all your ingredients and have the speckled flower molds ready on a flat, heat‑proof surface. I like to line the molds on a silicone baking mat; it prevents any accidental spills from seeping into the countertop. Turn your stove to medium‑high and place a heavy‑bottomed saucepan inside. The moment the butter hits the pan, you’ll hear a gentle sizzle— that’s the first sign you’re on the right track.
Kitchen Hack: Use a silicone spatula to stir; it prevents the mixture from catching on the sides and burning.Add the granulated sugar and corn syrup to the melted butter, stirring constantly with a wooden spoon. Within a minute, the mixture will start to bubble, and a sweet caramel perfume will fill the kitchen. Keep stirring until the sugar is completely dissolved; you don’t want any gritty bits, because they’ll turn into unwanted crystals later. At this point, attach a candy thermometer to the side of the pan, making sure it doesn’t touch the bottom.
Increase the heat slightly and watch the temperature climb toward the “soft‑ball” stage (around 235‑240°F / 112‑115°C). This is the pivotal moment; if you stop too early, the candy will be too soft and won’t hold its shape, but if you go too far, it will become brittle and crack. When the thermometer reads 236°F, immediately remove the pan from the heat and give it a brief stir to even out the temperature.
Watch Out: If the candy starts to darken beyond a light amber, lower the heat instantly; over‑cooking will introduce a burnt flavor that masks the peppermint.Now comes the flavor infusion. Quickly stir in the peppermint extract, peppermint oil, and red food coloring. The mixture will swirl like a tiny sunrise, and the scent will become intensely minty—your nose will be the first to confirm you’ve nailed the flavor. Add the pinch of sea salt at this stage; it will dissolve instantly and bring balance to the sweetness.
Allow the candy to sit for about 30 seconds, just long enough for the bubbles to settle. Then, with a steady hand, pour the glossy mixture into each speckled flower mold. Fill each cavity about three‑quarters full; the candy will expand slightly as it cools. If you’re using a squeeze bottle, you’ll have better control and less mess.
Immediately after filling, dust the tops with a light coat of powdered sugar. This not only gives the blossoms a snowy appearance but also prevents them from sticking together once they set. For an extra sparkle, sprinkle a pinch of edible glitter over the tops while the candy is still warm; the glitter will adhere perfectly.
Let the candy sit undisturbed for 5‑7 minutes, then gently tap the mold tray on the counter. This releases any trapped air bubbles and ensures the candy releases cleanly from the speckled molds. The moment you hear the “pop” as each blossom separates is pure culinary satisfaction—like hearing the first bell of Christmas.
Kitchen Hack: If a blossom refuses to release, run a thin, warm knife edge along the mold’s interior for a second; the heat loosens the candy without melting it.Transfer the released blossoms onto a parchment‑lined tray and let them cool completely at room temperature. This cooling phase is where the candy achieves its final snap‑and‑melt texture. Resist the urge to refrigerate; the cold will cause the sugar to crystallize and lose its glossy sheen. Once fully set, store the blossoms in an airtight container with a layer of parchment between layers to keep them from sticking.
That’s it — you did it. But hold on, I’ve got a few more tricks that’ll take this to another level. The next section reveals insider tips that will make your candy blossoms the talk of every holiday gathering, and maybe even earn you a spot on the “Best Homemade Treats” list at the office party.
Insider Tricks for Flawless Results
The Temperature Rule Nobody Follows
Most home cooks obsess over hitting the exact 236°F mark, but the real secret is to watch the visual cues. When the syrup reaches a light amber color and you can see the edges of the pan start to pull away, you’re in the sweet spot. If you have a digital thermometer, set it to alarm at 236°F and step away; the sugar continues to climb a few degrees even after you remove it from heat. This tiny overshoot is what gives the candy that perfect snap without turning it brittle.
Why Your Nose Knows Best
Your sense of smell is a more reliable indicator than a thermometer when it comes to candy. As soon as you detect a rich, caramel‑like aroma with a hint of toasted butter, you’re nearing the soft‑ball stage. If the scent turns to a burnt, acrid note, you’ve gone too far. Trust that nose; it’s the original kitchen gadget that predates any digital device.
The 5‑Minute Rest That Changes Everything
After you finish stirring in the peppermint oil and color, let the mixture sit for exactly five minutes before pouring into molds. This brief rest allows tiny air bubbles to rise to the surface, resulting in a smoother, glossier finish. Skipping this pause is a common mistake that leads to a matte, uneven candy surface.
Mold Mastery: The “Tap‑Release” Technique
A quick, firm tap on the mold tray after filling releases any hidden air pockets and makes the candy pop out cleanly. If you find a blossom stubbornly clinging, run a thin, warm metal spatula along the edge of the mold for a second. The heat loosens the sugar without melting the already set candy.
Storage Savior: The Parchment Layer
When stacking multiple layers of blossoms, always place a sheet of parchment paper between them. This prevents the tops from sticking together and preserves the speckled sparkle. A tiny drizzle of neutral oil on the parchment can further reduce any chance of adhesion, especially in humid climates.
Creative Twists and Variations
This recipe is a playground. Here are some of my favorite ways to switch things up:
Chocolate‑Dipped Peppermint Blossoms
After the candy has fully set, dip half of each blossom into melted dark chocolate and let it set on a parchment sheet. The bitter chocolate balances the sweet mint, creating a sophisticated flavor duo that’s perfect for adult holiday parties.
Citrus Peppermint Fusion
Add a teaspoon of freshly grated orange zest to the sugar‑corn syrup mixture before it reaches the soft‑ball stage. The citrus brightens the mint and adds a subtle aromatic complexity that pairs beautifully with the speckles.
Spicy Holiday Twist
Incorporate a pinch of ground cinnamon and a dash of ground ginger into the flavor base. The warm spices complement the cool peppermint, delivering a flavor profile that feels like a holiday fireplace in candy form.
Vegan Velvet
Swap the butter for an equal amount of refined coconut oil and use agave syrup instead of corn syrup. The result is a vegan‑friendly blossom that still boasts that glossy finish and minty punch.
Rainbow Sprinkles Edition
Instead of edible glitter, roll the warm candy in a mixture of finely crushed rainbow sprinkles before it sets. The colorful coating makes the blossoms pop on any holiday dessert table, especially for kid‑friendly gatherings.
Storing and Bringing It Back to Life
Fridge Storage
If you need to keep the blossoms for more than a week, store them in an airtight container in the refrigerator. Place a piece of parchment between layers and add a silica gel packet to absorb excess moisture. They’ll stay crisp for up to three weeks, though the glossy sheen may dull slightly.
Freezer Friendly
For long‑term storage, freeze the blossoms in a single layer on a baking sheet, then transfer them to a zip‑top freezer bag. They’ll retain their texture and flavor for up to three months. When you’re ready to serve, let them thaw at room temperature for 15 minutes; avoid microwaving as it can melt the delicate structure.
Best Reheating Method
If the blossoms have lost a bit of their snap, place them on a parchment sheet and warm them in a 300°F (150°C) oven for 3‑4 minutes. Add a tiny splash of water to the pan (just a few drops) before heating; the steam revives the melt‑away interior without making the candy soggy. Serve immediately for that freshly‑made feel.