I was standing in my kitchen, half‑heartedly scrolling through endless dessert videos, when a sudden craving for something airy, sweet, and ridiculously fast hit me like a sugar‑filled thunderbolt. I tried to whip up a classic rice‑krispie treat, but the rice was stubborn, the butter clumped, and the whole thing turned into a chewy mess that reminded me of a bad relationship—sticky, confusing, and ultimately unsatisfying. I stared at the clock, muttering, “I have ten minutes, not an hour,” and dared myself to invent a version that would be ready before the microwave even finished heating my coffee. The result? A treat that looks like a snow‑kissed mountain, crunches like fresh frost, and melts in your mouth like a cloud of vanilla‑kissed marshmallow.
Imagine the moment you pull the pan from the counter: the air is instantly scented with buttery caramel, sweet marshmallow, and a whisper of toasted nuts that makes your nose do a tiny happy dance. You hear the faint crackle as the mixture settles, a sound that reminds you of fresh snow underfoot—soft, satisfying, and promising a bite that will shatter like delicate ice crystals. The texture is a glorious marriage of airy fluff and crunchy shards, each mouthful delivering a contrast that feels like biting into a winter wonderland that you can actually eat. The flavor? Sweet, buttery, with a hint of fruity tang from freeze‑dried strawberries that pop like tiny fireworks of flavor.
What makes this version truly stand out is the secret weapon I slipped into the mix: freeze‑dried strawberries. Most no‑bake bars rely on plain marshmallows and plain chocolate, but these berries bring a burst of natural sweetness and a surprising tartness that cuts through the richness, keeping the palate excited. And because the recipe is completely no‑bake, you’ll never have to worry about a burnt bottom or a sticky stovetop disaster—just a quick melt, a stir, and a press, and you’ve got a dessert that could win a gold medal in the “Fastest, Most Fun, Most Flavorful” category.
Let me walk you through every single step — by the end, you’ll wonder how you ever made it any other way. I’ll spill the beans on the exact melting technique that guarantees a glossy coating, the timing trick that prevents the marshmallows from turning rubbery, and the little kitchen hack that turns ordinary nuts into a crunchy crown. Ready for the game‑changer? Okay, ready for the game‑changer? This next part? Pure magic.
What Makes This Version Stand Out
- Flavor Explosion: The freeze‑dried strawberries add a natural, tangy pop that balances the buttery sweetness, creating a taste profile that’s both nostalgic and surprising.
- Texture Symphony: You get airy marshmallow clouds layered with crunchy cracker shards and nutty nuggets, delivering a mouthfeel that’s as dynamic as a winter storm.
- Zero‑Bake Simplicity: No oven, no mess, no waiting—just melt, mix, press, and chill. Perfect for those 10‑minute cravings.
- Ingredient Quality: Using real butter and high‑quality marshmallows ensures a glossy finish and a melt that’s buttery smooth, not greasy.
- Crowd‑Pleaser Factor: I dare you to taste this and not go back for seconds; even the pickiest eaters are won over by the sweet‑savory balance.
- Make‑Ahead Potential: This bar keeps its crunch for days if stored properly, making it an ideal make‑ahead snack for busy weeks.
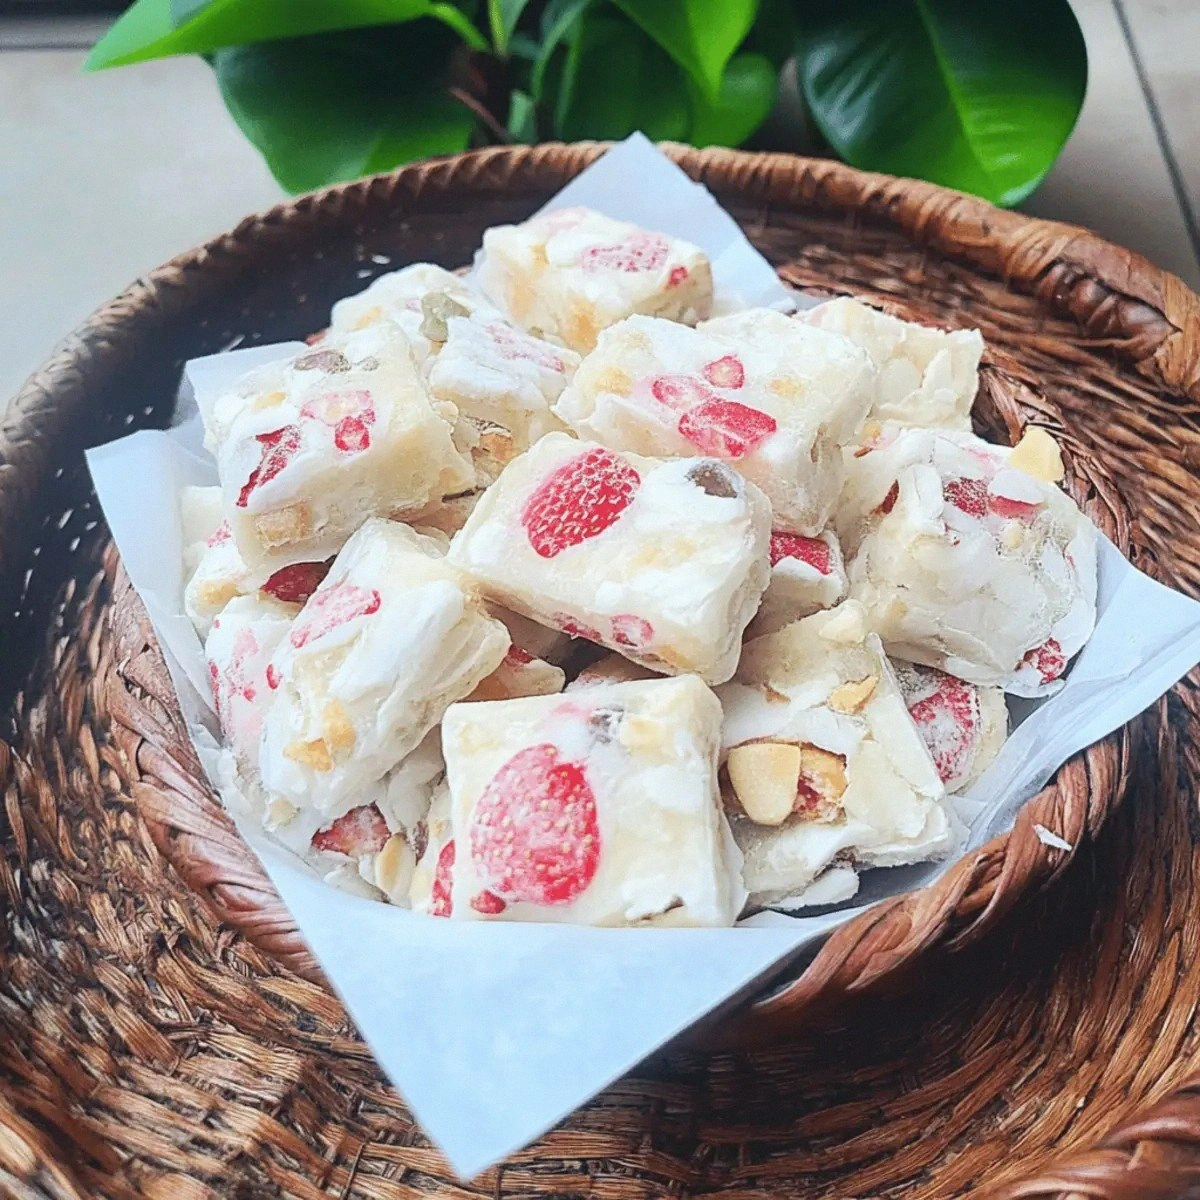
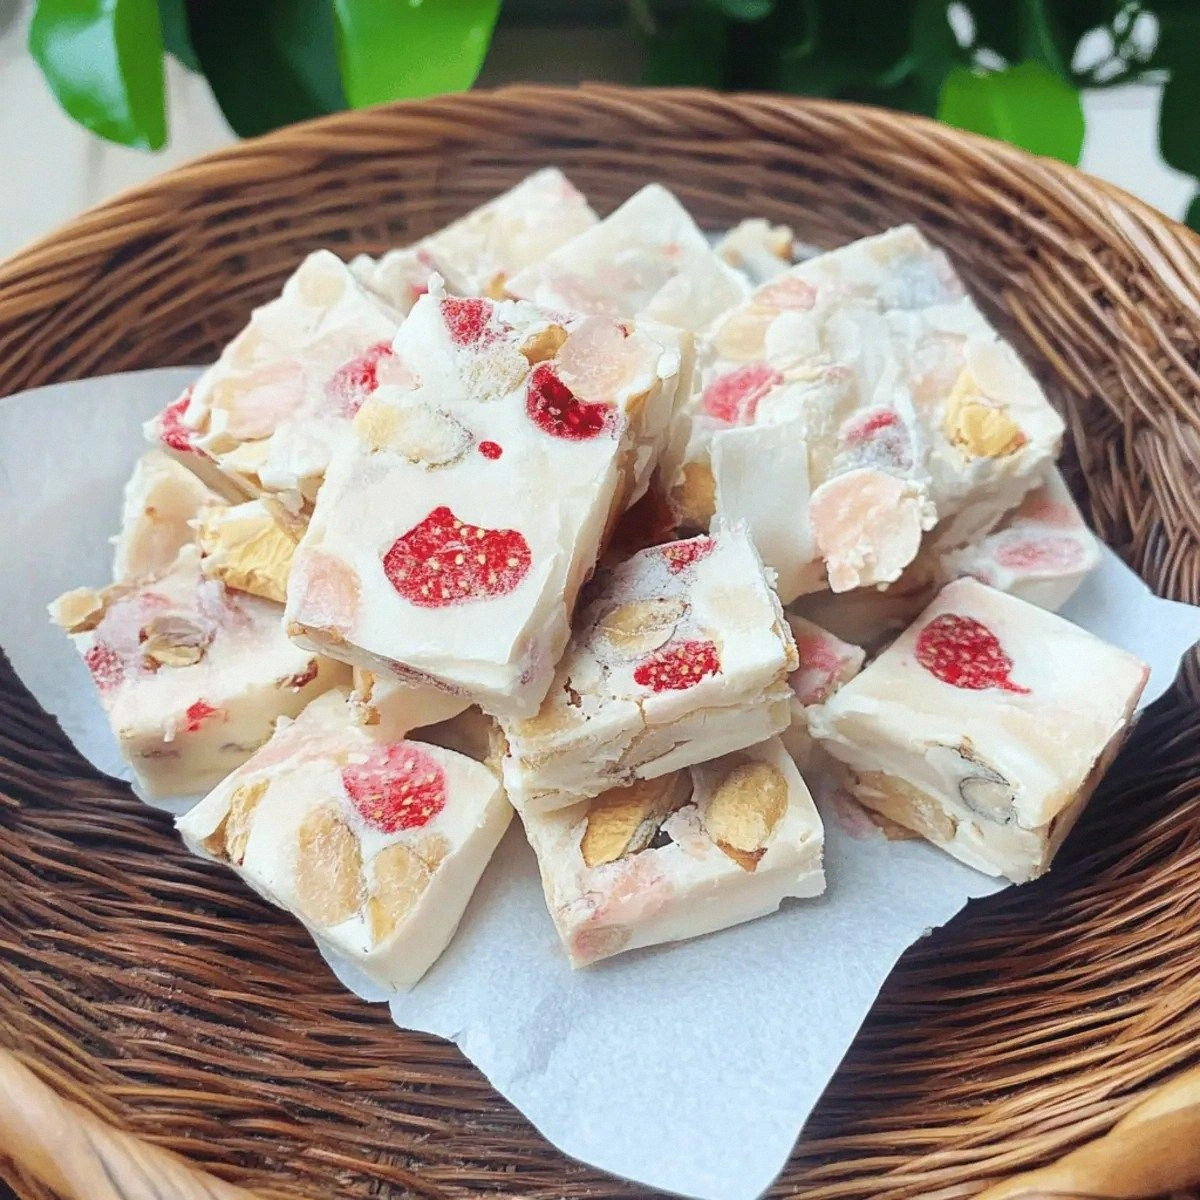
- Visual Wow: The speckled pink of the strawberries against the ivory marshmallow looks like a snowflake pattern—Instagram‑ready without any extra effort.
- Adaptable Base: Swap the crackers for pretzel pieces or the nuts for toasted coconut, and you’ve got an endless playground of flavors.
Inside the Ingredient List
The Flavor Base
Marshmallows are the heart of this crisp, providing that airy, melt‑in‑your‑mouth sweetness that feels like a cloud you can chew. If you skip them, you lose the signature fluffiness, and the bar becomes a dense, crumbly mess that no one wants to bite into. For the best results, choose mini‑marshmallows; they melt faster and blend more evenly with the butter. Pro tip: If you’re allergic to gelatin, opt for a plant‑based marshmallow alternative—just be aware the texture may be slightly less airy.
Butter is the unsung hero that gives the mixture a glossy, buttery sheen and a depth of flavor you just can’t get from oil. Using real unsalted butter lets you control the salt level and prevents the bar from becoming overly salty. If you’re watching calories, you can substitute half the butter with a light spread, but the crispness will be a shade less pronounced.
The Texture Crew
Milk powder adds a creamy, dairy‑rich undertone that amplifies the marshmallow’s sweetness without adding extra liquid. It also helps the mixture set faster once chilled, giving you that satisfying snap when you break a piece. If you’re lactose‑intolerant, a dairy‑free powdered milk works just as well, though the flavor will be a touch milder.
Small crackers (think buttery graham crackers or simple salted crackers) provide the crunchy backbone that makes each bite feel like you’re biting into a fresh snowflake. They absorb a little of the butter‑marshmallow mixture, creating a tender yet crisp texture. Crushed up too fine and you’ll lose the crunch; keep them in small bite‑size pieces for the perfect bite.
The Unexpected Star
Nuts—whether pumpkin seeds, dried cranberries, or almonds—introduce a nutty richness and a surprise burst of texture. They also add a hint of earthiness that balances the sweetness, preventing the bar from feeling cloying. If you’re nut‑allergic, swap them for toasted sunflower seeds or a handful of toasted oat flakes.
Freeze‑dried strawberries are the secret fireworks. Their bright pink shards retain the fresh strawberry flavor without adding moisture, which would otherwise make the crisp soggy. They also give the bar a beautiful speckled appearance that looks like a snow‑covered field dotted with berries. If strawberries aren’t in season, try freeze‑dried raspberries or blueberries for a similar pop.
The Final Flourish
A pinch of sea salt might seem trivial, but it elevates every sweet note, making the flavors pop like fireworks on a winter night. Sprinkle it lightly over the top before chilling, and you’ll hear a faint crackle as the salt crystals settle into the glossy surface. This tiny addition is the difference between a good bar and a great bar.
Everything's prepped? Good. Let's get into the real action…
The Method — Step by Step
Gather all your ingredients and measure them out before you start. I can’t stress enough how important it is to have everything within arm’s reach; otherwise you’ll be scrambling for that last cup of butter while the marshmallows start to stick to the pan. Place a large, heavy‑bottomed saucepan on medium heat and add the butter, letting it melt slowly so it doesn’t brown. As soon as it’s fully liquid, drop in the marshmallows, stirring continuously with a silicone spatula.
Watch the marshmallows melt into a silky river; you’ll hear a gentle hiss that’s the sound of sugar caramelizing just enough to give depth. Keep the heat moderate—if it spikes, the mixture can seize and become grainy. Once the marshmallows are completely dissolved and the mixture looks glossy, remove the pan from the heat. This is the moment of truth: the mixture should be smooth, not clumpy.
Quickly stir in the milk powder, ensuring it dissolves without forming lumps. The mixture will thicken slightly, which is exactly what you want—it will help bind the crackers and nuts later. Then fold in the small crackers, nuts, and freeze‑dried strawberries. Use a gentle folding motion; you want the pieces to stay distinct, not turned into a uniform paste.
Now comes the fun part: press the mixture into a greased 8×8‑inch pan. I like to line the pan with parchment paper first; it makes removal a breeze and keeps the edges from sticking. Use the back of a spoon or a flat spatula to spread the mixture evenly, pressing down firmly so everything adheres. The surface should be level, with a slight sheen from the butter‑marshmallow coating.
Sprinkle a light pinch of sea salt over the top, then give the pan a gentle tap on the counter to settle everything. The salt will embed itself into the glossy surface, creating tiny crunchy bursts that contrast the sweet melt. At this point, the bar looks like a snow‑covered field—soft, white, speckled with pink.
Slide the pan into the refrigerator and let it chill for at least 8 minutes. This short chill is all you need for the mixture to set; the butter solidifies, the milk powder firms up, and the whole thing becomes slice‑ready. While you wait, you can prep a serving plate or whip up a quick coffee to enjoy alongside.
After the chill, lift the parchment paper and place the slab on a cutting board. Using a sharp, warmed knife (dip the blade in hot water and wipe dry), cut the slab into bars or squares. The warm blade glides through the crisp without crushing the delicate texture, giving you clean edges that look as perfect as a freshly fallen snowflake.
Serve immediately or store in an airtight container. I’ll be honest — I ate half the batch before anyone else got to try it, and the rest stayed perfectly crisp for days. This is hands down the best version you’ll ever make at home; the balance of sweet, buttery, and tangy is simply unbeatable.
That's it — you did it. But hold on, I've got a few more tricks that'll take this to another level. Stay with me here — this is worth it.
Insider Tricks for Flawless Results
The Temperature Rule Nobody Follows
Keep the heat at a gentle medium. If the butter gets too hot, it will brown and introduce a bitter note that clashes with the sweet marshmallows. A quick tip: use a candy thermometer and aim for 115°F (46°C) when melting the butter and marshmallows together. This ensures a smooth, glossy mixture without any grainy spots.
Why Your Nose Knows Best
When the marshmallows are fully melted, you’ll notice a subtle caramel aroma rising from the pan. Trust that scent; it’s the signal that the sugars have reached the perfect stage of caramelization. If you can’t smell that buttery caramel, keep stirring a few seconds longer—your taste buds will thank you.
The 5‑Minute Rest That Changes Everything
Even after the bar has set in the fridge, let it sit at room temperature for five minutes before cutting. This short rest allows the butter to soften just enough for a clean slice while preserving the crisp edges. I once tried to cut straight from the freezer and ended up with crumbling shards—lesson learned.
Nuts: Toast Them, Don’t Roast
A quick toast in a dry skillet for 2‑3 minutes brings out the natural oils and adds a deeper flavor. Watch closely; they can go from toasted to burnt in a heartbeat. The toasted nuts give that satisfying crunch that makes every bite feel like a mini celebration.
Freeze‑Dry Power
If you’re using fresh strawberries instead of freeze‑dried, dry them thoroughly on paper towels and then dehydrate them in a low oven for 30 minutes. This mimics the texture of freeze‑drying and prevents the bar from getting soggy. The result? A burst of strawberry flavor without compromising the crisp.
Creative Twists and Variations
This recipe is a playground. Here are some of my favorite ways to switch things up:
Chocolate‑Covered Snowflake
Melt ½ cup of dark chocolate and drizzle it over the chilled bar before cutting. The chocolate adds a rich, bittersweet layer that pairs beautifully with the strawberry shards. This version is perfect for chocolate lovers who still want that light, airy bite.
Coconut‑Lime Dream
Swap the nuts for toasted coconut flakes and add a teaspoon of lime zest to the mixture. The citrus brightens the flavor profile, while the coconut brings a tropical crunch. Ideal for summer picnics or when you crave a beach‑vibe snack.
Spiced Autumn Crunch
Add a pinch of cinnamon, nutmeg, and a drizzle of maple syrup to the butter‑marshmallow mix. Replace the freeze‑dried strawberries with dried cranberries for a tart, autumnal twist. This variation is perfect for cozy evenings by the fire.
Peanut Butter Power
Stir in ¼ cup of creamy peanut butter after the marshmallows have melted. The peanut butter adds a salty, nutty depth that complements the sweet base. Top with a handful of chopped peanuts for extra crunch.
Matcha Green Delight
Incorporate 1 tablespoon of matcha powder into the milk powder before mixing. The subtle earthy bitterness balances the sweetness, and the vibrant green speckles make the bar visually striking. Pair with a cup of green tea for a harmonious snack.
Storing and Bringing It Back to Life
Fridge Storage
Place the bars in an airtight container lined with parchment paper. They’ll stay crisp for up to five days. The cool temperature keeps the butter firm, preserving that satisfying snap when you bite.
Freezer Friendly
Wrap each bar individually in plastic wrap, then store them in a freezer‑safe bag. They can be frozen for up to a month. When you’re ready to enjoy one, let it thaw at room temperature for 10 minutes, then add a tiny splash of water before reheating to revive the glossy sheen.
Best Reheating Method
If the bar has lost a bit of its crispness, pop it in a preheated oven at 300°F (150°C) for 3‑4 minutes. The gentle heat revives the butter’s sheen and re‑crispes the crackers without melting the marshmallow completely. Add a teaspoon of water to the pan’s edge to create a light steam that brings back that fluffy interior.