I was standing in my kitchen on a rainy Sunday, staring at a stack of stale cinnamon rolls that had survived the week like forgotten relics. The air was thick with the ghost of cinnamon sugar, and I could swear the rolls were judging me for letting them go to waste. I tossed a half‑eaten roll into the trash, then grabbed a whisk and thought, “What if I could turn that disappointment into something that sings on the breakfast table?” That moment sparked a culinary dare: create a pancake that captures the sweet, swirly heart of a cinnamon roll while staying light enough to eat guilt‑free. I’m still buzzing from that epiphany, and I promise you, this is the version that finally nailed the balance.
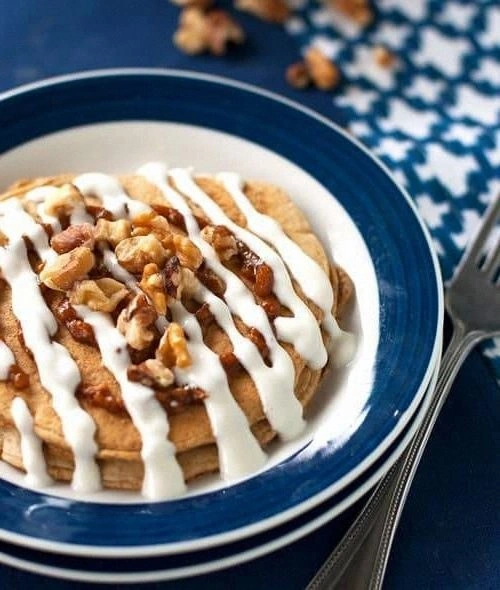
Picture this: a stack of golden‑brown pancakes, each one speckled with caramelized cinnamon ribbons that curl like tiny scrolls. The scent of toasted sugar and spice wafts through the kitchen, mingling with the buttery aroma of a fresh brew. When you cut into a pancake, the interior is fluffy, almost cloud‑like, yet the edges boast a crispness that snaps like a well‑timed drumbeat. The first bite delivers a buttery melt that quickly gives way to a warm cinnamon hug, and a drizzle of tangy cream cheese glaze finishes the experience with a silky finish. It’s like a breakfast hug from your favorite bakery, but with a health‑conscious twist that won’t sabotage your day.
Most cinnamon roll pancake recipes out there either drown you in sugar or sacrifice texture for health, leaving you with something that feels more like a soggy pancake than a true roll. I’ve tried the “quick fix” versions that use pre‑made batter, and they end up tasting like a sugary pancake that forgot its identity. This recipe, however, uses a strategic blend of whole‑grain flours, Greek yogurt, and a dash of almond milk to keep the pancakes light, while a secret swirl technique preserves that iconic cinnamon‑roll swirl. The result? A pancake that’s simultaneously airy and decadently spiced, with a glaze that’s just sweet enough to make you smile.
Let me walk you through every single step — by the end, you’ll wonder how you ever made it any other way. Okay, ready for the game‑changer? I’m about to reveal the technique that creates those perfect cinnamon swirls without any mess, plus a few hacks that will make your kitchen feel like a professional studio. Stay with me here — this is worth it.
What Makes This Version Stand Out
- Flavor Explosion: The combination of real cinnamon, a touch of nutmeg, and a maple‑sweetened glaze creates a depth that mimics a bakery‑fresh roll without the processed sugars.
- Texture Triumph: A dual‑flour system (whole wheat and oat) gives a tender crumb while the yogurt adds moisture, resulting in a pancake that’s fluffy inside and crisp on the edges.
- Simplicity Redefined: Only ten core ingredients and a single pan are needed, meaning you won’t spend hours hunting for obscure items or juggling multiple dishes.
- Unique Swirl Technique: By folding a cinnamon‑sugar paste into the batter just before cooking, you achieve those iconic ribbons without a rolling pin.
- Crowd‑Pleaser Factor: I dare you to taste this and not go back for seconds; even the most health‑conscious friends admit it feels like an indulgence.
- Ingredient Quality: Using Greek yogurt and real maple syrup raises the protein and flavor profile, turning a simple breakfast into a balanced meal.
- Cooking Method Mastery: A medium‑low heat ensures even cooking, preventing the dreaded burnt‑outside, raw‑inside scenario that plagues many pancake attempts.
- Make‑Ahead Potential: The batter holds up for up to an hour in the fridge, and the glaze can be prepared in advance, making weekend brunch a breeze.
Inside the Ingredient List
The Flavor Base
Cinnamon is the undisputed hero here, offering a warm, woody spice that instantly transports you to a cozy bakery. I use 2 teaspoons of ground cinnamon, which is enough to coat the batter without overwhelming the palate. If you’re feeling adventurous, a pinch of ground nutmeg adds a subtle citrusy undertone that deepens the flavor. Maple syrup, at ¼ cup, provides natural sweetness and a hint of caramel that pairs beautifully with the spice. Finally, a splash of vanilla extract (1 teaspoon) rounds out the sweetness, giving the batter a rounded, comforting aroma.
The Texture Crew
Whole wheat flour (2 cups) brings a nutty backbone and extra fiber, while oat flour (1 cup) lightens the texture, preventing the pancakes from feeling too dense. Baking powder (2 teaspoons) and a pinch of baking soda work together to create lift, ensuring each pancake rises like a sunrise. Greek yogurt (1 cup) injects protein and moisture, turning the batter into a silky mixture that stays tender after cooking. Unsweetened almond milk (1 cup) loosens the batter just enough for a smooth pour, and melted coconut oil (2 tablespoons) adds a subtle richness without the heaviness of butter.
The Unexpected Star
Low‑fat cream cheese (4 tablespoons) may seem out of place, but when whisked with a touch of powdered sugar (2 tablespoons) and melted butter (1 tablespoon), it becomes a glossy glaze that mimics the classic icing of a cinnamon roll. This glaze adds a tangy counterpoint to the sweet batter, preventing the dish from feeling one‑dimensional. If you’re dairy‑free, substitute with a plant‑based cream cheese and adjust the powdered sugar to taste.
The Final Flourish
A pinch of sea salt (1 teaspoon) amplifies every flavor, making the sweetness pop without being cloying. Finally, a drizzle of extra maple syrup just before serving adds a glossy finish and an extra layer of caramelized depth. Together, these ingredients create a harmonious symphony that’s both wholesome and indulgent.
Everything's prepped? Good. Let's get into the real action...
The Method — Step by Step
In a large mixing bowl, whisk together the whole wheat flour, oat flour, baking powder, baking soda, salt, and the 2 teaspoons of cinnamon. The dry mixture should look uniform, with no clumps of flour—think of it as the foundation of a skyscraper, solid and ready to support the weight above.
This is the moment of truth for the spice distribution; if you can smell the cinnamon now, you’re on the right track. Set the bowl aside while you prep the wet ingredients.
In a separate bowl, combine the Greek yogurt, almond milk, eggs, melted coconut oil, vanilla extract, and maple syrup. Whisk vigorously until the mixture is smooth and slightly frothy, resembling a silky custard.
I dare you to watch the batter transform from a clumpy mess into a glossy pour—it’s a visual cue that the proteins have emulsified correctly.
Create the cinnamon‑sugar paste: mix 2 tablespoons of coconut sugar with an extra teaspoon of cinnamon and a splash of water (about 1 tablespoon) until you get a thick, spreadable paste.
This paste is the secret weapon that will give you those iconic swirls without needing a rolling pin.
Gently fold the wet ingredients into the dry mixture, using a spatula and a light hand. Over‑mixing will develop gluten and make the pancakes tough, so stop once the batter is just combined and a few streaks remain.
Let the batter rest for 5 minutes; this allows the flours to hydrate fully, yielding a fluffier final product.
Heat a non‑stick skillet or griddle over medium‑low heat and lightly coat with a teaspoon of coconut oil. The surface should shimmer, but not smoke—think of it as a calm lake before a gentle breeze.
Drop a ladleful (about ¼ cup) of batter onto the pan, then quickly drizzle a teaspoon of the cinnamon‑sugar paste onto the center. Using a skewer or the back of a spoon, swirl the paste into the batter in a circular motion, creating a miniature cinnamon roll inside each pancake.
Cook each side for 2‑3 minutes, or until bubbles form on the surface and the edges start pulling away from the pan. Flip carefully; the pancake should hold its shape, and the swirl should be visible like a marble cake.
The sizzle when it hits the pan? Absolute perfection. Transfer cooked pancakes to a warm plate and keep them covered to stay fluffy.
While the pancakes are cooking, whisk together the cream cheese, powdered sugar, melted butter, and a splash of maple syrup to create a glossy glaze. The mixture should be smooth and pourable; if it’s too thick, add a tiny drizzle of almond milk.
This glaze is the final flourish that turns a good pancake into a show‑stopper. Drizzle it over the stack right before serving.
Serve the pancakes hot, topped with an extra dusting of cinnamon and a side of fresh berries if you like. The contrast of warm, spiced pancakes with cool, juicy berries adds a visual and flavor pop that makes the plate Instagram‑ready.
And now the fun part: dig in, savor the layers, and watch your family’s faces light up. That’s it — you did it. But hold on, I've got a few more tricks that'll take this to another level...
Insider Tricks for Flawless Results
The Temperature Rule Nobody Follows
Most home cooks crank the stove to “medium” and hope for the best, but the ideal heat for these pancakes is a steady 325°F (about 160°C) on a calibrated skillet. Use a kitchen thermometer or the back‑of‑a‑spoon test: a drop of water should sizzle gently, not dance wildly. If you keep the temperature consistent, the batter cooks evenly, preserving that perfect swirl without burning the edges. I once tried a higher heat and ended up with a charcoal‑tasting pancake—lesson learned.
Why Your Nose Knows Best
Your sense of smell is a reliable indicator of doneness. When the batter hits the pan, you’ll notice a sweet, nutty aroma within 30 seconds. As the pancakes cook, the scent deepens into a caramel‑like perfume; that’s the moment you should start checking the surface for bubbles. Trusting your nose can save you from over‑cooking and helps you achieve that golden‑brown hue every single time.
The 5‑Minute Rest That Changes Everything
After mixing wet and dry ingredients, let the batter sit for exactly five minutes. This short rest allows the flours to fully hydrate, and the baking powder to activate, creating a lighter crumb. Skipping this step is a common mistake that leads to dense, gummy pancakes. I used to rush this part, and the pancakes felt “meh”; now I set a timer and watch the batter blossom.
Glaze Timing is Everything
If you pour the glaze too early, it can seep into the pancakes and make them soggy. Wait until the pancakes are stacked and still warm, then drizzle the glaze in a slow, circular motion. The residual heat will melt the glaze just enough to coat each pancake without pooling at the bottom. This technique gives you that glossy finish that looks like a bakery masterpiece.
The “One‑Pan” Secret
When cooking multiple pancakes, avoid overcrowding the pan. Each pancake needs its own space to expand; otherwise, steam builds up and the edges become soggy. If you have a large skillet, you can fit three to four at a time, but keep the heat steady and rotate the pan if needed. This ensures every pancake gets that even browning and that signature swirl visible from the top.
The Power of a Light Dusting
A final sprinkle of a pinch of cinnamon or powdered sugar just before serving adds a visual pop and a subtle flavor lift. It’s a tiny detail that makes the dish feel finished, like a painter adding the final brushstroke. Trust me, that extra dash makes the plate look professionally plated.
Creative Twists and Variations
This recipe is a playground. Here are some of my favorite ways to switch things up:
Apple‑Cinnamon Crunch
Fold in ½ cup of finely diced, sautéed apples and a tablespoon of chopped toasted pecans into the batter. The apples add a juicy burst, while the pecans give a satisfying crunch that mimics a caramel apple topping.
Chocolate‑Hazelnut Delight
Replace half of the oat flour with cocoa powder and stir in ¼ cup of hazelnut spread into the glaze. This creates a decadent chocolate swirl that pairs beautifully with the cinnamon base, turning breakfast into dessert.
Pumpkin Spice Autumn
Swap the maple syrup for ¼ cup of pumpkin puree and add a teaspoon of pumpkin pie spice to the dry mix. The result is a velvety pumpkin‑infused pancake that still carries the cinnamon roll vibe, perfect for fall brunches.
Savory Herb Version
Omit the maple syrup and cinnamon, and instead add 1 teaspoon of dried rosemary, ½ teaspoon of garlic powder, and a pinch of smoked paprika. Top with a dollop of Greek yogurt mixed with chives for a brunch that leans savory yet remains fluffy.
Berry‑Infused Swirl
Create a mixed‑berry compote (blueberries, raspberries, and a splash of lemon juice) and swirl it into the batter instead of the cinnamon paste. The tartness of the berries balances the sweet glaze, delivering a fresh, summer‑ready twist.
Storing and Bringing It Back to Life
Fridge Storage
Allow the pancakes to cool completely, then stack them with parchment paper between each layer and store in an airtight container. They’ll stay fresh in the refrigerator for up to 3 days. When ready to eat, reheat in a skillet over medium heat for 2 minutes per side, adding a splash of water to the pan to create steam and revive the fluffiness.
Freezer Friendly
For longer storage, place the cooled pancakes on a baking sheet and freeze until solid, then transfer to a zip‑top freezer bag. They can be kept for up to 2 months. To reheat, pop them straight into a preheated oven at 350°F (175°C) for 8‑10 minutes, or microwave for 30 seconds with a damp paper towel on top to prevent drying.
Best Reheating Method
The secret to reviving that original texture is a quick steam boost. Before reheating, drizzle a tiny splash (about 1 tablespoon) of water over the pancake stack, then cover with a damp kitchen towel and microwave for 45 seconds. The steam penetrates the interior, making the pancake as soft as the day it was made, while the glaze re‑melts into a silky coating.